# Documentation

<figure><img src="/files/L6885Qg5nJD7yopz3dgc" alt="" width="315"><figcaption></figcaption></figure>

## Welcome to MetaCopier.io!

With **MetaTrader 4, MetaTrader 5, TradeLocker, cTrader, Binance, Bybit, Bitget, BloFin, OKX, Gate.io, Bitunix, Hyperliquid, DXtrade, MatchTrader, TradeStation, Tradovate, Alpaca and more** (see [full list here](/features/specifications#master-slave-compatibility)) you can easily enhance your trading strategy using our advanced Web Application, built to seamlessly copy trades across multiple accounts - including on-chain/DEX platforms.

Check out our detailed documentation to quickly set up MetaCopier, discover its powerful features, and maximize your trading efficiency. Whether you're looking to grow or maintain consistency, MetaCopier is here to support your trading success. Let's reach new heights together!

<table data-view="cards"><thead><tr><th align="center"></th><th data-hidden data-card-cover data-type="files"></th><th data-hidden data-card-target data-type="content-ref"></th></tr></thead><tbody><tr><td align="center">BASIC FEATURES</td><td><a href="/files/9Fxh09naNN8jJoKGor7R">/files/9Fxh09naNN8jJoKGor7R</a></td><td><a href="/pages/MKE3YJhnBM7ggjcsMHMt">/pages/MKE3YJhnBM7ggjcsMHMt</a></td></tr><tr><td align="center">PRO FEATURES</td><td><a href="/files/ww9x0xhUuOrrSZyG4Gig">/files/ww9x0xhUuOrrSZyG4Gig</a></td><td><a href="/pages/r44UeUzQAnZvRq340ojY">/pages/r44UeUzQAnZvRq340ojY</a></td></tr><tr><td align="center">TUTORIALS</td><td><a href="/files/EpXSzwPQXSi5oLkanZle">/files/EpXSzwPQXSi5oLkanZle</a></td><td><a href="/pages/M5BmN3ChVfl7wfgn6GWO">/pages/M5BmN3ChVfl7wfgn6GWO</a></td></tr><tr><td align="center">Business-to-Business (B2B)</td><td><a href="/files/3EwD9M6zRblz1qkcBR2n">/files/3EwD9M6zRblz1qkcBR2n</a></td><td><a href="/pages/bzmuJs7ospnMG6CLGLVz">/pages/bzmuJs7ospnMG6CLGLVz</a></td></tr><tr><td align="center">RELEASE NOTES</td><td><a href="/files/4tJBhZK9VgeFWmilHOUu">/files/4tJBhZK9VgeFWmilHOUu</a></td><td><a href="/pages/tyofjjGjFUlbhIT8mCZC">/pages/tyofjjGjFUlbhIT8mCZC</a></td></tr><tr><td align="center">API</td><td><a href="/files/M3MxRdJmo08eab0dDkIv">/files/M3MxRdJmo08eab0dDkIv</a></td><td><a href="/pages/6caiwOfbqFACH3UarxFX">/pages/6caiwOfbqFACH3UarxFX</a></td></tr><tr><td align="center">SDK</td><td><a href="/files/TTCg64wOApQTgeO2Y4z2">/files/TTCg64wOApQTgeO2Y4z2</a></td><td><a href="/pages/Lmy4bPOkyEzKNd1vDj17">/pages/Lmy4bPOkyEzKNd1vDj17</a></td></tr><tr><td align="center">App</td><td><a href="/files/pCMRflbo3GJ0Q9QJ9rwh">/files/pCMRflbo3GJ0Q9QJ9rwh</a></td><td><a href="/pages/24TB3A78GIGRISKOgeFk">/pages/24TB3A78GIGRISKOgeFk</a></td></tr></tbody></table>


# Introduction

We're a team of traders and developers who've been in the trading world for a long time. We've experienced the highs and lows, but one thing we couldn't find was a reliable trade copying service online.

So, we decided to create our own. With our combined expertise in trading and development, we built a solution from scratch that we could trust. Our goal was simple: to make trading easier and more reliable for everyone.

Our developers bring over 15 years of experience in building secure systems in critical industries like medical, automotive, and telecommunications. With advanced degrees and a deep understanding of functional safety (FuSi), they ensure that MetaCopier is not only effective but also incredibly safe.

We designed MetaCopier with a modern, robust architecture that can handle any situation. It's built across multiple regions and providers, with a backup plan for everything. If there's ever an error, MetaCopier automatically switches to a backup system in less than a minute. Even in major outages, the backup system kicks in within five minutes, keeping your trades safe and secure.

MetaCopier supports traditional brokers (MetaTrader, cTrader, TradeLocker, DXtrade, MatchTrader), centralized crypto exchanges (Binance, Bybit, Bitget, BloFin, OKX, Gate.io, Bitunix), on-chain/DEX trading (Hyperliquid), US brokers (TradeStation, Tradovate, Alpaca), and signal sources like TradingView and Telegram - all from a single platform.

While issues like this don't happen often, we wanted to make sure that when they do, we're ready. MetaCopier is built to be reliable, so you can trade confidently, knowing your trades are protected.

We didn’t stop at just making it secure. We’ve continued to add features based on our own needs and feedback from other traders. And the best part? You can contribute too. We're always open to your ideas and suggestions. MetaCopier is a tool built by traders, for traders.

Our mission is to provide a trustworthy service with all the tools you need to succeed. With MetaCopier, you're not just getting a tool – you're gaining a reliable partner in your trading journey.

## Architecture

Security is our top priority. Our cloud infrastructure is built to meet military-grade security standards (FIPS 140-2), ensuring that our data and operations are always protected.

We’ve made MetaCopier both reliable and easy to scale. By using multiple providers, we reduce the chances of outages or problems in specific regions, keeping the system stable. Our setup can also handle more users or trading activity, ensuring everything runs smoothly even when there’s a lot of activity.

We built our platform with open-source technologies, avoiding vendor lock-ins or hyper cloud services. This gives us the flexibility and control to ensure everything functions just the way we want.

And because we own 100% of the source code, we have full control over every aspect of the system. This allows us to quickly make updates, improvements, and adjustments whenever needed.


# Dashboard

The MetaCopier dashboard provides you with a centralized platform to manage your projects, billing, payment methods, and account profile.

<figure><img src="/files/nOsI0XFzX3Pmj91Ko7pm" alt=""><figcaption><p>MetaCopier Dashboard</p></figcaption></figure>

## Navigation menu

On the left-hand side of the dashboard, you'll find the main navigation menu, which helps you manage different aspects of your MetaCopier account:

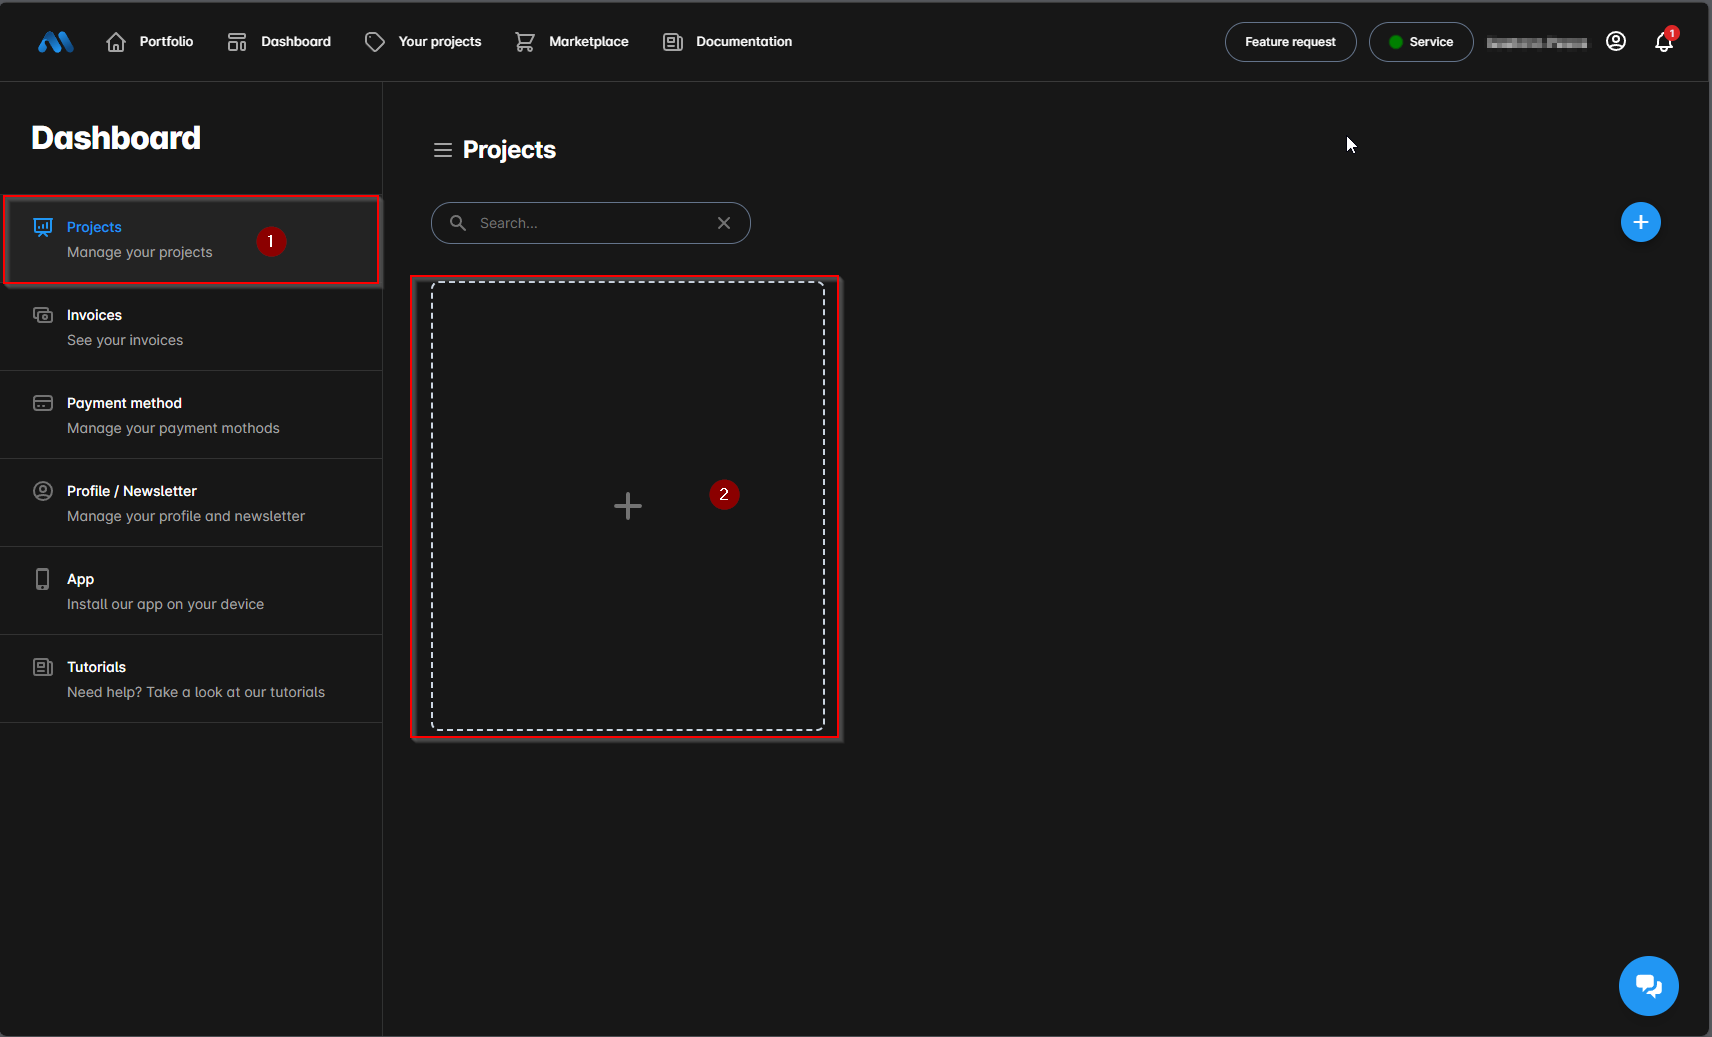
* **Projects:** View and manage all your active projects. Each project includes details like payment method, billing address, and currency breakdown.
* **Invoices:** Access and download your invoices related to project subscriptions or payments.
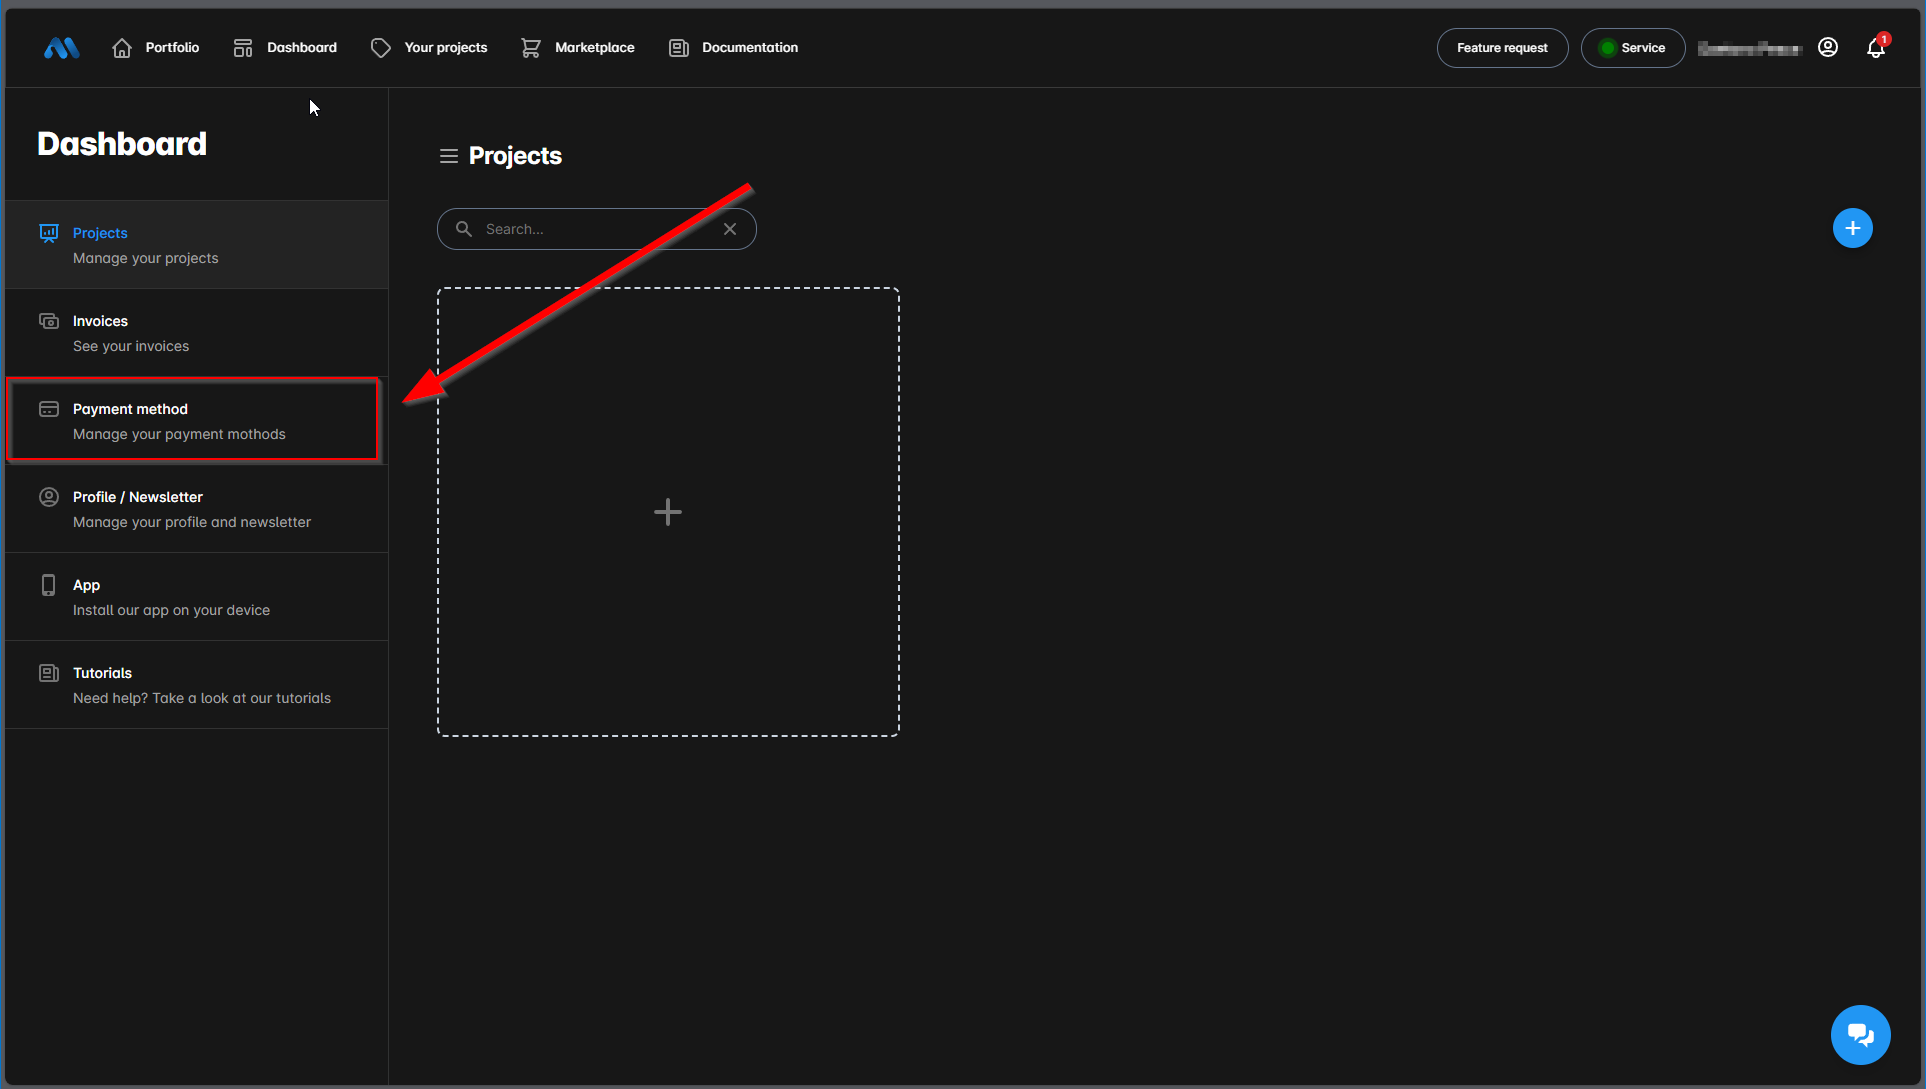
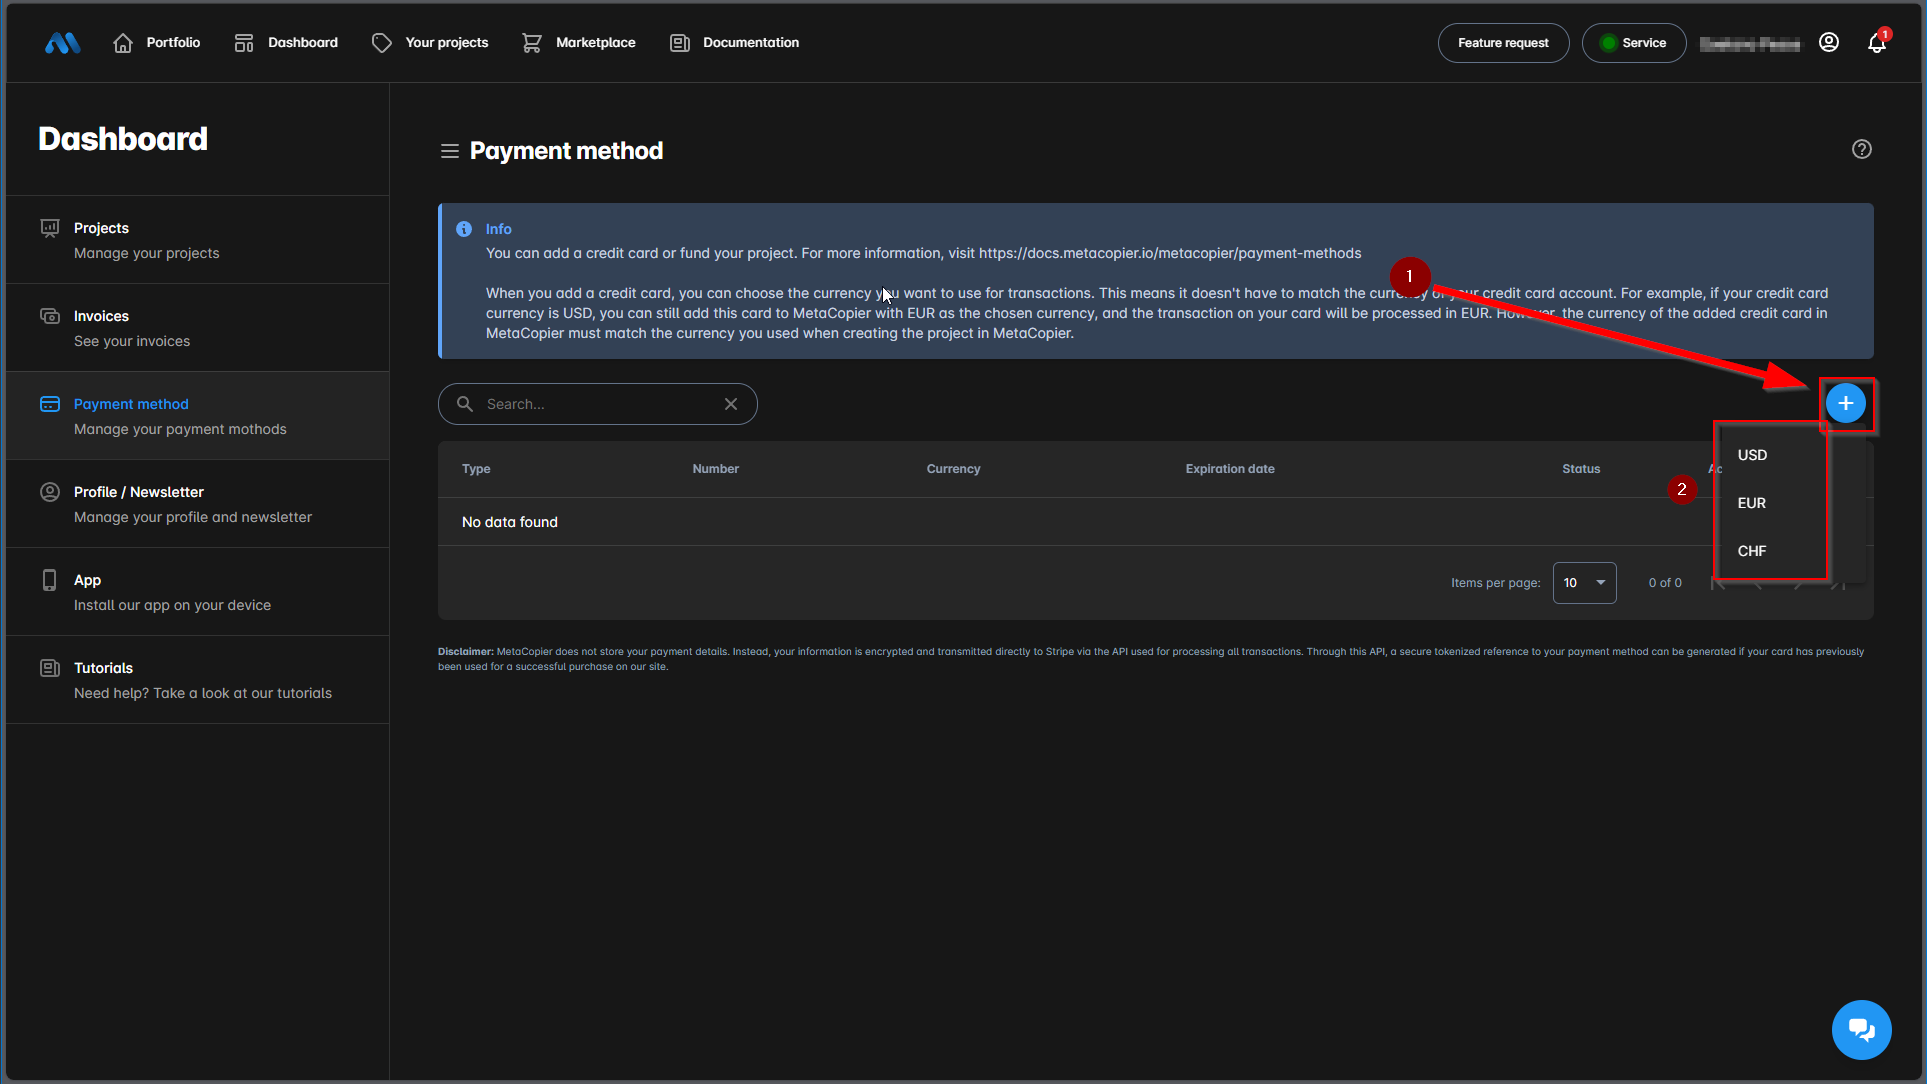
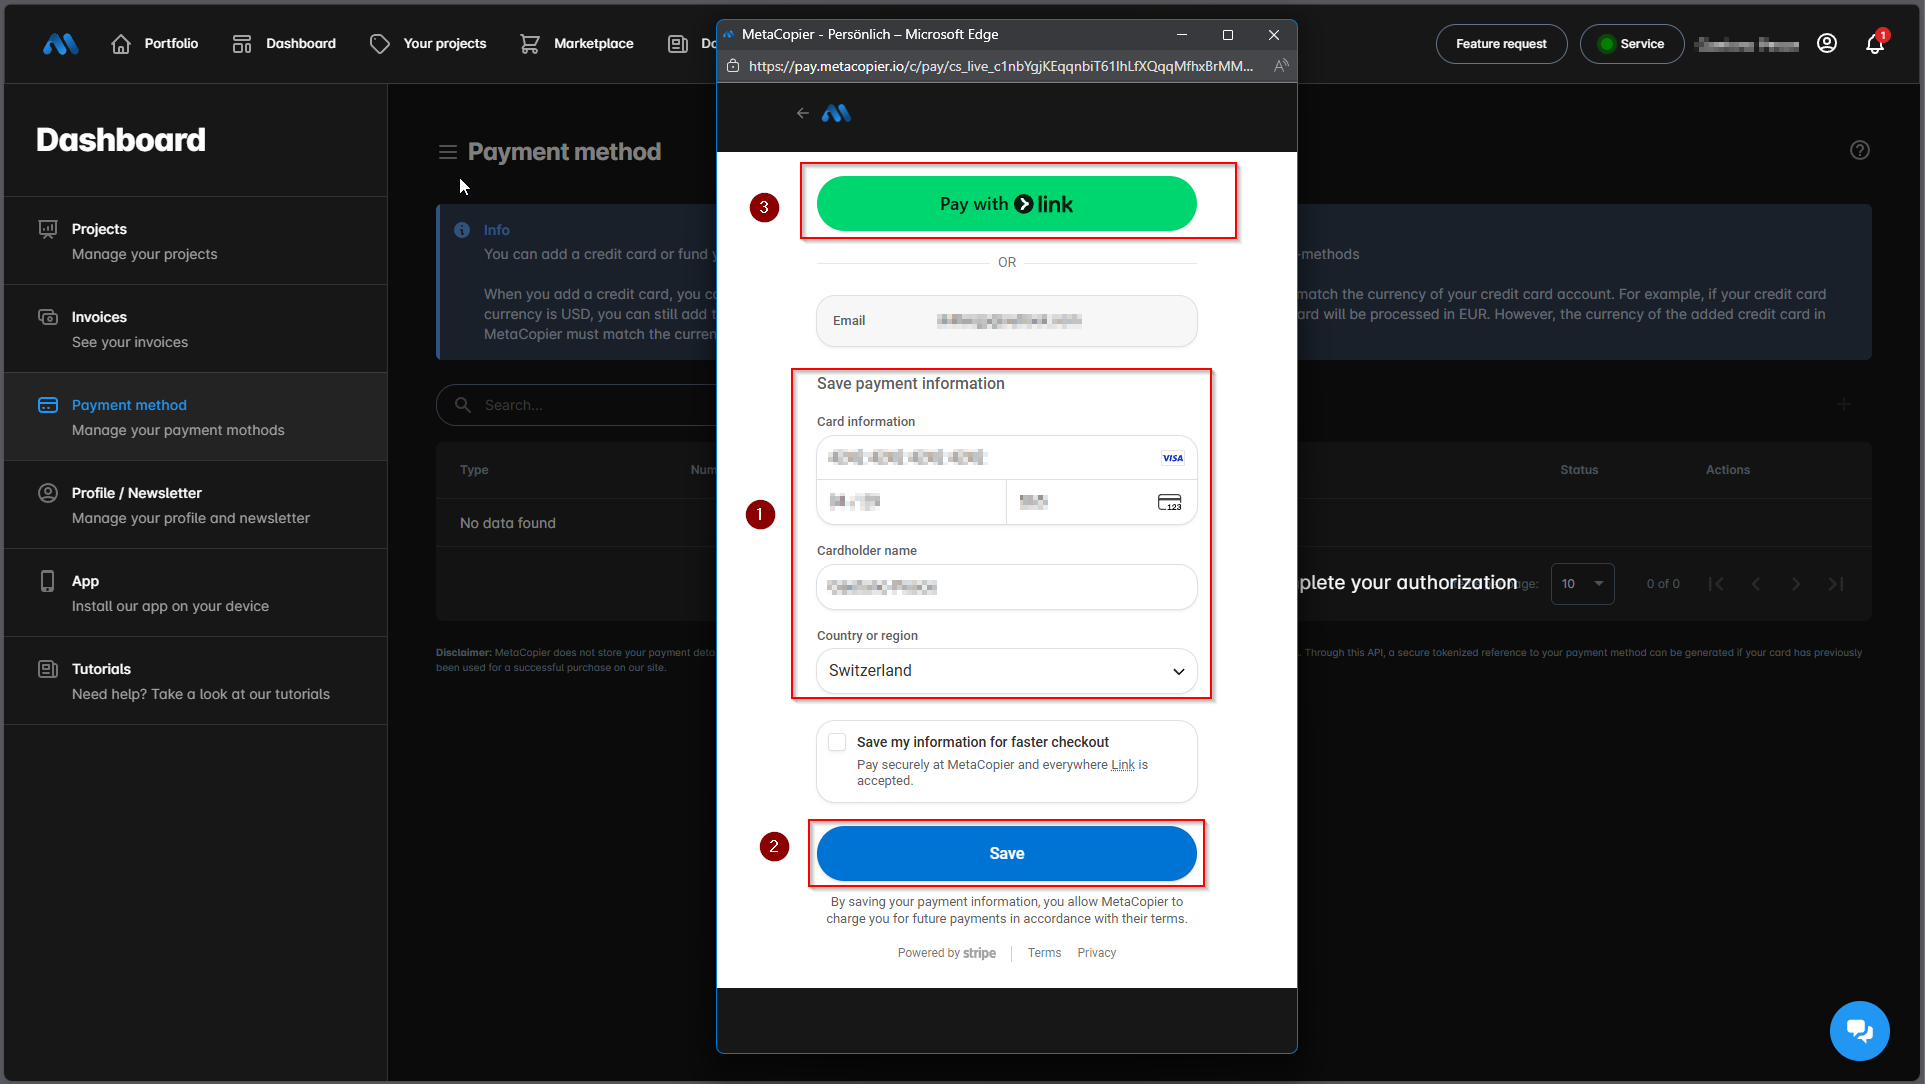
* **Payment Method:** Add or update your credit cards or other payment options. Each project can have its own linked payment method.
* **Profile / Newsletter:** Edit your personal details, such as your email and name, and manage your newsletter preferences.
* **App:** Install MetaCopier on your device by following the link to the appropriate app version.
* **Tutorials:** Learn how to get the most out of MetaCopier with step-by-step guides and detailed instructions.

## Project overview

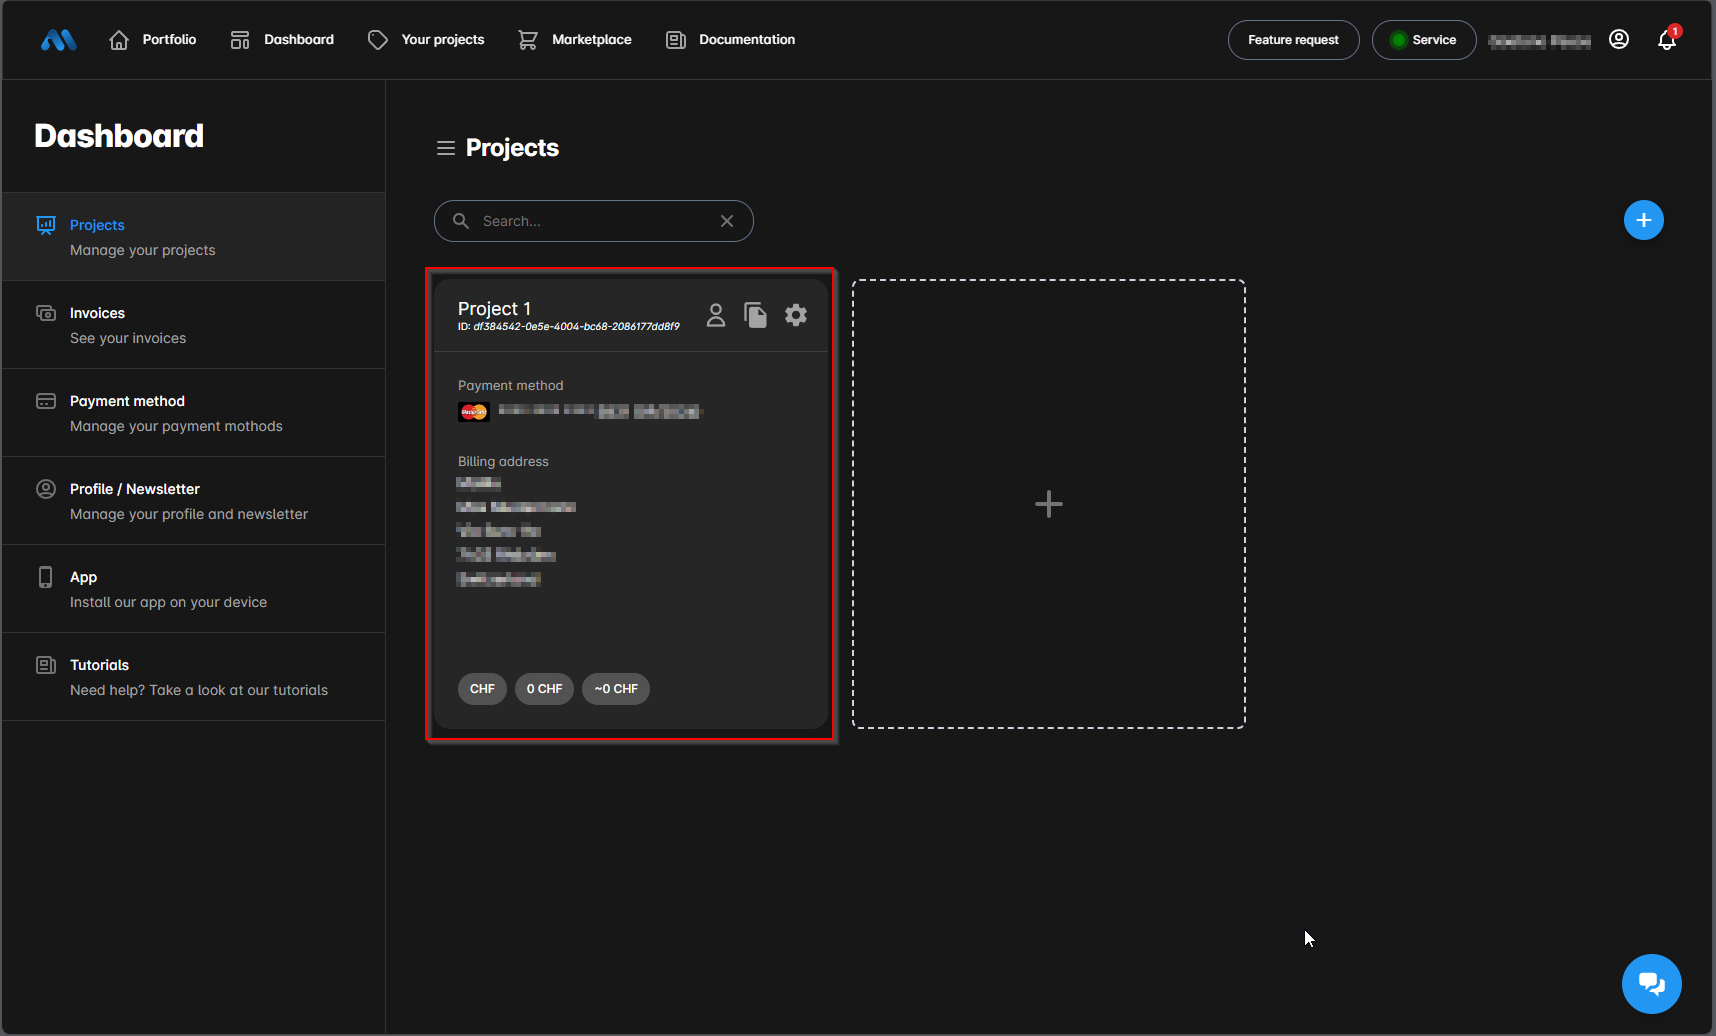
The main dashboard area shows your projects as individual cards. Each card summarizes the most important information for quick reference and management.

<figure><img src="/files/iuM7oen8PCPhgqwXRDnG" alt=""><figcaption></figcaption></figure>

* **Project Name & ID:** You’ll see the name and a unique ID for each project, which can be useful when reaching out to support.
* **Payment Method:** You can assign a specific payment method to each project. If no method is set, you’ll see a red "none" label. Otherwise, the card shows the masked card number and expiration date.
* **Billing Address:** Each project includes the billing name and address you entered when setting it up.
* **Currency Tags:** These tags show:
  * The primary currency (e.g., USD, EUR, CHF)
  * Your current balance
  * The monthly cost forecast
  * Additional project type indicators like “Dedicated”
* **Action Icons**
  * **Open:** Opens the selected project’s workspace, where you can see all the accounts
  * **Fund:** Opens a submenu that allows you to choose how to fund the project (e.g., via card or crypto).
  * **Fund via bank:** Provides instructions and banking details for funding the project using a manual bank transfer.
  * **Settings:** Opens the project settings panel. You can update the project name, currency, payment method, and other related configurations.
  * **Permissions:** Lets you manage user access to the project, such as assigning read-only or full-access rights.
  * **Delete:** Deletes the project from your dashboard. This is a permanent action and should be used with caution.

## Adding New Projects

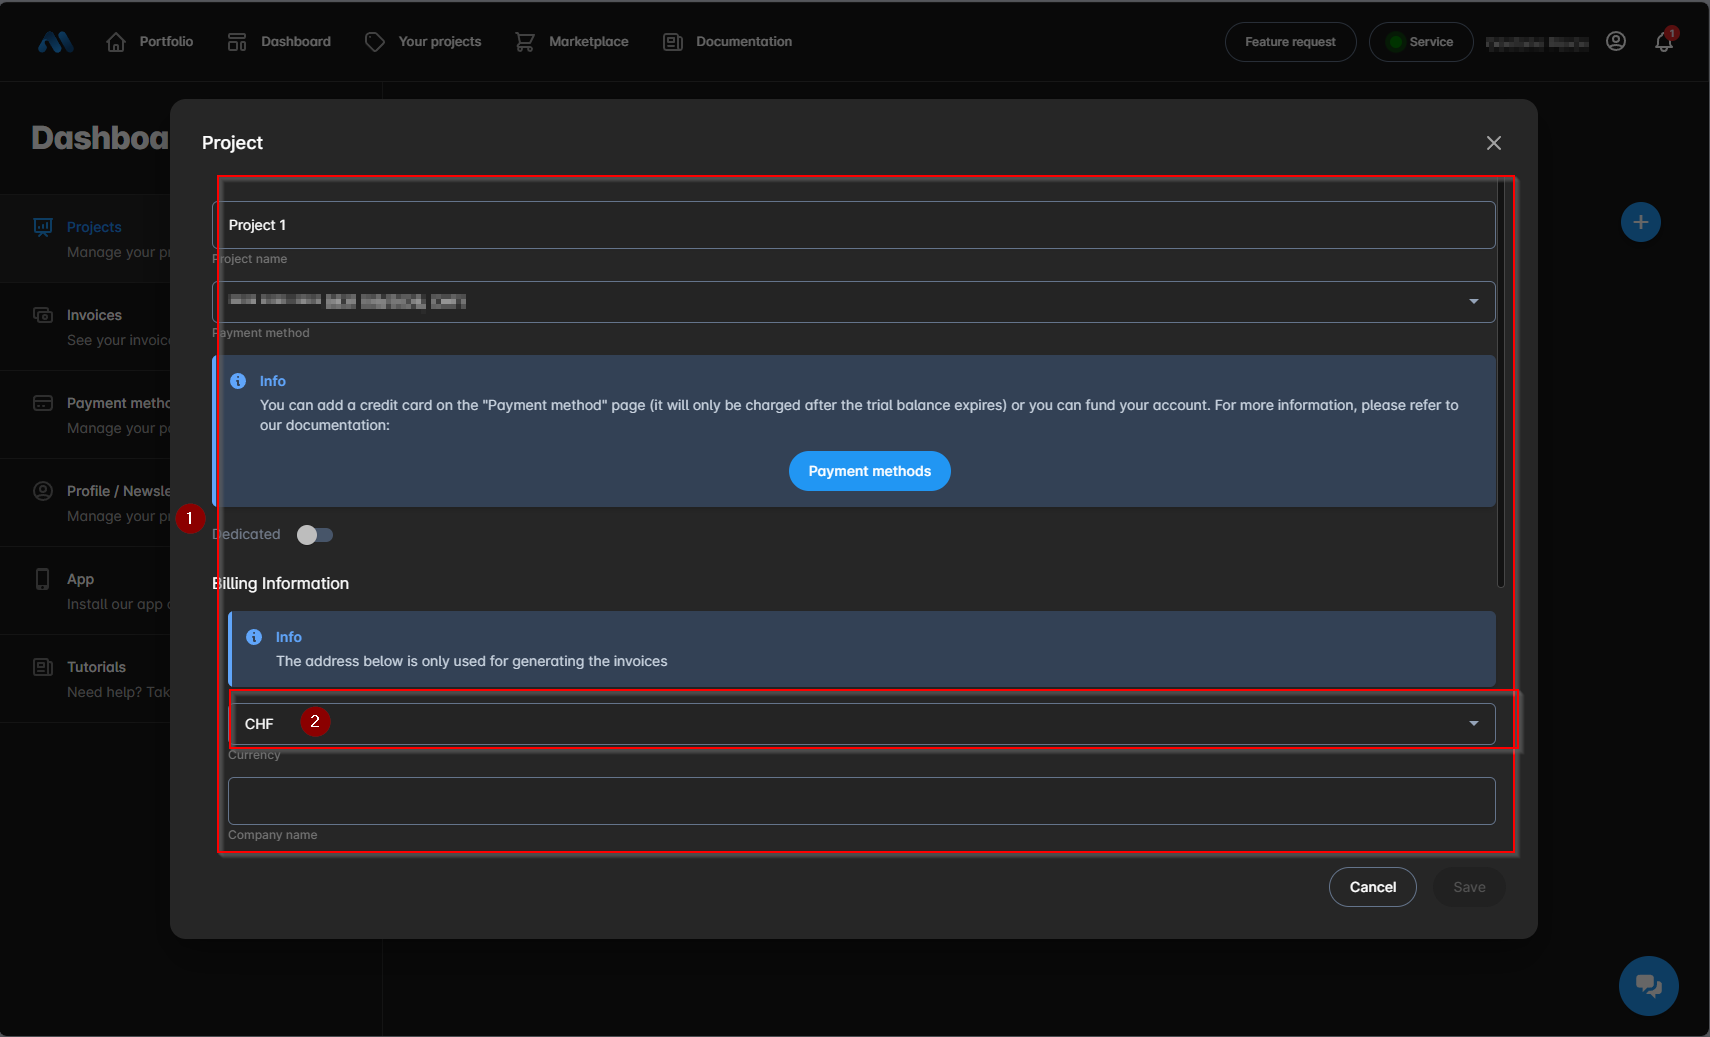
A floating blue **plus button** in the upper-right corner allows you to create new projects. You’ll be guided through setting the project name, selecting a payment method, and entering billing details.

## Project dashboard

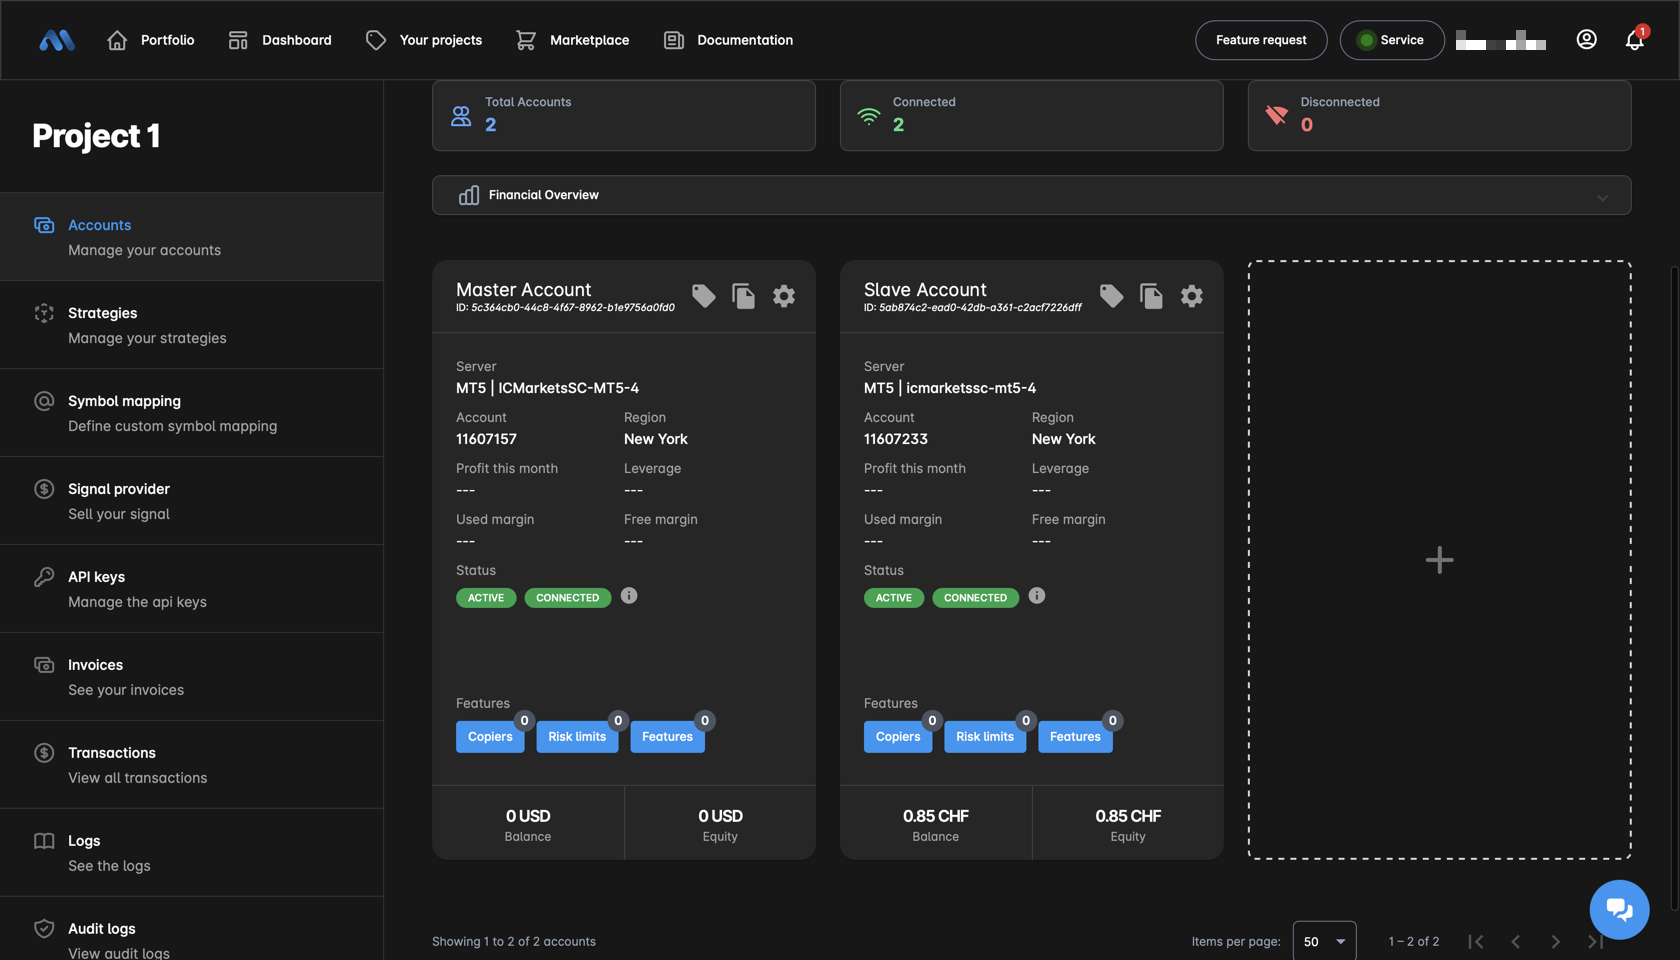
The Project Dashboard is the central workspace where you manage all trading accounts of an individual MetaCopier project, allowing you to configure accounts, copiers, strategies, signal settings, API access, notifications, and more.

All features available in this dashboard are explained in detail in the following sections of the documentation:

* [**Basic Features Documentation**](/features/basic-features): covers fundamental modules such as accounts, strategies, and dedicated IPs.
* [**Pro Features Documentation**](/features/pro-features): includes advanced capabilities

Use this dashboard to set up and operate your automation workflows according to your personal or institutional needs.

<figure><img src="/files/oEgDjUZMop2ekP3YboYG" alt=""><figcaption><p>Project dashboard</p></figcaption></figure>

## Add a new account

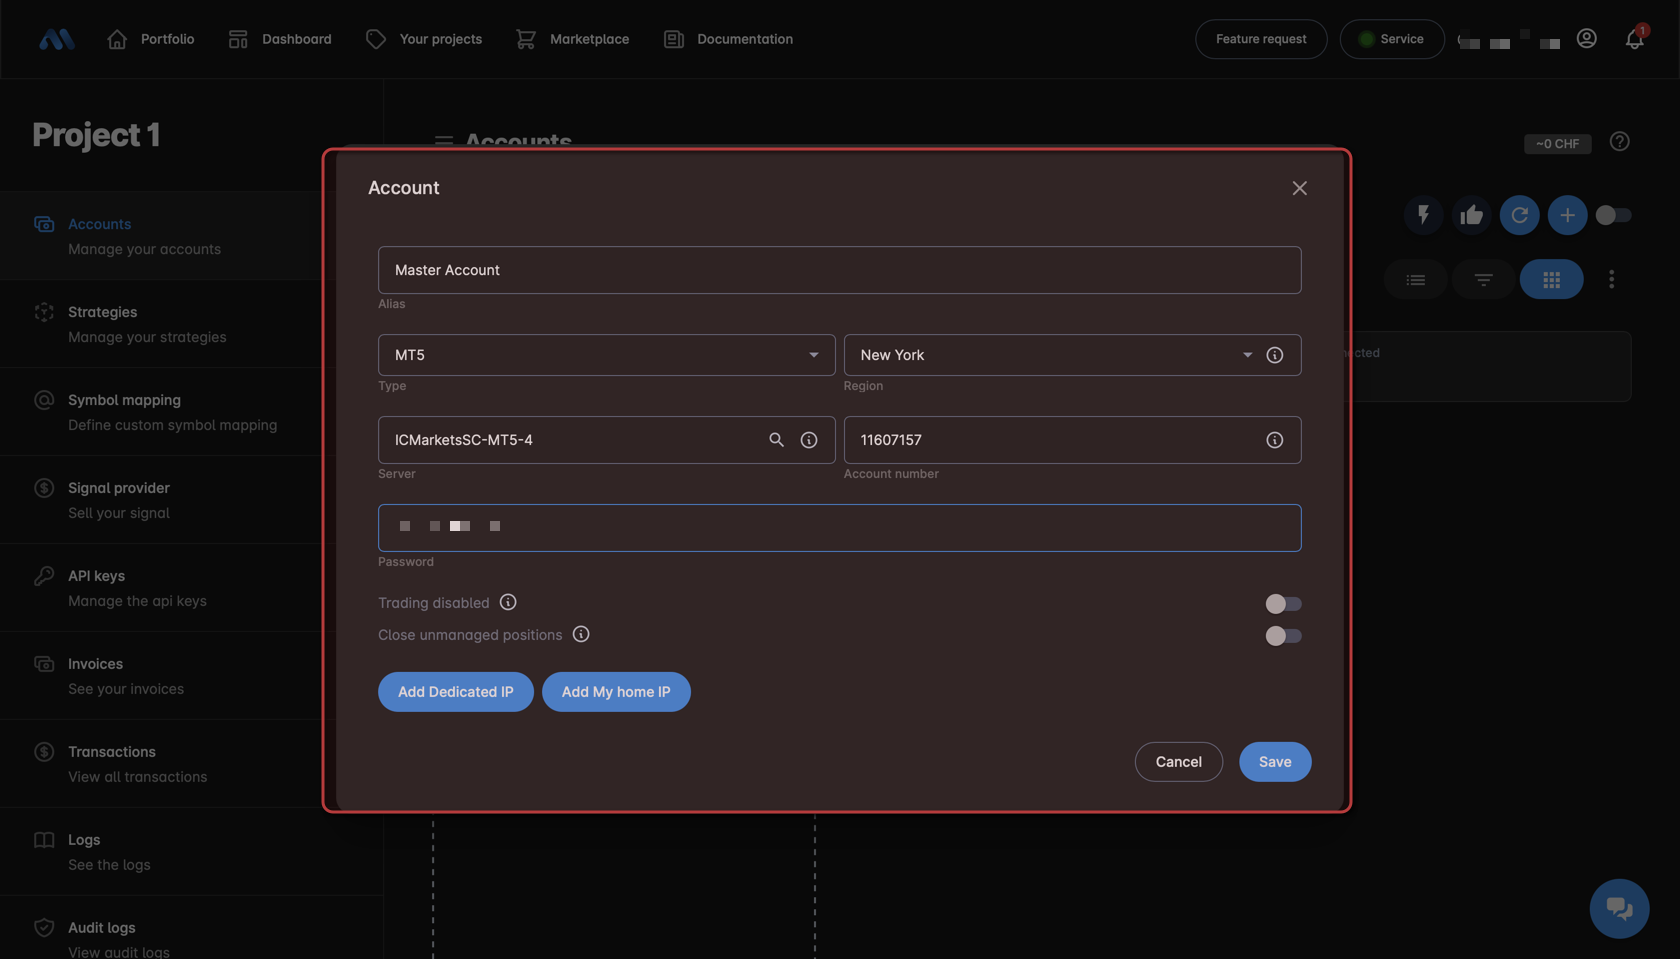
The **Account Setup Dialog** allows you to connect a new trading account to your MetaCopier project.

<figure><img src="/files/CKBUsxtdJZiOGG9R4nPA" alt=""><figcaption></figcaption></figure>

### Fields & Options

* **Alias:** A custom name for your account.
* **Type:** Select your platform type ([see supported platforms](/features/specifications#master-slave-compatibility))
* **Region:** Choose the region closest **to your broker server** for optimal latency
* **Server:** Enter the name of your broker’s server. You can also use the magnifier icon to search for supported servers.
* **Account Number:** Your trading account number, as provided by your broker.
* **Password:** The password used to access the trading account. Ensure you use either the investor (read-only) or trader password, depending on your use case.

### Advanced Options

* **Trading disabled:** When enabled, puts the account in read-only mode, preventing any new trades from being opened or existing trades from being modified or closed. Use this when you want to use the account as a read-only master.
* **Close unmanaged positions:** When enabled, any open positions on the account that were originally opened by MetaCopier but are no longer managed, due to technical issues, will be automatically closed after 10 minutes. However, this mechanism can occasionally result in false positives. For example, if there are open positions by MetaCopier and the copier is removed, such positions are marked as unmanaged and will be closed. If disabled, such unmanaged positions will remain open, and a notification will be sent to the notification center or to Telegram (if configured). In this case, manual intervention is required. We recommend keeping this option disabled to avoid accidental closures. This option also controls what happens to positions recognised as manually opened when a copier uses [hide comment](/features/basic-features/copiers): they are only closed if this option is enabled.
* **Add Dedicated IP:** Assign a [dedicated IP address](/features/pro-features#dedicated-ip) to this account
* **Add My Home IP:** Assign a [home IP address](/tutorials/my-home-ip) to this account


# Economic calendar

The **Economic calendar** shows the scheduled macroeconomic releases that move currencies, together with what the market expected and what was actually published. You find it inside a project, in the left-hand menu under **Economic calendar**.

{% hint style="info" %}
The calendar is part of your subscription. It unlocks as soon as at least one account is connected to the project, because it is a trading tool and not a public news page.
{% endhint %}

All times on the page are **UTC**, including the times shown in the event dialog. This is deliberate: brokers sit in different server time zones, and an event time that silently shifts is worse than no event time at all.

## The event table

| Column         | Meaning                                                                                                                  |
| -------------- | ------------------------------------------------------------------------------------------------------------------------ |
| **Time (UTC)** | Scheduled release time.                                                                                                  |
| **Impact**     | How strongly a release of this kind usually moves the market: High, Medium, Low or Holiday.                              |
| **Currency**   | The currency the release belongs to. Some events (OPEC meetings, G20, geopolitics) have no currency and count as global. |
| **Event**      | The name of the indicator.                                                                                               |
| **Actual**     | The number that was actually published. Empty until the release happens.                                                 |
| **Forecast**   | What analysts expected before the release.                                                                               |
| **Previous**   | The number from the previous release of the same indicator.                                                              |

Actual, Forecast and Previous are printed with their unit and scale, so `0.3 %`, `250K` or `1.2B` instead of a bare number. Where the source does not publish a unit, the plain number is shown.

Above the table you can filter by text, impact, currency and a date range. The search covers the event title, its description, the currency and the country code, so `unemploy`, `USD` and `US` all work.

## Insight cards

* **Next event:** The next scheduled release across your filters.
* **Surprise index (90d):** How the last 90 days of data compare with what was expected, per currency. Positive means the data has been beating forecasts. The direction is corrected, so rising unemployment counts as a miss rather than a beat.
* **Week ahead:** An impact weighted heat map of the next seven days. A high impact release counts three times a medium one, and the busiest cell of the week is the reference. It shows when the week is loaded, not how this week compares with other weeks.
* **Rate outlook:** The current policy rate and the next scheduled decision per currency. The rate comes from the last released decision in the calendar archive, for EUR from the ECB open data portal. The expected change is the market forecast, not ours.

## Event details

Clicking a row opens the event dialog:

* **Actual, Forecast and Previous** as three tiles, with a plain sentence underneath saying whether the release beat or missed the forecast and by how much.
* **Surprise** expressed in standard deviations (sigma), which tells you whether a miss was unusual for this indicator or business as usual.
* **Revisions:** Data providers correct published numbers. Every correction we have seen is listed with its timestamp.
* **Past releases:** The recent history of the same indicator, with a chart of the surprises around a zero line. Bars above the line are beats, bars below are misses. The chart appears only once there are at least three scored releases, because two bars say more about the scale than about the indicator.

## Reminders

* **Bell icon on a row:** Arms a single reminder for that one event. You pick the lead time in minutes and where it should be delivered.
* **Standing rules:** A rule arms every matching event automatically, so you do not click forty bells. A rule matches on minimum impact and currencies, can carry several lead times, and can additionally announce market headlines. Editing a rule drops the reminders its previous version had already created.
* **Pending alerts:** Everything that is armed and not yet sent, including your own bells, what the rules created, and the warnings of the News filter and News protection features.

Reminders are delivered through the notification channels of the project (Telegram, e-mail, webhook and so on). Leaving the target list empty sends them to every channel of the project.

Reminders belong to the **project**, not to the individual member. Everyone with access to the project sees the same rules and the same pending alerts.

## Calendar subscription

The **Calendar subscription** button creates an iCal (`.ics`) feed you can add to Google Calendar, Apple Calendar or Outlook. Each subscription carries its own filters (name, currencies, minimum impact, bank holidays), so you can keep one link for high impact USD only and another for everything.

* The link is shown **once**. Only a hash of it is stored, so a lost link cannot be recovered, it has to be revoked and created again.
* Anyone holding the link can read the feed. Treat it like a password and keep it out of shared calendars.
* The feed carries the last 7 and the next 60 days and allows 60 requests per hour, far more than a calendar app needs.
* Revoking a link stops the feed at once.

{% hint style="warning" %}
The feed is meant for your own calendar, not for redistribution.
{% endhint %}

## How current the data is

* The schedule is refreshed every 30 minutes.
* Published actuals are picked up every 10 minutes.
* Reminders are dispatched every minute.
* Bank holidays and the statistics behind the surprise index are rebuilt weekly.

Event titles and descriptions are restated in plain English automatically. They are a summary, not the wording of any particular data provider.

## Acting on events automatically

The calendar itself only informs. If you want your trading to react to it, use the two features that read the same calendar:

* [**News filter**](/features/pro-features/news-filter) on a copier, which skips new trades around an event.
* [**News protection**](/features/pro-features/news-protection) on an account, which closes affected positions before an event and can re-open them afterwards.


# Market news

**Market news** collects the financial headlines that matter for the instruments you trade and puts them next to the [Economic calendar](/features/economic-calendar). You find it inside a project, in the left-hand menu under **Market news**.

{% hint style="info" %}
Market news is part of your subscription. It unlocks as soon as at least one account is connected to the project.
{% endhint %}

## What an article shows

Every article is condensed into a short headline and a one paragraph summary of at most 150 characters, together with:

* **Currencies:** The ISO codes actually affected by the article.
* **Impact:** High only when the article can move a whole currency or asset class, Medium for scheduled data and company results, otherwise Low.
* **Sentiment:** Bullish, Neutral or Bearish for the instruments named in the article, not for the market as a whole.
* **Published:** When the article appeared.

{% hint style="warning" %}
Headline, summary, impact and sentiment are produced automatically from the incoming articles. They are a restatement, not the original text, and they are not investment advice. Treat them as a fast overview and verify anything you intend to trade on.
{% endhint %}

Articles that are not market relevant (lifestyle, sport, promotions, pure opinion pieces) are dropped before they reach the page.

## Filtering

* **Search** across headline, summary, currencies and category.
* **Category:** Forex, Markets, Indicators, Crypto or General.
* **Impact** and **Sentiment**.
* **Currencies:** Any combination of the currencies you care about.
* **Saved:** Shows only the articles you bookmarked.

## Bookmarks

The bookmark icon on an article keeps it in the **Saved** list. Bookmarks belong to the **project**, not to the individual member, which is the same scope every other news setting has. Saving an article that is already saved is not an error.

## How current the data is

News is refreshed every 15 minutes.

## Getting headlines pushed to you

You do not have to open the page to stay informed. In the [Economic calendar](/features/economic-calendar), a **standing rule** with **Also announce market headlines** enabled forwards high impact articles matching its impact and currency settings to your notification channels as they are published. Such a rule needs no lead time, so it can be used for headlines alone.


# Basic features

Welcome to the essential toolkit of MetaCopier, where simplicity meets efficiency. Our Basic Features offer everything you need for straightforward trade copying.

Pick a feature below to read its detailed documentation.

{% hint style="success" %}
Looking for more advanced tools? See the [🌟 Pro features](/features/pro-features) for additional capabilities like HFT mode, Trailing stop, Risk per trade and more.
{% endhint %}

{% hint style="info" %}
**Scope legend**: every feature can be added at a specific level:

* **`Account`**: added on an account; applies to every copier of that account.
* **`Copier`**: added on a specific copier (master → slave link); only affects that link.
* **`Account & Copier`**: can be added at either level; the copier-level setting overrides the account-level one for that copier.

Pages without a tag describe an entity or built-in capability rather than an add-on feature.
{% endhint %}

## Account & copier entities

* [**Accounts**](/features/basic-features/accounts): Overview of the account tile, its fields and per-account functions.
* [**Copiers**](/features/basic-features/copiers): Replicate trades between accounts with fine-grained control.
* [**Audit logs**](/features/basic-features/audit-logs): Complete visibility into how your MetaCopier API is being used.
* [**Logs**](/features/basic-features/logs): Comprehensive record of all activities and events.
* [**Symbol mapping**](/features/basic-features/symbol-mapping): Map symbols across platforms when names differ.
* [**Maintenance window**](/features/basic-features/maintenance-window): Pause or stop trading during planned maintenance.
* [**Risk limits**](/features/basic-features/risk-limits): Stop copying new trades when an account drawdown threshold is hit.

## Account-level features

Added on an account; applies globally to that account.

* [**Profit targets**](/features/basic-features/profit-targets) `Account`: Automatically close positions once a daily / weekly / monthly profit objective is reached.
* [**Overall target**](/features/basic-features/overall-target) `Account`: Profit target and loss limit measured against a fixed starting balance, never reset. Built for prop firm challenge phases.
* [**Scheduled close & reopen**](/features/basic-features/scheduled-close-reopen) `Account`: Close open positions at defined times, for example before the weekend or overnight, and optionally open them again later.
* [**Fallback setting**](/features/basic-features/fallback-setting) `Account`: Control how the system behaves during regional fallback.
* [**Telegram**](/features/basic-features/telegram) `Account`: Receive trade and account notifications on Telegram.
* [**Webhook**](/features/basic-features/webhook) `Account`: Send real-time HTTP POST notifications when trading events occur.
* [**My home IP**](/tutorials/my-home-ip) `Account`: Route the account through the IP address of your own machine.
* [**Dedicated IP**](/features/pro-features/dedicated-ip) `Account`: An IP address reserved exclusively for your accounts. The dedicated IP **pool** requires the Pro plan.
* [**Signal provider / Signal follower**](/features/signal-sharing) `Account`: Publish your trades as a signal or follow a signal from the marketplace.
* [**Trader / Investor**](/features/investor-program) `Account`: Take part in the Investor Program as a trader or as an investor.

## Copier-level features

Added on a specific copier; only affects that master → slave link.

* [**Copier filter**](/features/basic-features/copier-filter) `Copier`: Selectively copy trades based on comment, magic number or lot size.
* [**Permitted symbols**](/features/basic-features/permitted-symbols) `Copier`: Whitelist or blacklist the symbols a copier is allowed to trade.
* [**Order Type Filter**](/features/basic-features/order-type-filter) `Copier`: Choose which order types are copied (market, limit, stop, etc.).
* [**Exit signal override**](/features/basic-features/exit-signal-override) `Copier`: Delay or ignore exit signals coming from the master.
* [**Multiplier**](/features/basic-features/multiplier) `Copier`: Fine-tune the copier multiplier per symbol.
* [**Maximum lot**](/features/basic-features/maximum-lot-size) `Copier`: Limit the total lot size of all open positions of the copier.
* [**Max lot size**](/features/basic-features/maximum-lot-size) `Copier`: Limit the lot size of each individual position opened by the copier.
* [**Martingale strategy**](/features/basic-features/martingale-strategy) `Copier`: Keep the lot progression of the master intact when the slave balance is much smaller.
* [**Minimum holding time**](/features/basic-features/minimum-holding-time) `Copier`: Force a minimum lifetime for copied trades before they can close.
* [**Skip position**](/features/basic-features/skip-position) `Copier`: Skip trades that are missing Stop Loss or Take Profit.
* [**Live delay**](/features/basic-features/live-delay) `Copier`: Skip the first N trades from the master.
* [**Block hedging**](/features/basic-features/block-hedging) `Copier`: Prevent the copier from opening positions opposite to existing ones.
* [**Spread filter**](/features/basic-features/spread-filter) `Copier`: Block copying new opens when the current spread is too wide.
* [**Trade cooldown**](/features/basic-features/trade-cooldown) `Copier`: Block copying a new open on a symbol for a set time after a previous trade on the same (or a correlated) symbol, to respect prop-firm "trade idea" rules (e.g. FTMO's 1-hour rule).

## Account & copier features

Can be added at either level. When set on both, the copier-level setting wins for that copier.

* [**Max open positions**](/features/basic-features/max-open-positions) `Account & Copier`: Cap the number of simultaneously open positions and trading frequency.


# Accounts

The account tile provides an at-a-glance summary of all key account details, including identification, current financial metrics, and status indicators. Each labeled element corresponds to a specific piece of information about the account, as described below. This overview helps users monitor account performance and ensure the account is properly connected for copy trading. By reviewing these details, you can quickly assess the account’s monthly performance, margin status, and any configured copy trading settings or limits.

<figure><img src="/files/KlukUwgBiuGG2A09lsHO" alt=""><figcaption><p>Account tile</p></figcaption></figure>

## Account Fields

* **Account Name**: A user-defined name for the trading account (e.g., “Demo Account”). This serves as a friendly label to easily identify the account within MetaCopier.
* **Account ID**: The system-generated unique identifier for the account (e.g., `1530b73e-4dfc-425c-9284-778a6180afef`). It is used internally (and in the API) to reference the account unambiguously.
* **Labels, JSON, and Settings**: In the top-right corner, you can assign labels, view the raw JSON configuration, and access the [account functions](/features/basic-features/accounts).
* **Server**: The trading platform and server the account is connected to, for example **MT4 | PUPrime-Demo**. This indicates both the platform type (MT4/MT5, cTrader, etc.) and the specific broker server or environment where the account resides.
* **Account Number**: The actual broker account number or login ID (e.g., **100480713**). This is the number you use to log into the trading platform, identifying the account on the broker’s side.
* **Region**: The geographical server region used for the account’s connection (e.g., **New York**). Typically, this is chosen for optimal latency, meaning the account is hosted on a server in that region to reduce delay in trade copying. Currently available are: **New York, London, Berlin and Singapore**.
* **Profit This Month**: The net profit or loss realized by the account in the current month to date (e.g., **0 USD** if no profit has been made yet this month). This value helps track the account’s performance over the month. When you hover over the "Profit this month" label, the daily and weekly profit metrics appear, providing a quick view of short-term performance.
* **Used Margin**: The amount of margin currently tied up in open positions (e.g., **0** if no trades are open). It shows how much of the account’s funds are being used to maintain existing trades.
* **Free Margin**: The remaining margin available for opening new trades (e.g., **2000.07**, typically in the account’s base currency). Free Margin is essentially Equity minus Used Margin, indicating how much resource is left to take on new positions.
* **Leverage**: The account’s leverage ratio (e.g., **1:500**). This denotes how much the account’s trading capacity is multiplied relative to its balance – a higher ratio means you can trade larger positions for a given balance, but with higher risk.
* **Status**: The current status of the account’s connection and activity. For example, it may display **Active** (the account is enabled for copying) and **Connected** with a latency indicator (e.g., `1 ms`), meaning the account is online and communicating with minimal delay.
* **Balance**: The current account balance, in the account’s base currency (e.g., **2000.07 USD**). This is the cash amount in the account excluding any unrealized profits or losses from open trades.
* **Equity**: The current account equity, in the base currency (e.g., **2000.07 USD**). Equity is the balance plus or minus any unrealized profit or loss on open positions (it equals the balance if there are no open trades).
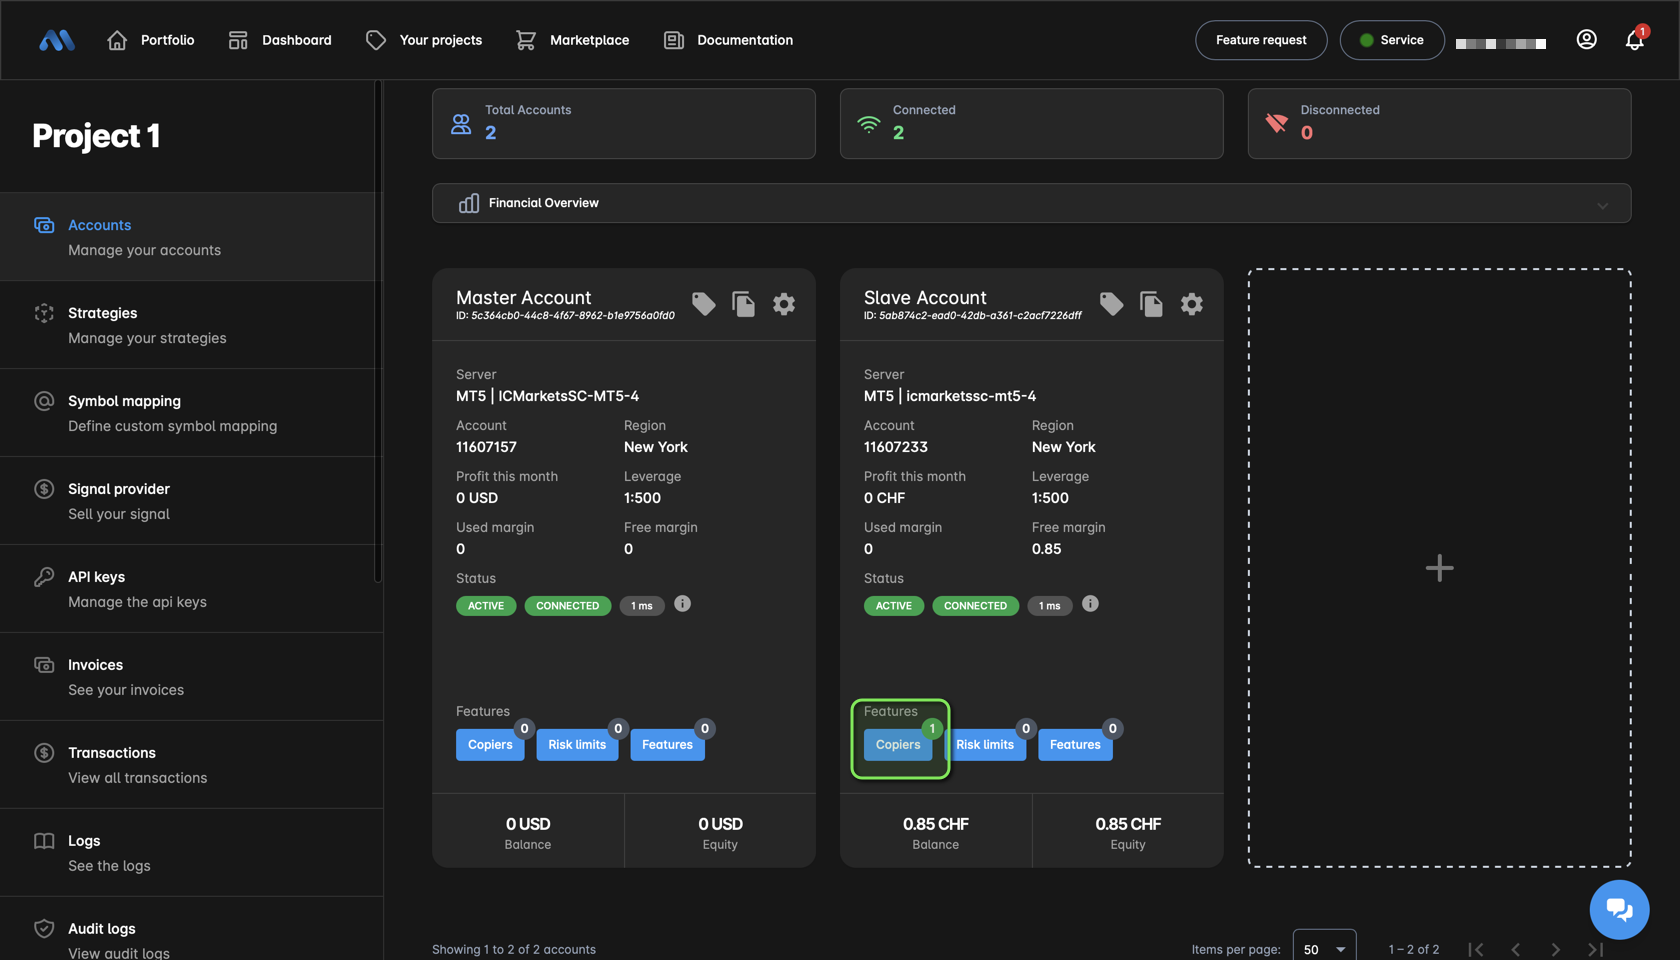
* **Copiers**: The number of copier accounts that this account itself is following, meaning it is acting as the “slave” in a copy trading setup. A value here (e.g., **1**) shows how many “master” accounts this account is currently copying trades from.
* **Risk Limits**: The count of active risk management rules applied to this account. For instance, a **0** here means no risk limits are set.
* **Features**: The number of optional copy-trading features or settings enabled on this account. A value (e.g., **0**) indicates how many advanced features (such as trailing stop, break-even, or other Pro features) are active for this account. Each enabled feature contributes to this count, helping you see at a glance if any special trade-handling functionalities are in use.

{% hint style="info" %}
Certain features can be assigned directly to the trading account, while others are applied to the copier itself. Account-level features typically affect overall risk management and trade handling for that account, whereas copier-level features control how trades are copied and managed for each linked copier, offering more granular customization.
{% endhint %}

{% hint style="info" %}
There are also alternative visualization options, such as List and Compact views, which display the same core information in a different layout. All essential details, like account status, key metrics, and settings, remain consistent across these different views.
{% endhint %}

## Account Functions

Every account has the following functions (click the gear icon to open the menu):

<figure><img src="/files/crGZqSgIaUZjhecrQcfv" alt=""><figcaption><p>Account functions</p></figcaption></figure>

* **Stop:** Stops and disconnects the account. Open positions remain untouched, but no new trades will be copied until the account is started again. **Note:** Stopped accounts are still billed. To avoid charges, delete the account.
* **Logs:** Opens the log viewer, where you can find action events, trade-copy operations, risk-limit triggers, warnings, and errors for this account. Useful for troubleshooting.
* **Audit logs:** Records all configuration changes and user actions for this account, including timestamp, event type, API endpoint, status, API key, and source IP. Useful for tracking activity, verifying actions, and ensuring compliance.
* **History:** Displays a chronological list of all completed trades executed through this account, including time, symbol, volume, P/L, and ticket ID. Helps you quickly review performance. The list updates every few minutes.
* **Analytics:** Displays detailed charts and statistics of your account, including equity, profit and loss, drawdowns, and trade distribution. Helps you quickly evaluate performance and optimize your trading decisions.
* **Data collector:** If the data collector feature is enabled, you will see details about equity, balance, and floating P/L.
* **Symbols:** Shows the symbols currently active on the broker. Useful for symbol mapping.
* **Terminal:** Launches the embedded web terminal so you can place or adjust trades manually without leaving MetaCopier.
* **Settings:** Opens the account configuration, allowing you to rename the account or update your password if needed.
* **Troubleshooting:** AI-based assistant that analyzes common issues and provides solutions in near real time.
* **Close:** Immediately closes all open positions.
* **Slave copiers:** Manage all copiers at once.
* **Delete:** Permanently removes the selected account and stops billing.


# Audit logs

Every time someone makes a request to your MetaCopier API, we capture it. The Audit Logs feature gives you complete visibility into how your API is being used, who's using it, and whether those requests are succeeding or failing. Think of it as a detailed history book for your API, one that helps you understand patterns, troubleshoot problems, and keep your project secure.

You can access Audit Logs in two ways:

* **Project-level**: See all API activity across your entire project by clicking the Audit Logs panel (shield icon) in your project's navigation menu
* **Account-specific**: View activity for a single API key by going to Accounts, clicking the three-dot menu on an account card, and selecting "Audit Logs"

When you open Audit Logs, you'll see a table where each row represents a single API request:

**Timestamp** shows exactly when the request came in, crucial for correlating logs with events.

**HTTP Method** indicates the operation type. POST requests typically create new resources (shown in blue), PUT requests update existing ones (shown in orange), and DELETE requests remove items (shown in red).

**Endpoint** shows which specific API route was called, helping you understand which parts of your API are most used.

**Status Code** tells you whether the request succeeded or failed. We use a traffic light system: green badges (200-299) mean success, yellow badges (400-499) indicate client errors like bad requests, and red badges (500-599) signal server errors.

**Duration** shows processing time in milliseconds-invaluable for spotting performance issues.

**API Key** displays which account made the request using the friendly alias you assigned.

**Actions** provides a button to view detailed information about each request, including headers, request body, response body, and error messages.


# Copiers

The copier provides precise control over trade replication between accounts, offering customizable settings to ensure each trade is copied in line with specific trading strategies and risk preferences. Additionally, multiple copiers can be combined for greater flexibility and more advanced strategy implementation.

{% hint style="warning" %}
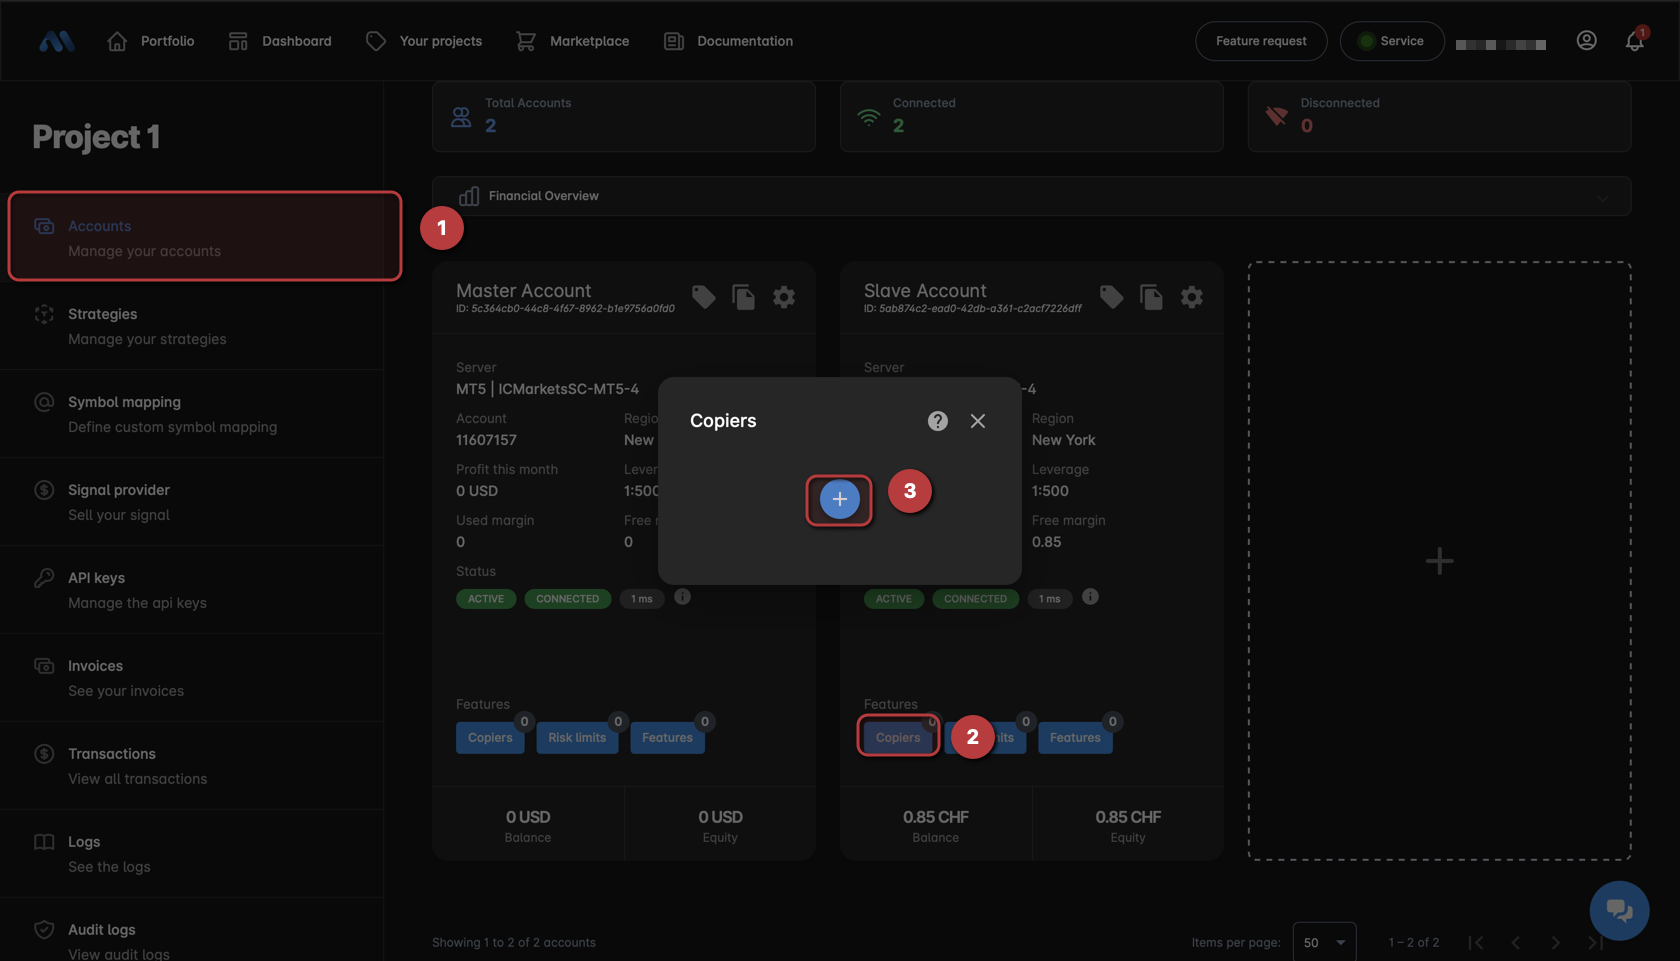
**A copier is always created on the slave account.** Open the **Copiers** dialog on the account that should **receive** the trades, then select the account the trades come **from** in the **"From account"** field.
{% endhint %}

## Copy direction (master and slave)

Trades always flow in one direction. Getting this direction right is the most important step when you set up a copier, so please read this section before you create your first one.

<figure><img src="/files/30cFeM392lQjHskKNXB6" alt=""><figcaption></figcaption></figure>

| Role                    | Also called                     | What happens there                                             | Copier configured here |
| ----------------------- | ------------------------------- | -------------------------------------------------------------- | ---------------------- |
| **Master** (source)     | "From account", signal provider | You trade here, or an EA, a strategy or a signal provider does | No                     |
| **Slave** (destination) | receiver, follower              | Positions are replicated here by MetaCopier                    | **Yes**                |

### Example: copy from TradeStation to MT5

You want the direction `TradeStation -> MT5`:

1. Open the **Copiers** dialog on the **MT5** account, because MT5 is the slave and receives the trades.
2. Click the **+** to add a new copier.
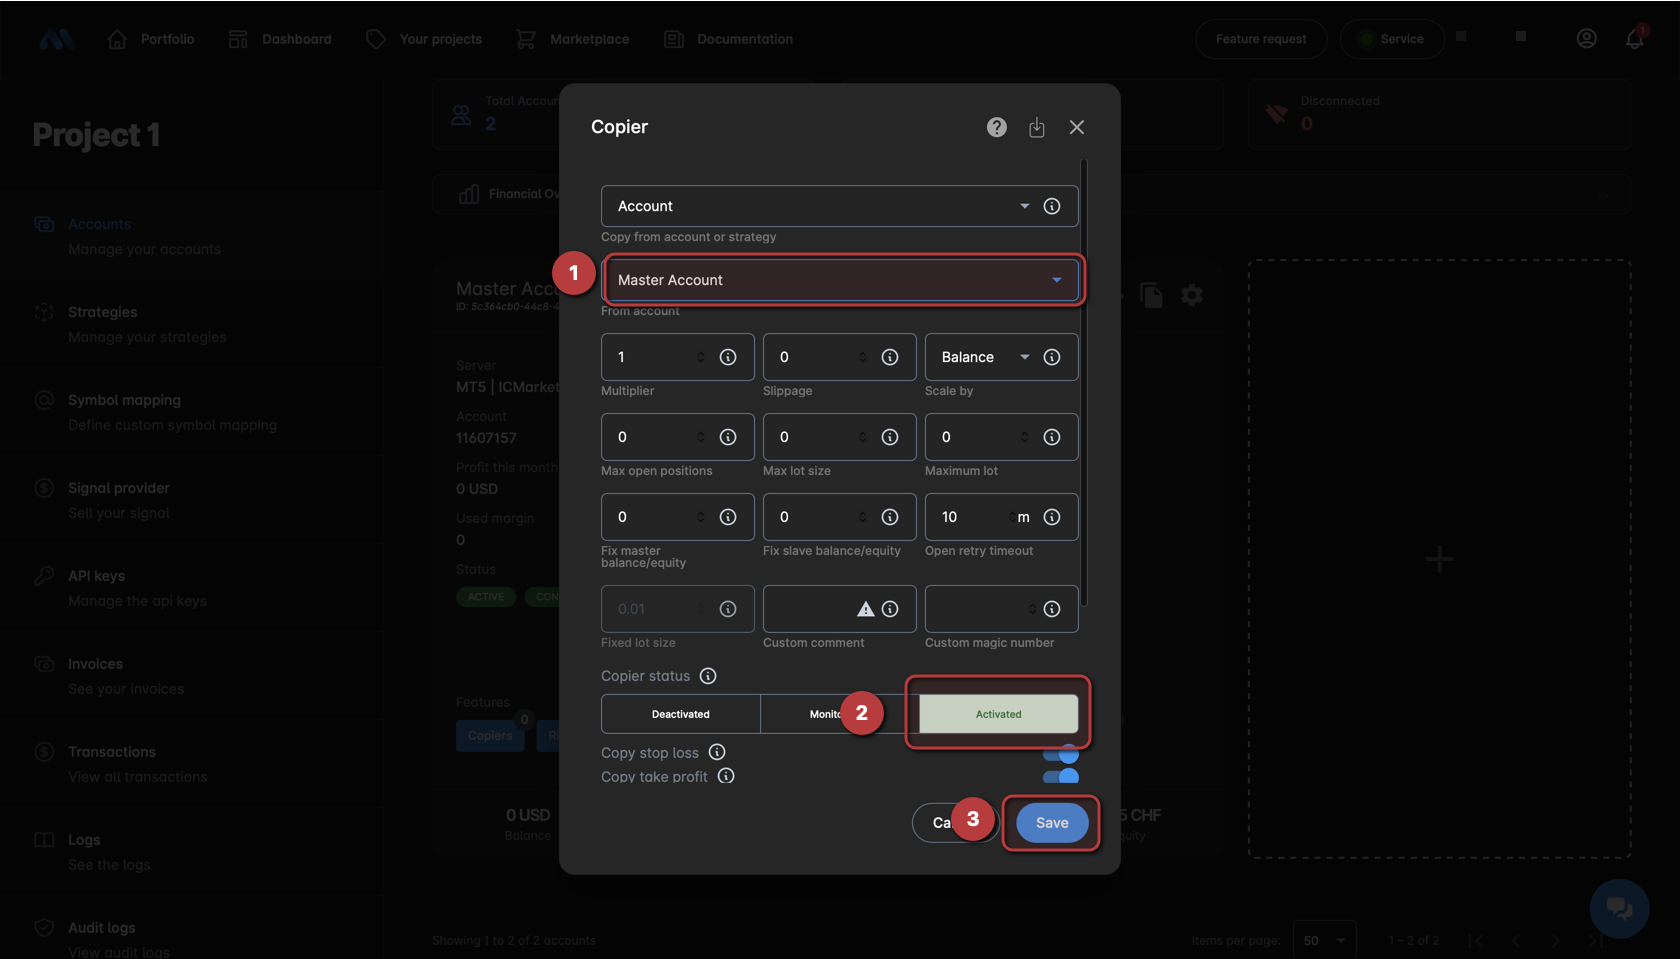
3. In **"From account"** select the **TradeStation** account, because TradeStation is the master.
4. Set the status to **Active** and save.

If you instead create the copier on the TradeStation account and select MT5 in "From account", the direction is reversed and you get `MT5 -> TradeStation`.

{% hint style="info" %}
**How to verify the direction:** open **View current symbol mapping** on the copier. The column **"Copy from (master)"** must show the symbols of your **master** account. If it shows the symbols of the account you wanted to copy *to*, the copier was created on the wrong account. Delete it and create it again on the other account.
{% endhint %}

## Overview

<figure><img src="/files/CU8jL0ZaaB6WITumumRn" alt=""><figcaption><p>Overview of configured copiers</p></figcaption></figure>

Each copier comes with the following functions:

* **Copier status:**
  * **Active (A):** The copier is running in normal mode, copying trades from the master and managing positions as expected.
  * **Monitor (M):** The copier will not take any new trades but continues to manage all open positions on the account. This is useful if you want to pause new entries while still keeping control over existing trades.
  * **Disabled (D):** The copier is completely turned off and will not copy or manage any trades.
* **Force copy open positions**: This re-syncs the slave account with the master. If a position was closed on the slave but is still open on the master, it will be reopened on the slave to match.
* **View current symbol mapping:** Helpful if you want to check whether each symbol is mapped correctly.
* **View settings in JSON format**: Helpful if you're using our API to automate operations
* **Edit** the copier settings
* **Delete** the copier
* **Add** a new copier

{% hint style="warning" %}
When removing the copier, open positions created by the copier will be marked as unmanaged, and a notification will be sent to you in the notification center.
{% endhint %}

{% hint style="warning" %}
**We don’t recommend** **deleting and re-creating the copier**, especially with the same master account and while positions are open, as this can lead to unexpected behavior.

If you want to copy trades that are already open on the master account, please use the **“Copy open positions”** button in the copier.\
Alternatively, you can enable the **“Copy open positions”** setting, then simply turn the copier off and back on.
{% endhint %}

## Settings

<figure><img src="/files/76fPOkunrry3ushqy5UZ" alt=""><figcaption><p>Copier settings</p></figcaption></figure>

* **Copy from account or strategy:** Specify the source by entering the account or strategy name. This setting determines where the trades are copied from, allowing users to select a specific trading account or strategy as the replication source. The account selected here is the **master (source)**. The copier itself always belongs to the account whose **Copiers** dialog you opened, which is the **slave (destination)**. See [#copy-direction-master-and-slave](#copy-direction-master-and-slave "mention").
* **Multiplier**: A multiplier is a factor applied to a certain value, such as the size of a trade (lot) or investment (balance or equity), to increase its impact. In trading, it is often used to amplify the exposure or returns of a position.
* **Slippage**: Slippage occurs when a trade is executed at a different price than expected. It often happens in fast-moving markets, and the actual execution price may be worse than the intended price, leading to potential differences in profit or loss.

  Slippage is in points (10 points = 1 pip). A value of 0 means deactivated (Trade is always executed at actual price).
* **Scale by**: Scaling refers to adjusting the size of a trading position based on the total account balance or equity. It is also possible to use a fixed lot size or disable the scaling to use the same lot size as the master account. The following options are available:

  * **Balance**: The slave lot size is scaled proportionally to the balance ratio between the accounts, using the formula `slave_lot = master_lot * (slave_balance / master_balance)`. For example, if the master balance is 10 000 USD and the slave balance is 1 000 USD, a 1.00 lot trade on the master will result in a 0.10 lot trade on the slave. When the master and slave use different base currencies and *Ignore currency* is disabled, both balances are converted to a common reference before the ratio is applied.
  * **Equity**: Same behavior as *Balance*, but the current account equity is used instead of the balance (`slave_lot = master_lot * (slave_equity / master_equity)`). Because equity includes floating profit and loss, the calculated lot size reacts to open-position P\&L. This option is useful when you want the copied exposure to follow the real-time value of the account rather than the static deposit.
  * **Fixed lot size**: The slave always opens the exact lot size configured in the **Fixed lot size** field, regardless of what the master traded. The master lot size and balance/equity are ignored entirely. Combine this with the **Multiplier** to further scale the fixed value, or use the [Multiplier feature](/features/basic-features/multiplier) to configure a different fixed lot size per symbol.
  * **No scaling**: The slave copies the master lot size 1:1 (`slave_lot = master_lot`). Balance, equity and currency conversion are **not** applied, so the master's lot is used as-is regardless of the account sizes or base currencies. **Contract size is still adjusted** when the master and slave symbols have different contract sizes, unless **Ignore contract size** is enabled. This option is useful when both accounts are of similar size and you want an identical replica, or when you use the **Multiplier** to apply your own custom ratio on top of the master lot.

  <div data-gb-custom-block data-tag="hint" data-style="info" class="hint hint-info"><p>Regardless of the selected scale type, the final lot size is still passed through the <strong>Multiplier</strong>, any active <a href="/pages/lUphB1t488WShw1lgGv8">Multiplier feature</a>, the <a href="/pages/CLxS0gUOV4555snrOowN#contract-sizes">contract size</a> adjustment (unless <strong>Ignore contract size</strong> is enabled), and lot-related limits such as <strong>Max lot size</strong>, broker minimum/maximum volume, and step rounding.</p></div>
* **Fix master balance/equity**: Override the master balance and equity to the specified value. If set to 1000, the lot size calculation for the slave account will always use 1000 as balance/equity reference ignoring the real balance/equity of the account. A value of 0 means deactivated.
* **Fix slave balance/equity**: Override the slave balance and equity to the specified value. If set to 1000, the lot size calculation for the slave account will always use 1000 as balance/equity reference ignoring the real balance/equity of the account. A value of 0 means deactivated.
* **Custom comment:** A user-defined comment that will be applied to all trades initiated by this account. If specified, this value overrides the system’s default trade tracking comment.\
  This can be useful for tagging, categorization, or distinguishing trades from multiple strategies or sources.
* **Custom magic number:** A custom *magic number* to stamp on every **copied** trade on the slave account, overriding the master's magic number regardless of the **Copy magic number** setting. It applies only to copied trades - trades opened directly on the slave account (manually or by other systems) are not affected and carry no magic number from this setting. The value `0` (and `null`/omitted) is treated as "not set": no override is applied and no magic number is sent on the copy. To assign a magic number, use any positive integer. Magic numbers are often used to uniquely identify and manage trades created by different expert advisors (EAs) or trading strategies, and combined with this option they let you tag every copy of a given strategy with a stable identifier independent of what the master sends.
* **Open retry timeout:** Specifies the total duration (in minutes) during which the retry mechanism will attempt to resend a rejected or failed request. If set to 0, the system will retry indefinitely. Once this duration elapses, no further retry attempts will be made. This setting is applicable only if 'openRetry' is set to true.
* **Max open positions:** Limits the maximum number of open positions the copier can maintain at any given time. If the limit is reached, new positions will be skipped until existing positions are closed. A value of 0 means the feature is deactivated. If, for any reason, the number of open positions exceeds the defined limit, the additional positions will be closed immediately. **Important**: Positions manually opened on slave accounts or originating from external sources or another copier will not be closed.\
  For more information see: [Max open positions](/features/basic-features/max-open-positions)
* **Max lot size:** Sets the maximum lot size for each position. If a position exceeds this size, it will be adjusted to this maximum limit. A value of 0 means deactivated. Optionally, you can choose to skip positions that exceed the limit entirely instead of adjusting them. Additionally, you can base the check on the master account's original lot size rather than the calculated slave lot size.
* **Maximum lot:** Define the total allowable lot size across all open positions for the copier. This feature aggregates the lot sizes of all your current trades and ensures that their sum does not exceed a specified limit. A value of 0 means deactivated.
* **Active**: Indicates whether the copier is active and operational. This setting allows users to easily manage the status of their trade copier, turning it on or off as needed.
* **Copy stop loss / take profit values**: Ensure critical risk management settings, like Stop Loss (SL) and Take Profit (TP), are copied alongside each trade. This maintains strategy integrity and protects against undue losses.
* **Skip pending orders**: This setting allows traders to choose whether or not to replicate pending orders (orders that have not yet been executed). Skipping pending orders is highly recommended. By default, this option is blocked. If you are an expert trader, [please contact us to unlock this option](/metacopier/support).
* **Force min trade**: If the calculated position size is less than 0.01 lots, then the position will be placed at the minimum lot size of 0.01.
* **Min volume safety skip threshold**: Safety limit for **Force min trade**. It defines the maximum allowed amplification when the calculated slave lot has to be raised to the broker's minimum lot size. If the amplification (`slave minimum lot / calculated lot`) is equal to or greater than this value, the trade is **skipped** instead of being opened far too large. A value of **0 means deactivated**.

  Example: master minimum lot 0.01, slave minimum lot 1.00, calculated lot 0.10 → amplification = 1.00 / 0.10 = **10.0x**. With a threshold of 3.0 the trade is skipped.

  <div data-gb-custom-block data-tag="hint" data-style="info" class="hint hint-info"><p>This check only applies when the slave broker's minimum lot size for the symbol is greater than the master broker's minimum lot size. If both brokers have the same minimum lot size, the check is never triggered.</p></div>
* **Adjust lot size based on martingale multiplier**: If there is a significant difference in balance/equity between the master and slave accounts, the lot size on the slave account may be rounded down. For example, if trades of 0.02 and 0.04 lots are placed on the master account (balance 4000 USD), a standard copier would open 0.01 and 0.01 lots on the slave account (balance 1000 USD - which is incorrect). However, if this option is activated, it will open 0.01 and 0.02 lots.
* **Open retry:** Is a feature that ensures your trade orders are executed even if they initially fail due to temporary issues such as connectivity problems or market conditions. When a trade order fails to open, the Open Retry mechanism will automatically attempt to re-execute the order at regular intervals until it succeeds. Additionally, in the rare event that a trade is opened twice, our system detects the duplication and closes one of the positions. If set to false, the request is only sent once. For Martingale strategies, it is recommended to activate this option. For strategies with a small pip profit and a greater lot size, it is better to deactivate it. For HFT, it is better to deactivate it as well.
* **Reverse**: This feature allows you to invert the direction of trades being copied. When enabled, a buy (BUY) order from the source account will be converted into a sell (SELL) order on the destination account, and vice versa. This can be helpful if you want to trade in the opposite direction of a strategy being followed. If you are using a Take Profit (TP) or Stop Loss (SL) value, these will also be inverted: the TP on the master will become the SL on the slave, and the SL on the master will become the TP on the slave. Note that the risk-to-reward ratio (RRR) will also be reversed. For instance, if you’re using an RRR of 1:2 on the master, it will become 2:1 on the slave. This feature does not support pending orders.
* **Hide comment:** When enabled, MetaCopier’s trade comment will be hidden, leaving the comment field empty. Because copied trades can then no longer be identified by their comment, MetaCopier recognises positions opened manually or by other systems indirectly, by verifying over several checks that no copy request matches them. Such positions are left open and are only closed if **Close unmanaged positions** is enabled on the account. Positions that you close manually on the slave account are not re-opened by the copier. Manual trading or running other systems on the slave account is nevertheless **not recommended** while this option is active, because a position can still be misclassified. Positions that were already open before the account reconnected cannot be classified and always remain untouched. This option should only be enabled if absolutely necessary. *Note: Comments remain visible inside the MetaCopier terminal, but they will not appear on the broker’s side.*
* **Copy open positions:** When this option is enabled, any currently open trades on the master account are immediately replicated to the connected account upon activation of the copier. By default, this feature is deactivated, meaning only new trades will be copied unless this option is selected. This can be especially useful for users who want to join an already active trading strategy without waiting for new trade entries.
* **Force position lot size:** When this option is turned on, the copier will break large orders into smaller ones if they go over the set lot size limit for a symbol. For example, if your account has a general limit of 100 lots and a specific limit of 10 lots for BTC/USD, placing an order of 30 lots will result in three orders of 10 lots each. If this option is turned off, the copier will only place one order of 10 lots and ignore the rest.
* **Ignore contract size:** By default, the copier takes into account the [contract size](/features/specifications#contract-sizes) of the respective platform or broker. This means the lot size might appear incorrect at first glance, but it is actually accurate because the [contract size](/features/specifications#contract-sizes) is considered to ensure the risk settings are respected. However, if you prefer not to factor in the [contract size](/features/specifications#contract-sizes), you can choose to ignore it.
* **Ignore currency:** This option allows you to ignore differences in the account base (deposit) currency between the master and slave accounts. By default, the copier adjusts trade sizes using exchange rates to maintain consistent risk, but when this option is enabled, currency conversion is skipped and both accounts are treated as if they share the same base currency, which can lead to incorrect sizing if currencies differ. In some cases, account base currencies may have the same or similar names while representing different actual currencies (for example, cent-based or broker-specific variants), so you must manually verify the real base currencies and decide whether this option should be enabled or disabled. Only enable this option if the currencies are truly equivalent or the difference is intentionally ignored.
* **Copy original comment:** By default, the copier uses its own internal comment system on the slave account to reliably track and manage trades. If you enable this option, it will copy the original comment from the master account instead. While this might seem useful for transparency, it can interfere with internal tracking and potentially cause some trades to be misidentified as manually opened or unmanaged. Furthermore, any positions opened manually or by other systems with an empty comment field will be closed to prevent them from remaining open in case of an error (manual positions with a comment won’t be affected). It is best to leave this option disabled unless you have a specific reason to preserve the master’s comment.
* **Copy magic number:** The magic number is a unique identifier assigned to trades by Expert Advisors (EAs) or automated strategies in MetaTrader platforms. Enabling this option ensures that the exact magic number from the master account's trade is copied to the slave account. This is crucial when you use specific EAs or scripts on the slave account that depend on the magic number to manage or filter trades. If the master's magic number is `0` (or absent), no magic number is stamped on the copy - the field is omitted in the outgoing order rather than sent as `0`. If **Custom magic number** is set to a positive value, it takes precedence and overrides this option.

{% hint style="info" %}
The **master account** is the reference for the limitations "*Max open positions*", "*Max lot size*" and "*Maximum lot*"
{% endhint %}

{% hint style="info" %}
When the "**hide comment**" feature is enabled, comments still appear in the Metacopier terminal but are hidden on the trading account.
{% endhint %}

{% hint style="warning" %}
With "**hide comment**" enabled, manual trading or other systems on the slave account are **not recommended**. Without the comment, MetaCopier can only distinguish your own trades from copied ones indirectly, so a position may be misclassified. Manually opened positions are left open (and only closed if "*Close unmanaged positions*" is enabled on the account), and manually closed positions are not re-opened - but the classification is not guaranteed to be correct in every situation.
{% endhint %}

{% hint style="info" %}
When copying between accounts with different base currencies - for example, a master account in USD and a slave account in EUR - the conversion is handled automatically using the most recent exchange rates.
{% endhint %}

## Features

Every copier can be customized with additional features. Below is an overview.

{% hint style="info" %}
Features can be configured on both **account copiers** (the copier on a slave account) and **strategy copiers** (the copier within a strategy). When an account subscribes to a strategy, features defined on the **account copier take priority** over features defined on the **strategy copier**. This means that if the same feature type is configured on both levels, only the account copier's version will be applied.

The exceptions to this rule are the **Copier filter**, **Permitted symbols**, and **Order type filter** - these are additive, meaning both the account-level and strategy-level configurations are applied together.
{% endhint %}

See the [Basic features](/features/basic-features) index for the full list of copier-level features that can be added to a copier.

## Remarks

* **If the copier is disabled, positions that were opened via the copier and are still open will continue to be managed.** This means that any updates to Take Profit (TP) or Stop Loss (SL), or if the position is closed on the master account, will also be reflected on the slave account.
* **However, if the copier is removed while positions are still open, they will be marked as unmanaged and will require manual action.** You will also see a notification in your portal.
* The **copied trades** to the slave accounts are placed like **manual trades**.
* If the trades are copied from an account the **magic number will be set to 0**. If the trades are copied from a strategy the **magic number will be taken from the defined value in the strategy settings.**
* If the lot size on the slave account exceeds the symbol's maximum allowed size, it will automatically be adjusted to the highest possible value.
* If the lot size exceeds the account's maximum leverage, the position will not be copied. To avoid this, use the option in the copier "**Max lot size**" to limit it
* In case of errors please check the [logs](/features/basic-features/logs) for the affected account


# Copier filter

The copier filter lets you selectively copy trades based on their properties. Only positions that match at least one of the configured filters will be copied. For examples of how to use regex, [please look at this page](/tutorials/regex).

* **Comment**: A regex filter (case insensitive) applied to the trade's comment field. If multiple filters are specified, they are combined using an OR condition - a trade is copied if it matches **any** of the configured comment patterns.
* **Magic number**: A regex filter (case insensitive) applied to the trade's magic number field. On MetaTrader this corresponds to the magic number, on cTrader to the label, and on DXtrade/TradeLocker/MatchTrader/Binance/Bybit/Bitget/BloFin/OKX this field is not available. If multiple filters are specified, they are combined using an OR condition.
  * **cTrader limitation**: Only **numeric** labels are supported. The cTrader `label` field is internally mapped to a numeric value, so labels containing letters or other non-numeric characters (e.g. `MA_PD_4_12_26`) are ignored and the filter will never match. To use the magic number filter on cTrader, set a numeric-only label on each trade (e.g. `412260`) and then filter by that number. If you need to route by a string tag, use the **Comment** filter instead.

Additionally, you can filter positions based on the **lot size** of the master account:

* **Min lot size**: If the master position's lot size is less than this value, the trade will be skipped. Set to 0 or leave empty to disable.
* **Max lot size**: If the master position's lot size is greater than this value, the trade will be skipped. Set to 0 or leave empty to disable.

<figure><img src="/files/IdXm55oLo8zoUZWxTmM8" alt="" width="375"><figcaption></figcaption></figure>


# Permitted symbols

This feature allows you to control which financial instruments can be traded by your account.

* **Whitelist**: By using a whitelist, you can create a specific list of symbols that are allowed to be traded. Only the symbols included in this list will be eligible for trading, and all other symbols will be restricted. This is useful if you want to focus your trading on a select group of instruments.
* **Blacklist**: Conversely, the blacklist enables you to specify symbols that are not allowed to be traded. All symbols not included in the blacklist will be permitted for trading. This approach is useful for excluding certain instruments that you consider too risky or outside your trading strategy.

For examples of how to use regex, [please look at this page](/tutorials/regex).

<figure><img src="/files/K9SEs8H47TDbJqBSA9Js" alt="" width="375"><figcaption></figcaption></figure>


# Exit signal override

This feature allows slave accounts **to delay or ignore exit signals** from the master account, with options to define a wait time and to apply the override only when both Take Profit (TP) and Stop Loss (SL) are set.

<figure><img src="/files/0NnrTUCnNjTgFIxTse0u" alt="" width="375"><figcaption></figcaption></figure>

**Key Options:**

* **Ignore for seconds:** This setting allows you to delay exit signals from the master account for a specified number of seconds. During this time, the connected account will not act on the signal, giving trades a chance to continue without immediate closure. A value of 0 indicates that the exit signal will be ignored indefinitely.
* **Only if TP/SL are set:** When this option is enabled, the override will apply only to trades where both Take Profit (TP) and Stop Loss (SL) levels are defined. If either TP or SL is missing, the exit signal from the master account will not be overridden.

**Benefits:**

* Maximize profit by holding positions longer to reach TP levels.
* Avoid unnecessary exits by ignoring exit signals under certain conditions.
* Gain more control over trade behavior on slave accounts.

This feature is ideal for users who prefer to optimize trade outcomes on slave accounts while still leveraging the signal copying capabilities of MetaCopier.


# Multiplier

With the multiplier feature, you can fine-tune the multiplier for each symbol. When you activate it, you need to define a global multiplier (which overrides the copier settings). After that, you can add specific symbols and configure their settings as desired.

<figure><img src="/files/66AdaqVi0RCsSip6guUY" alt=""><figcaption><p>Multiplier feature</p></figcaption></figure>

## Settings

The feature exposes the same lot-sizing knobs as the copier itself, so it can fully replace them for the affected trades:

* **Multiplier**: Global multiplier applied to the calculated slave lot size.
* **Scale by**: Scale type used for lot sizing. See [Copiers](/features/basic-features/copiers#scale-by) in the copier settings for a description of each option (**Balance**, **Equity**, **Fixed lot size**, **No scaling**).
* **Fixed lot size**: Lot size used when **Scale by** is set to **Fixed lot size**.
* **Fix master balance/equity**: Overrides the master account balance/equity used in the lot-size calculation. A value of 0 means deactivated (the real value is used).
* **Fix slave balance/equity**: Overrides the slave account balance/equity used in the lot-size calculation. A value of 0 means deactivated (the real value is used).
* **Symbols configuration**: Optional per-symbol overrides. For each configured symbol you can define its own **Multiplier**, **Scale by**, **Fixed lot size**, **Fix master balance/equity** and **Fix slave balance/equity**.

## Override behavior

When the Multiplier feature is added to a copier, its values **replace** the corresponding copier settings for lot-size calculation. The precedence is:

1. **Symbol-specific configuration** (if the traded symbol is listed in the feature's symbols configuration) - highest priority.
2. **Global values inside the feature** (used when no symbol-specific entry matches).
3. **Copier settings** - used only when the feature is not attached to the copier.

Because of this, once the Multiplier feature is active, the **Multiplier**, **Scale by**, **Fixed lot size**, **Fix master balance/equity** and **Fix slave balance/equity** defined on the copier itself are effectively ignored for any trade the feature applies to.

{% hint style="info" %}
Other copier-level options (Slippage, Max lot size, Max open positions, Copy SL/TP, Reverse, Ignore contract size, Ignore currency, etc.) are **not** touched by this feature. They always come from the copier settings.
{% endhint %}


# Maximum lot & max lot size

MetaCopier has **two separate lot limit features**. They are often confused, so make sure you add the one you actually need:

* **Maximum lot** limits the **total** volume of all open positions of a copier.
* **Max lot size** limits the volume of a **single** position.

Both are copier-level features and both can be configured per symbol. A value of `0` means the limit is deactivated.

## Maximum lot

Limits the total lot size of all open positions created by this copier, globally or per symbol.\
If the configured maximum is reached, no new positions are opened until existing positions are closed. This setting overrides the maximum lot configured directly on the copier.

### Settings

* **Maximum lot:** The total volume all open positions of this copier may reach. `0` disables the check.
* **Add symbol configuration:** Define a different total limit for a specific symbol.

## Max lot size

Limits the lot size of each individual position. If a position exceeds this size, it is **adjusted down** to the configured limit, unless you choose to skip it instead. This setting overrides the max lot size configured directly on the copier.

### Settings

* **Max lot size:** The maximum volume of a single position. `0` disables the check.
* **Skip if exceeds max:** When enabled, a position that would exceed the limit is skipped instead of being resized. The trade is not limited or resized, it is simply not executed.
* **Check master lot size:** When enabled, the check is performed against the **master account's** original lot size instead of the calculated slave lot size. A trade is then skipped if the master trade itself exceeds the limit, even if the calculated slave lot size would be smaller. Only active together with **Skip if exceeds max**.
* **Add symbol configuration:** Define a different per-position limit for a specific symbol.

<figure><img src="/files/7jiJMUyfhtOmxkWnfjhV" alt="" width="375"><figcaption></figcaption></figure>


# Martingale strategy

The **Martingale strategy** feature controls how the lot size is rounded when the master and the slave account have very different balances.

If there is a significant difference in balance or equity between the two accounts, the calculated lot size on the slave account may be rounded down. For example, if trades of `0.02` and `0.04` lots are placed on a master account with 4000 USD, a standard copier would open `0.01` and `0.01` lots on a slave account with 1000 USD, which no longer reflects the progression of the master. With this feature enabled, the copier opens `0.01` and `0.02` lots instead, so the martingale progression of the master is preserved.

The same option also exists directly on the copier as **Adjust lot size based on martingale multiplier** (see [Copiers](/features/basic-features/copiers)). Adding it as a feature lets you enable or disable it **per symbol**.

## Settings

* **Enable martingale strategy:** Turns the rounding adjustment on for this copier. Disabled by default.
* **Add symbol configuration:** Enable or disable the adjustment for a specific symbol. A symbol entry overrides the global setting of this feature.

{% hint style="info" %}
This feature only changes how the lot size is **rounded**. It does not increase your lot size after a loss and it does not create additional trades. If you are looking for an automatic lot increase after losing trades, see [Progressive trade sizing](/features/pro-features/progressive-trade-sizing).
{% endhint %}

{% hint style="info" %}
For martingale strategies it is also recommended to keep **Open retry** enabled on the copier, so a failed entry of the progression is retried instead of being lost.
{% endhint %}


# Order Type Filter

The **Order Type Filter** allows you to choose which specific order types should be copied from the master to the slave account. Only the selected types will be copied, giving you full control over whether to include market orders, pending orders, or both. If no types are selected, all order types will be copied by default.

{% hint style="info" %}
Limit and stop orders are disabled by default. If you enable them through the order type filter, they still won’t be copied unless your project has pending orders enabled. For more information, see the [pending orders page](/pending-orders).
{% endhint %}

<figure><img src="/files/SYfegvP1fyFDxylAcjIu" alt=""><figcaption><p>Order Type Filter</p></figcaption></figure>

### Remarks

* **If the copier is disabled, positions that were opened via the copier and are still open will continue to be managed.** This means that any updates to Take Profit (TP) or Stop Loss (SL), or if the position is closed on the master account, will also be reflected on the slave account.
* **However, if the copier is removed while positions are still open, they will be marked as unmanaged and will require manual action.** You will also see a notification in your portal.
* The **copied trades** to the slave accounts are placed like **manual trades**.
* If the trades are copied from an account the **magic number will be set to 0**. If the trades are copied from a strategy the **magic number will be taken from the defined value in the strategy settings.**
* If the lot size on the slave account exceeds the symbol's maximum allowed size, it will automatically be adjusted to the highest possible value.
* If the lot size exceeds the account's maximum leverage, the position will not be copied. To avoid this, use the option in the copier "**Max lot size**" to limit it
* In case of errors please check the [logs](/features/basic-features/logs) for the affected account


# Risk limits

The Risk Limiter stops copying new trades whenever your account reaches a certain drawdown, helping protect your money and prevent bigger losses. It can also automatically close open positions if your risk limits are hit. You can set it to work on a daily, weekly, or monthly basis, depending on what fits your strategy, and you can combine multiple limits for even tighter control.

<figure><img src="/files/tBEPgLAt3LgPkGIzMGmZ" alt=""><figcaption><p>Risk limit settings</p></figcaption></figure>

## Settings

* **Risk type & period**: Choose the type of drawdown limit and the specific period it applies to. This setting allows you to select how you wish to monitor drawdown - actual, daily, weekly, or monthly - offering flexibility in how you apply risk management strategies over different time frames.
  * Balance-equity: The reference value is based on **balance**, while risk is monitored using **equity**
  * Equity-equity: Both the reference and monitoring are based on **equity**
  * Actual: Risk is tracked from the **current balance**, adapting continuously without relying on a fixed reference point.
  * Smart reference: The **higher of balance or equity** is used as the reference, with monitoring based on **equity**
* **Reset time**: Determine the exact **local time** at which the drawdown calculation period should reset. This feature enables you to align the limiter's operation with your trading schedule or the specific trading session you're most active in, ensuring that the drawdown calculation starts fresh at a time that makes sense for you
* **Fullfillment in seconds**: Specify the delay in seconds before the limiter activates once the defined risk limit is reached. Setting this to '0' triggers the limiter immediately upon reaching the drawdown threshold, while a higher value introduces a delay, allowing for brief fluctuations before the limiter takes effect
* **Percentage Risk Limit** sets the maximum allowable drawdown as a percentage of the account balance or equity (e.g., 0.1 = 10%). When this limit is reached within the selected period, the system triggers the defined risk control actions. To account for fees or minor fluctuations, consider setting the value slightly below your actual tolerance (e.g., 0.09 instead of 0.1). Set to 0 to deactivate.
* **Relative risk Limit:** This option defines a drawdown limit based on the difference between the current balance or equity and the starting value at the beginning of the selected period (daily, weekly, or monthly). When the relative loss reaches the specified amount, the limiter is triggered. Set to 0 to deactivate. Consider setting the value slightly below your actual limit to account for fees and market fluctuations.
* **Absolute Risk Limit:** it sets a fixed minimum balance your account should not fall below. When your balance reaches or drops below this value, the system automatically activates the limiter to stop trading or apply your chosen protection. This limit is defined in your account’s currency (for example, 1,000 USD) and stays constant regardless of profits or performance. To account for small market movements or trading fees, it’s recommended to set the limit slightly above your true cutoff point (for example, 1010 USD instead of exactly 1,000). Set to 0 to deactivate.
* **Close all open positions:** Enable this option to automatically close all open positions immediately upon reaching the drawdown limit. This feature serves as an essential stop-loss mechanism, providing immediate action to protect your capital during adverse market movements. If this option is disabled, existing positions will remain open, but new trades will not be copied to the slave accounts, preventing further exposure while allowing current positions the potential to recover.
* **Fallback limits:** If your main risk limit is reached and you chose not to automatically close all open positions, the system will stop opening new trades. The fallback limits then act as a second layer of protection. If any of these limits are triggered, all open positions will be closed immediately.

{% hint style="danger" %}
If you have many positions or large lot sizes, the risk limit may be affected by factors like slippage, market volatility, and broker execution latency. To improve effectiveness, consider reducing the lot size.

A withdrawal or deposit order will trigger a "reset risk limit" (see below).
{% endhint %}

{% hint style="info" %}
If you intend to utilize two risk limits, one for the day and one for the current drawdown, we recommend utilizing distinct percentages to differentiate between them effectively.
{% endhint %}

## Reset risk limit

With this button, you can reset your risk limits, allowing for a fresh start in managing your trading risk. Whether you need to recalibrate your strategy or adjust to changing market conditions, the Risk Limit Reset offers flexibility and control at your fingertips.

<figure><img src="/files/xgiI6YGp36z3aizopy5v" alt=""><figcaption></figcaption></figure>


# Profit targets

The profit targets feature allows you to set specific profit objectives for your trading account, giving you greater control over your gains. By defining daily, weekly, or monthly profit targets, this feature ensures positions are automatically closed once your target is achieved. This approach helps lock in profits systematically and maintains a disciplined trading strategy aligned with your financial goals.

<figure><img src="/files/pF8w1TRdm4cq6uUpytY8" alt=""><figcaption><p>Daily profit target</p></figcaption></figure>

## Settings

* **Profit Target in Percent:** This setting enables you to specify a profit target as a percentage of your account balance. When the target is reached, your positions will automatically close within the defined period (daily, weekly, or monthly). For example, if your target is 1%, we recommend setting a slightly higher value (e.g., 1.1%) to account for fees and possible market fluctuations. Set to 0 to deactivate.
* **Relative Profit Target:** This option sets a profit target relative to the balance at the start of the selected period (daily, weekly, or monthly). When the difference between the current balance and the period’s starting balance reaches the target amount, all positions will automatically close. Set to 0 to deactivate. As with other targets, consider a slightly higher value to account for fees and market volatility.
* **Absolute Profit Target** allows you to set a fixed profit goal in your account’s currency (e.g., 100 USD). When this amount is reached within the selected period (daily, weekly, or monthly), all positions will automatically close. To account for fees and market fluctuations, it's recommended to set a slightly higher value (e.g., 105 instead of exactly 100). Set to 0 to deactivate.
* **Reset Time:** The reset time determines when the profit tracking period refreshes for your selected interval. For daily targets, the reset time marks the beginning of each new trading day; for weekly targets, it resets at the start of a new week, and for monthly targets, it resets at the beginning of a new month.
* **Autoreset:** Reset this target if the balance falls below the target. For example, after a withdrawal. To avoid rapid hit/reset flip-flopping, the auto-reset only re-arms the target once the balance drops clearly back below the target (a buffer of roughly 40% of the target profit), not exactly at the target line. This prevents the situation where fees, swap, or slippage leave the closed balance a fraction below the target (e.g. 4.9% after a 5% hit) and immediately re-trigger the target.
* **Pause instead of close**: If set to true, when the profit target is reached, the copier will pause and stop opening new positions instead of closing all existing positions. The open positions will remain active. If set to false, all positions will be closed when the target is reached.
* **Reset on balance change:** If set to false, balance changes (deposits and withdrawals) will NOT trigger a reset of this profit target. If set to true, any deposit or withdrawal will reset the profit target reference balance. This option allows you to maintain the profit target calculation even when adding or removing funds from the account.
* **Track by open date**: If enabled, trades are grouped by their open date. Each day's group is tracked independently across multiple days. The system sums the realized P\&L (from already-closed trades in the group) plus the unrealized P\&L (from still-open trades in the group). When a group's total hits the target, only that day's remaining open positions are closed - other day groups are unaffected. Example: 4 trades opened on March 4 with a target of $800. Trade 1 closes on March 4 (+$200), trade 2 closes on March 5 (+$300). On March 6 the last two trades reach +$300 unrealized together, making the group total $800 - those two are closed by the system. Only available for the daily profit target. Useful for prop firm consistency rules (e.g. Aqua Funded).

## Manual reset profit target

When the daily target is reached and all positions have been closed, a symbol will appear on your account. If you click it, you can reset the target and continue trading.

<figure><img src="/files/Ca31ZOhkJlaDYXJu07PO" alt=""><figcaption><p>Reset profit target</p></figcaption></figure>


# Overall target

The overall target feature defines a profit target and a loss limit for the whole life of an account. In contrast to the daily, weekly and monthly [profit targets](/features/basic-features/profit-targets) and the period based [risk limits](/features/basic-features/risk-limits), this feature is never reset. Both values are always measured against one fixed reference balance, which makes it the right choice for a prop firm challenge phase or any goal that has to be reached over an unlimited number of days.

Because the target is attached to the account, every account can have its own target regardless of which copier delivered the trades. A slave account that has to make 8% while its master keeps trading simply closes out on its own once the 8% are reached.

## Why the period targets are not enough

The daily, weekly and monthly profit targets measure the gain against a reference balance that is re-anchored at the start of every new period. After a losing period, the reference moves down together with the account, so the next target is measured from the new lower balance instead of from the original starting balance. Over several periods the goal drifts along with the account and never represents the total gain you actually wanted.

The overall target keeps one anchor for the whole run, so 8% always means 8% above your starting balance.

## Settings

* **Overall profit target in percent:** The profit target as a percentage of the reference balance. When it is reached, all positions are closed and no new positions are copied. Because fees, swap and slippage are charged on top of the market result, we recommend setting the value slightly above your real goal, for example 8.1% instead of 8%. Set to 0 to deactivate.
* **Overall profit target amount:** The same target expressed as an amount in your account currency, measured as the gain above the reference balance. Set to 0 to deactivate. If the percentage and the amount are both active, whichever is reached first triggers the target.
* **Overall loss limit in percent:** The maximum loss as a percentage of the reference balance. It uses the same anchor as the profit target, which means it behaves as a static drawdown and does not follow the account upwards. Set to 0 to deactivate.
* **Overall loss limit amount:** The same limit expressed as an amount in your account currency, measured as the loss below the reference balance. Set to 0 to deactivate.
* **Reference mode:** Selects which account value is compared against the reference balance.
  * **Equity** includes open positions, swap and accrued costs. The target can therefore trigger while trades are still running, which locks in the result at the moment the level is touched.
  * **Balance** only counts closed trades. All fees are already realized before the target can trigger, so the number you see is final, but open floating profit is ignored until the trades are closed.
* **Reference balance:** The fixed starting balance that both the target and the limit are measured against. Leave it at 0 to capture the current account balance automatically when the feature is activated. Set it manually if you want to anchor to a specific value, for example the official starting balance of a challenge account. Changing this value also re-arms a target that has already been reached, which is the way to start a new run without removing the feature.
* **Adjust reference on balance change:** If enabled, deposits and withdrawals shift the reference balance by the same amount, so your target and limit stay intact after a funding change. If disabled, the reference balance is never touched and a deposit counts towards the profit target. This only applies while the reference balance is captured automatically, a manually entered reference balance is never moved.
* **Pause instead of close:** If enabled, reaching the target or the limit only pauses the copier so that no new positions are opened, while the open positions keep running. If disabled, all open positions are closed.

## Example

A challenge account starts with 100,000 USD and has to make 8% to pass phase one, with a maximum static drawdown of 10%.

| Setting                            | Value                                 |
| ---------------------------------- | ------------------------------------- |
| Overall profit target in percent   | 8.1                                   |
| Overall loss limit in percent      | 10                                    |
| Reference mode                     | Equity                                |
| Reference balance                  | 0 (captured automatically at 100,000) |
| Adjust reference on balance change | Enabled                               |
| Pause instead of close             | Disabled                              |

The account now closes all positions as soon as equity reaches 108,100 USD, and it stops trading if equity falls to 90,000 USD. Losing trades along the way are fully counted, so the target only fires when the account is genuinely 8% up in total.

## Per symbol configuration

Next to the account wide values you can add an entry per symbol. A symbol entry is measured on the result of that symbol alone, counted from the moment the reference balance was anchored: the closed trades of that symbol plus the floating result of its currently open positions.

Symbol entries are **additive**, they do not replace the account wide values. Both are evaluated at the same time, and the account wide values still apply to the whole account.

Only these fields are read from a symbol entry:

* Overall profit target in percent and Overall profit target amount
* Overall loss limit in percent and Overall loss limit amount
* Pause instead of close

The percentages of a symbol entry are still measured against the account wide reference balance, so 2% on XAUUSD means 2% of your starting balance made on XAUUSD.

*Reference mode*, *Reference balance* and *Adjust reference on balance change* are always account wide and are ignored inside a symbol entry.

When a symbol entry fires, only that symbol is affected: its open positions are closed (or kept, if *Pause instead of close* is enabled for that entry) and no new positions are copied for it. Every other symbol keeps trading until the account wide target or limit is reached.

**Example:** the challenge account above additionally wants to stop trading gold after it has lost 2% of the starting balance on gold, while everything else keeps running.

| Symbol | Setting                       | Value    |
| ------ | ----------------------------- | -------- |
| XAUUSD | Overall loss limit in percent | 2        |
| XAUUSD | Pause instead of close        | Disabled |

As soon as XAUUSD has lost 2,000 USD in total, all gold positions are closed and gold is blocked for the rest of the run. The 8.1% target and the 10% limit of the account are unaffected.

## Relation to other features

* [Profit targets](/features/basic-features/profit-targets) remain the right choice when you want a recurring goal per day, week or month.
* [Risk limits](/features/basic-features/risk-limits) remain the right choice for period based drawdown rules, for example a daily loss limit that a prop firm evaluates per trading day.
* [Risk per trade](/features/pro-features/risk-per-trade) works in a similar way but on a **single position**: it limits how much one trade may risk and can also be configured per symbol. The overall target instead looks at the accumulated result of the account (or of one symbol) over the whole run. The two combine well, risk per trade keeps every single trade small while the overall target decides when the run is over.
* [TP/SL Management](/features/pro-features/tp-sl-management) is a different thing: it sets a Take Profit and a Stop Loss in points on each individual copied position. It does not know anything about the overall result of the account.

## Important

The overall target monitors the account from our side and closes the positions when the level is reached. It does not place Take Profit or Stop Loss orders at your broker. The account therefore has to be connected for the target to be evaluated. If you need protection that survives a connection loss, combine this feature with a Stop Loss on the individual positions.


# Max open positions

Once the defined limit is reached, **no new positions will be opened** until existing ones are closed. If the number of open positions ever exceeds the threshold, **any excess will be closed automatically**. You also have the option to apply **symbol-specific limits**.

It's important to note that the system **only tracks active (open) positions**, not pending orders. If multiple orders are submitted at the same time, they may bypass the limit temporarily, as they aren’t recognized as open positions until executed. Once active, however, the limit will be enforced, and any positions exceeding the cap will be **immediately closed**, starting with the most recent.

Additionally, you can enable time-based throttling by setting a maximum number of positions allowed within a specific time window (e.g., 1 position every 120 seconds), which helps control trading frequency during high-activity periods.

<figure><img src="/files/UR5hMJH4gDEuNz1Nvl42" alt=""><figcaption></figcaption></figure>

## Settings

* **Max open positions**: The maximum number of positions that can be open simultaneously. When this limit is reached, new positions will be skipped until existing ones close. Set to 0 to disable this limit.
* **Max positions in time window**: The maximum number of positions allowed to open within the specified time window. For example, setting this to 1 limits opening to 1 position per time window. When multiple orders arrive simultaneously, only the first N positions (based on this value) will be opened; the rest are skipped. Set to 0 to disable time-based throttling.
* **Time window (seconds)**: The duration in seconds for the throttling period. Works together with "Max positions in time window" to control position opening frequency. For example, 120 seconds with 1 max position means only 1 position can be opened every 2 minutes.


# Symbol mapping

{% hint style="info" %}
The system attempts to automatically detect symbol mappings across different platforms. If this process fails, you can contact us for assistance or define the mapping manually as described here.
{% endhint %}

The symbol mapping function allows users to establish a connection between symbols across different trading platforms. This feature is particularly useful when the symbols on the master and slave accounts differ but represent the same financial instrument.

By mapping symbols, the copier ensures accurate trade replication by recognizing equivalent symbols and executing trades accordingly. For example, if EUR/USD is represented as "EURUSD" on the master account and "EUR/USD" on the slave account, the symbol mapping function allows users to link these symbols, enabling seamless trade copying between accounts despite the symbol variations.

To show the current symbol mapping click on button on the copiers list.

<figure><img src="/files/DPofHy1xLkqmQ453kA06" alt=""><figcaption></figcaption></figure>

A new window opens with a list of symbols and their mapping. You can filter to the desired symbol.

{% hint style="info" %}
The column **"Copy from (master)"** always lists the symbols of the **master (source)** account. This is also a quick way to check that your copier runs in the intended direction: if you see the symbols of the account you wanted to copy *to*, the copier was created on the wrong account. See [Copiers](/features/basic-features/copiers#copy-direction-master-and-slave).
{% endhint %}

<figure><img src="/files/ZqXvWOUa82hkzf74YBRK" alt=""><figcaption></figcaption></figure>

If a mapping is missing or wrong go to the **Symbol mapping** page and add a new mapping similar to the example provided.

<figure><img src="/files/TPVRgSYgDaUxPyeV4VRl" alt=""><figcaption></figcaption></figure>

## Settings

* **From symbol:** Specify the symbol name from the source trading platform.
* **To symbol:** Define the corresponding symbol name on the target trading platform.
* **From Broker (Regex):** Set a regular expression pattern to match symbols from the source broker. This allows for flexible matching of symbols based on patterns rather than exact matches
* **To Broker (Regex):** Establish a regular expression pattern to match symbols from the target broker, offering the same flexibility for symbol matching.
* **Priority:** Assign priority levels to symbol mappings. In case of multiple mappings matching a symbol, the priority determines which mapping takes precedence (lower number means higher priority).

{% hint style="info" %}
If you need some help with regex filters we have also [this page](https://docs.metacopier.io/tutorials/regex) with some examples
{% endhint %}

## AI-Assisted Symbol Mapping

### Overview

The AI-Assisted Symbol Mapping feature helps you automatically generate symbol mappings between master and slave accounts using artificial intelligence. This feature is particularly useful when you have missing symbol mappings that prevent proper trade replication between accounts.

### What It Does

When trades are replicated from a master account to a slave account, MetaCopier needs to know how symbols map between the two brokers. For example, "EURUSD" on one broker might be "EURUSD.m" on another. The AI Assistant analyzes the available symbols on both accounts and intelligently suggests the most appropriate mapping.

### How to Access

{% hint style="info" %}
**Important:** The AI Assistant can only map symbols that have been automatically detected as missing by the system. Missing symbols are detected during actual trade replication when a trade cannot be copied due to a symbol mismatch between master and slave accounts.
{% endhint %}

1. Navigate to your project's **Symbol Mappings** section
2. Click the **AI Assistant** button
3. The AI-Assisted Symbol Mapping dialog will open

### Using the AI Assistant

**Step 1: Select the Master Account**

Choose the master account (source) that has missing symbol mappings. The dropdown will only show accounts that have detected missing symbols.

**Note:** The system automatically detects missing symbol mappings when trades fail to replicate due to symbol mismatches.

**Step 2: Select the Missing Symbol**

After selecting a master account, choose which missing symbol you want to map. The dropdown will display all symbols that are currently unmapped for the selected account.

**Step 3: Review the Destination Account**

The "To Account" field automatically displays the slave (destination) account that needs the mapping. This is determined from the account that reported the missing symbol.

**Step 4: Generate AI Mapping**

Click the **AI Map** button to generate an intelligent suggestion. The AI will:

1. Analyze all available symbols on the master account
2. Analyze all available symbols on the slave account
3. Use pattern recognition and trading symbol conventions to suggest the best match
4. Display the suggested mapping in the "Suggested Mapping" field

**Step 5: Create the Mapping**

If you're satisfied with the AI suggestion:

1. Review the suggested mapping displayed in the "Suggested Mapping" field
2. Click **Create Mapping** to save it to your project
3. The mapping will be created with:
   * Source symbol: The missing symbol from the master account
   * Target symbol: The AI-suggested symbol
   * Broker pattern: `.*` (applies to all brokers by default)
   * Priority: 100


# Telegram

Receive instant updates on your trades directly to your Telegram app for quick and convenient monitoring.

<figure><img src="/files/ju2II4UOomV4mzi81Wqv" alt=""><figcaption><p>Telegram notification settings</p></figcaption></figure>

## Set up steps

1. Open Telegram with the user that you want to receive the notifications
2. Send a `/start` message to our Telegram bot with this link <https://t.me/MetaCopierNotificatorBot> or directly message `@MetaCopierNotificatorBot`
3. In MetaCopier, navigate to your project and access the Telegram menu item
4. Add a new telegram nofitication under your project (you can add later more)
5. Configure the settings as described in the next chapter

## Settings

* **Telegram username:** Enter your Telegram username to receive notifications. You can find your username in the settings (e.g., `@User123`)
* **Log type:** Choose the type of logs you want to receive notifications for, whether it's informational, warnings or just error-related. Details:
  * **INFO**: Receive errors, warnings, and informational logs, such as trade open/close events.
  * **WARN**: Receive errors and warnings
  * **ERROR**: Receive errors only
* **Accounts filter:** Customize which accounts you want to receive notifications for
* **Use alias instead of UUID :** When enabled, account aliases will be used in notifications instead of UUIDs


# Fallback setting

Maintaining a stable connection is our top priority. To ensure reliability, we’ve built multiple layers of redundancy so that in the event of issues such as network disruptions or hardware failures, the service will automatically recover within a few minutes.

When the service is restored, the connection may temporarily switch to a different IP address, which in certain cases (such as with some proprietary trading firms) could potentially violate specific rules.

For this reason, we’ve integrated this feature that allows you to configure how the system behaves during fallback, giving you full control over the recovery process.

## Settings

<figure><img src="/files/O3bztEeayxNbAHqe3ghC" alt=""><figcaption><p>Fallback settings</p></figcaption></figure>

* **Allowed Regions:** Specify a list of regions where the account can be moved in case of an issue. By default, all regions will be used except New York.
* **No Fallback:** Enable this option to disable fallback. The account will remain disconnected until the service is restored. This option is considered only if the account is using a dedicated IP. By default this option is disabled

{% hint style="warning" %}
For prop firms that require strict IP checks, we recommend disabling the fallback (enable the "No fallback" setting) and using a dedicated IP or My Home IP
{% endhint %}

## **Accounts vs Project Level Fallback**

* **Account-Level Fallback**: The feature can be applied to individual accounts, ensuring they are dynamically reassigned to operational regions during issues.
* **Project-Wide Fallback**: When applied to a project, the fallback behavior is inherited by all accounts under that project, streamlining regional failover for multiple accounts.


# Logs

The logs section provides a comprehensive record of all activities and events occurring within the MetaCopier platform. It serves as a detailed audit trail, allowing users to monitor and review various actions, errors, and system events.


# Maintenance window

The Maintenance Window feature allows you to safely pause or stop trading activity during planned maintenance, broker downtime, or strategy updates. It provides full control over when maintenance occurs, which accounts are affected, how copiers behave, and how open positions are handled, all without manual intervention.

When the maintenance window starts, the configured actions are applied automatically. Once the window ends, normal operation is restored automatically.

<figure><img src="/files/4zEHPAN5eh8XeFfuuyqO" alt=""><figcaption><p>Maintenance Window</p></figcaption></figure>

## **Settings**

* **Broker Restriction:** Optionally restrict maintenance to a specific broker using a case-insensitive regex (e.g., `ICMarkets.*` for ICMarkets brokers, or `.*` for all brokers).
* **Start & End Time:** Defines the time range (local timezone) for the maintenance window.
* **Account Type:** Limits the maintenance window to specific account types (e.g., MT4, MT5, DXtrade, etc.), or applies it to all accounts when is empty.
* **Maintenance Action:** Defines how trading activity behaves during maintenance. You can either fully stop accounts or temporarily pause copiers.
* **Close Position Strategy:** Determines how open positions are handled before maintenance start: keep them open, close all, or close only if total profit is positive.

{% hint style="info" %}
If an account is already stopped before the maintenance window begins, it will still be restarted once the maintenance window ends.
{% endhint %}


# Webhook

The **Webhook** feature sends real-time HTTP POST notifications to your endpoint when trading events occur on your accounts. It can be configured at the **account level** (via Features) or at the **project level** (applies to all accounts in the project).

## Key capabilities

* **Events:** Position Opened, Position Closed, History Updated
* **Authentication:** None, HMAC-SHA256 (with optional timestamp for replay protection), or Bearer Token
* **Delivery:** Configurable retries (0–5), retry delay, request timeout, and rate limiting
* **Payload options:** Choose whether to include position details and account metadata
* **Custom headers:** Add up to 10 custom HTTP headers to each request

{% hint style="info" %}
When configured at the project level, the webhook is active for **all accounts** in that project.
{% endhint %}

For a detailed setup guide with client-side implementation examples, see the [Webhook Tutorial](/tutorials/webhook).


# Minimum holding time

This setting defines the minimum number of seconds a copied trade must remain open on the slave account before it can be closed. Even if the master account exits earlier, the slave will hold the position for at least this duration. For example, if set to 30, the slave trade will stay open for 30 seconds regardless of the master’s faster exit. A value of 0 disables the setting.


# Skip position

The **Skip Position** feature allows the copier to exclude positions from being copied if essential risk management parameters are missing. Specifically, it can skip trades that lack a defined Stop Loss (SL), Take Profit (TP), or both, based on the selected logic (`AND` or `OR`). You can also configure symbol-specific rules, which take precedence over the general settings. This helps enforce stricter risk policies and prevent uncontrolled trades on slave accounts.


# Live delay

The **Live Delay** feature lets you control when trades from the master account are copied to follower accounts. It allows you to skip the first few trades and, if desired, automatically reset this skip count after a set time. This **can be useful with grid strategies** if your goal is to **filter out early entries or reduce risk**. However, it may also cause **desynchronization** if the grid depends on every single order being executed.

<figure><img src="/files/2ciESHNv6HQ9WcPlgi54" alt=""><figcaption><p>Live delay feature</p></figcaption></figure>

## Settings

* **Skip orders count:** The number of trades to skip from the master account.\
  \&#xNAN;*Example*: If set to **3**, the first three trades will be ignored, and only the following trades will be copied. A value of **0** disables this feature.
* **Reset interval (minutes):** The time period (in minutes) after which the skip count resets. The timer starts from the last trade opened.\
  \&#xNAN;*Example*: If set to **120**, the skip count resets every 120 minutes from the last trade. A value of **0** disables this feature. The maximum allowed value is **1440 minutes** (24 hours).
* **Track by direction:** If enabled, BUY and SELL orders are tracked separately. For example, if skipOrdersCount is 3, the first 3 BUY orders AND the first 3 SELL orders will be skipped (6 total). If false (default), direction is ignored and the first 3 orders are skipped regardless of direction.
* **Reset on position close:** If true, the skip counter resets automatically when a copied position closes. For example, if skipOrdersCount is 1, order 1 is skipped, order 2 is copied, and when order 2 closes, the counter resets so the next order will be skipped again. This can be used with resetIntervalMinutes=0 to disable time-based reset and only reset on position close.
* **Add symbol configuration:** Create custom settings for specific trading symbols.

{% hint style="info" %}
To manually reset the interval, remove the live-delay feature from the copier and then add it again
{% endhint %}


# Block hedging

The **Block Hedging** feature prevents the copier from opening a position when the slave account already has an open position with the same symbol but in the opposite direction (BUY vs SELL). This is particularly useful for prop firms that prohibit hedging, ensuring your account stays compliant with their rules.

When enabled, if the slave account holds a BUY position on a symbol and the master account opens a SELL position on the same symbol (or vice versa), the copier will skip that trade instead of opening a hedged position.

<figure><img src="/files/J97jRVqj5BDnY2iCutTP" alt=""><figcaption></figcaption></figure>

## Settings

* **Block hedging:** If set to true, the copier will skip opening a position when the slave account already has an open position with the same symbol but in the opposite direction. Default value is `true`.


# Spread Filter

The **Spread Filter** feature blocks the copy of new positions when the current spread of the symbol exceeds a configured threshold at the moment the open is detected. This protects slave accounts from being filled at unfavorable conditions caused by short-lived spread widening (news, rollover, low-liquidity sessions, broker quote anomalies).

The filter applies **to position opens only**. Closes, partial closes, and SL/TP modifications are **always copied** regardless of the spread, so the slave is never left holding a position the master has already exited.

If the measured spread exceeds the threshold, the open is **blocked** and written to the copier log (symbol, master ticket, measured spread, configured mode and threshold). By default the blocked open is dropped immediately. If the spread filter's **Retry on block** setting is enabled, the open is treated as a failed open and re-evaluated through the copier's existing **Open retry** / **Open retry timeout** mechanism: the spread is re-checked on each retry and the open is copied as soon as it comes back under the threshold, or definitively dropped when the open-retry timeout elapses.

## How It Works

When a new master position is detected, MetaCopier:

1. Reads the current bid/ask of the symbol from the configured **source account** (master by default, optionally the slave) and computes the spread.
2. Compares it to the configured threshold (global or per-symbol).
3. If the spread is **within** the threshold, the open is copied normally.
4. If the spread **exceeds** the threshold, a log entry is written. If **Retry on block** is off (default), the open is dropped immediately. If **Retry on block** is on and the copier has **Open retry** enabled, the open is re-attempted (and the spread re-checked) until it passes or the **Open retry timeout** elapses.

## Threshold Modes

Each symbol (and the global default) defines how the threshold is interpreted:

* **Points**: an absolute spread limit in broker points. *Example:* `30` on EURUSD means the open is blocked if the spread on the source account is greater than 3.0 pips.
* **Percentage of price**: the spread limit expressed as a percentage of the current symbol price (`spread / price × 100`). The limit scales automatically with the instrument's price level, which is convenient for symbols where the price moves over a wide range (e.g. indices, metals, crypto). *Example:* `0.05` on XAUUSD at a price of `2,400` means the open is blocked if the spread exceeds `1.20` (= 0.05% × 2,400).

## Settings

* **Mode**: How the threshold is interpreted (`Points` or `Percentage of price`). Can be overridden per symbol.
* **Threshold**: The global spread limit applied to all symbols that do not have a per-symbol override. A value of `0` disables the global filter.
* **Source**:
  * **Master** (default): The spread is read from the master account's symbol at the moment the open is detected. This is the typical use case - filtering out trades opened during abnormal market conditions on the source signal.
  * **Slave**: The spread is read from the slave account's mapped symbol just before sending the copied open. This protects the slave from poor execution conditions on its own broker (e.g. a slave broker with significantly wider spreads than the master) but adds an extra tick lookup per copied open.
* **On missing price**: Defines what to do when the bid/ask of the symbol is not available on the source account at the time of the check (no recent tick, symbol not subscribed, market closed, broker quote feed temporarily missing). The spread can't be measured in that case, so a decision has to be made:

  * **Allow** (default): Let the open through and copy it normally (fail-open). Missing data is treated as "no evidence of an abnormal spread", which avoids dropping trades just because of a momentary tick gap.
  * **Block**: Drop the open the same way as a threshold violation (fail-closed). Recommended when the filter is used as a hard guard (e.g. prop firm or HFT setups) where copying without a measurable spread is unacceptable.

  In both cases the event is written to the copier log.
* **Retry on block**: Whether a spread-blocked open should be re-evaluated through the copier's existing open-retry mechanism instead of being dropped immediately.
  * **Off** (default): A blocked open is dropped right away, even if the copier has **Open retry** enabled. This keeps spread blocks decoupled from transport-error retries.
  * **On**: A blocked open is treated as a failed open. The copier-wide **Open retry** flag must also be enabled - otherwise nothing is retried. The spread is re-checked on each retry attempt; the open is copied as soon as it passes or definitively dropped when **Open retry timeout** elapses.
* **Per-symbol configuration**: Optionally define a different mode and threshold per symbol. Symbol-specific rules always take priority over the global setting. This is useful because spreads differ drastically between asset classes (e.g. tight on majors, wide on exotics and indices).

{% hint style="info" %}
The spread filter does not introduce its own retry timeout. When **Retry on block** is enabled, the retry window comes from the copier's **Open retry timeout** setting (see the **Copiers** section). Both **Retry on block** and copier-wide **Open retry** must be on for a spread-blocked open to be retried.
{% endhint %}

{% hint style="info" %}
The Spread Filter affects **opens only**. If the master closes or modifies SL/TP on a position, those events are always copied regardless of the current spread - the slave will never be left holding a position the master has already exited.
{% endhint %}


# Trade cooldown

The **Trade cooldown** feature blocks the copy of a new position on a symbol for a configurable amount of time after a previous copied trade on the **same** (or a **correlated**) symbol was opened or closed. It is designed to help you comply with prop-firm **"trade idea"** rules, most notably **FTMO's 1-hour rule**, where any new position opened within one hour of a previous trade on the same or a correlated symbol (in the same direction of exposure) is still treated as a continuation of the same trade idea.

The filter applies **to market-order opens only**. Pending orders (limit/stop) are never blocked, and closes, partial closes, and SL/TP modifications are **always copied** regardless of the cooldown, so the slave is never left holding a position the master has already exited.

When a new market open is blocked, the event is written to the copier log (symbol, master ticket, remaining cooldown time).

## How It Works

1. When a copied position is **opened** or **closed** on the slave, MetaCopier records the moment (the *anchor*) for that symbol on that copier.
2. When a new master position on the same symbol is detected, MetaCopier checks how long ago the anchor was recorded.
3. If the elapsed time is **less than** the configured cooldown, the open is **blocked** and logged.
4. If the cooldown has already elapsed (or none was recorded), the open is copied normally.

The cooldown is tracked per copier and survives node restarts.

## Settings

* **Cooldown (minutes):** How long, after the anchor event, new market opens on the symbol are skipped.\
  \&#xNAN;*Example*: If set to **60**, once a copied trade on EURUSD is closed, any new EURUSD open within the next 60 minutes is skipped. A value of **0** disables the feature. The maximum allowed value is **1440 minutes** (24 hours).
* **Cooldown anchor:** Whether the cooldown window is measured from the previous copied position's **close** (FTMO's literal rule, default) or its **open**.
* **Track by direction:** If enabled, BUY and SELL are tracked separately, so only a new open in the **same direction** as the anchored position is blocked (matching FTMO's "same direction of exposure" wording). If disabled (default), **both** directions are blocked during the cooldown, which is the safest choice.
* **Correlation mode:** How a "correlated symbol" is resolved.
  * **Same symbol only** (default): The cooldown applies only to the exact symbol that triggered it.
  * **Custom groups:** Symbols you group together are treated as one trade idea. A cooldown started by any member of a group also applies to the other members.
* **Correlation groups:** Only used with **Custom groups**. Enter one group per line, with the symbols separated by commas, for example `US30, US500, NAS100` on one line and `USOIL, UKOIL` on another. Closing a trade on any symbol in a group starts the cooldown for the whole group. This is the reliable way to express non-FX correlation (indices, oil, crypto) and cross-asset groups. Use the **slave-side** symbol names (the names as they appear on the account the trades are copied to). If your slave broker uses different symbol names than the master, enter the slave names here, otherwise the group will not match.
* **Add symbol configuration:** Optionally define a different **Cooldown (minutes)**, **Cooldown anchor** and **Track by direction** for specific symbols. The **Correlation mode** and **Correlation groups** are always taken from the top-level configuration, since they define how symbols are grouped across the whole feature.

{% hint style="info" %}
The Trade cooldown affects **market opens only**. Pending orders are never blocked, and closes or SL/TP modifications are always copied regardless of the cooldown, the slave will never be left holding a position the master has already exited.
{% endhint %}

{% hint style="info" %}
FTMO enforces the "trade idea" rule as a **risk-aggregation** rule (several entries within an hour share the same 1% risk budget) rather than an outright ban. Using a cooldown that skips re-entries within the window is a simple, deterministic way to stay compliant.
{% endhint %}


# Scheduled close & reopen

The **Scheduled close & reopen** feature closes the open positions of an account at defined times and, if you want, opens them again later. Typical use cases are closing everything before the weekend and reopening on Monday, closing overnight to avoid swap and gap risk, or flattening the account before a daily broker rollover.

You can define **several schedules**, each with its own close time, its own optional reopen time and its own active weekdays. Every schedule can also be configured **per symbol**, so you can, for example, close gold every evening while leaving the FX positions untouched.

All times are interpreted in **UTC**.

## How It Works

1. At the **close time** of an active schedule, MetaCopier closes the open positions of the account (optionally including pending orders) and remembers what was closed: symbol, direction, volume, stop loss, take profit and close price.
2. If a **reopen time** is configured, the schedule stays armed until then and the positions are opened again with the stored volume and direction. With **Restore stop loss and take profit** the original SL/TP are applied again.
3. If **no reopen time** is configured, the positions are only closed, and new trades are blocked for a short grace period so the copier does not immediately reopen what was just closed.
4. The state is persisted, so a restart of the node does not lose the armed reopens. If the node was offline over the close time, the close is caught up as soon as it is online again while the schedule is still running.
5. Armed reopens expire after **24 hours**. If the reopen could not be executed within that window, the entry is discarded.

## Settings

* **Enabled:** Master switch. If it is off, no schedule is evaluated, not even the ones defined per symbol, and pending reopens are discarded.
* **Schedules:** The list of close and reopen definitions. Each entry has:
  * **Enabled:** Turns this single schedule off without deleting it.
  * **Label:** A free text name, for example `Weekend` or `Overnight`. It is only used for display and in the logs.
  * **Close time (UTC):** The time of day at which the open positions are closed.
  * **Reopen:** If disabled, the positions are only closed and never opened again by this schedule.
  * **Reopen time (UTC):** The time of day at which the closed positions are opened again.
  * **Reopen day offset:** How many days after the close day the reopen happens, `0` to `7`. Use `0` for an overnight schedule (close 21:00, reopen 07:00 the next morning is detected automatically) and `2` for a Friday close with a Sunday reopen.
  * **Active days:** The weekdays on which the close is executed. Leave the selection empty to run the schedule every day.
  * **Skip new trades until reopen:** While the schedule is running, the copier does not open new positions on the affected symbols. Without it the copier would immediately copy a new master trade into the window you just closed.
* **Include pending orders:** Pending orders are deleted at the close time and placed again at the reopen time with the same price.
* **Restore stop loss and take profit:** The stop loss and take profit of the closed position are applied again on the reopened one.
* **Only close positions in profit:** Only positions whose result including swap and commission is above zero are closed. Losing positions stay open.
* **Only close positions with negative swap:** Only positions that actually cost swap are closed, positions that earn swap stay open. This is the usual setting for an overnight schedule.
* **Max loss to close (points):** A position that is further than this many points in loss is left open instead of being closed at a bad price. `0` disables the check.
* **Max reopen slippage (points):** If the price moved further than this from the close price, the position is not opened again. This protects you from reopening into a large weekend gap. `0` disables the check.
* **Skip reopen if the master closed:** For copied positions, if the master closed its position in the meantime, the position is not reopened. This only applies to positions that came from a copier.
* **Add symbol configuration:** Define a completely separate configuration for a single symbol.

## Symbol configurations

A symbol entry **replaces the whole configuration** for that symbol, it is not merged field by field with the global one. Everything a symbol entry needs, including its own schedules and its own close and reopen options, has to be set inside that entry.

If you want the feature to be active **only for specific symbols**, leave the global **Schedules** list **empty** and add the symbols you want below. All other symbols then have no schedule and are never touched.

{% hint style="info" %}
Do not use **Enabled** to achieve "only for one symbol". **Enabled** is a master switch and an emergency stop: switching it off also discards the reopens that are already armed. Use an empty global schedule list instead.
{% endhint %}

{% hint style="info" %}
All times are **UTC**, not broker time and not your local time. If your broker server runs on GMT+3, a broker-time close at 23:00 corresponds to 20:00 UTC.
{% endhint %}

{% hint style="warning" %}
Reopening a position always happens at the current market price. Volume, direction and, if enabled, stop loss and take profit are restored, but the entry price will differ from the original one. Use **Max reopen slippage (points)** to limit how far the price may have moved before the reopen is skipped.
{% endhint %}


# Pro features

Welcome to the pro features of MetaCopier, where smart tools help you take your trading to the next level. Our Pro Features are built for traders who want more control, flexibility, and accuracy.

Pick a feature below to read its detailed documentation.

{% hint style="info" %}
**Scope legend**: every feature can be added at a specific level:

* **`Account`**: added on an account; applies to every copier of that account.
* **`Copier`**: added on a specific copier (master → slave link); only affects that link.
* **`Account & Copier`**: can be added at either level; the copier-level setting overrides the account-level one for that copier.
  {% endhint %}

## Account-level features

Added on an account; applies globally to that account.

* [**Dedicated IP**](/features/pro-features/dedicated-ip) `Account`: An IP address reserved exclusively for your accounts. The feature itself is part of the Basic plan, only the dedicated IP **pool** requires Pro.
* [**Keep alive trade**](/features/pro-features/keep-alive-trade) `Account`: Prevents account inactivity by scheduling small keep-alive trades.
* [**HFT mode**](/features/pro-features/hft-mode) `Account`: Minimizes execution latency for high-speed trading strategies.
* [**Socket**](/features/pro-features/socket) `Account`: Keeps your account connected in real time for instant updates.
* [**Data collector**](/features/pro-features/data-collector) `Account`: Records equity, balance, and floating P\&L over time.
* [**Trade Guardrails**](/features/pro-features/trade-guardrails) `Account`: Automatically enforces safety rules on open trades.
* [**TradingView Webhook**](/features/pro-features/tradingview-webhook) `Account`: Execute trades automatically from TradingView alerts.
* [**Telegram Signal Integration**](/features/pro-features/telegram-signal-integration) `Account`: Automatically execute trading signals received on Telegram.
* [**News protection**](/features/pro-features/news-protection) `Account`: Close open positions before a scheduled economic release and optionally reopen them afterwards.

## Copier-level features

Added on a specific copier; only affects that master → slave link.

* [**TP/SL Management**](/features/pro-features/tp-sl-management) `Copier`: Full control over how Take Profit and Stop Loss are handled on copied trades.
* [**Progressive trade sizing**](/features/pro-features/progressive-trade-sizing) `Copier`: Automatically increases lot size after losing trades (Martingale-style).
* [**Approval**](/features/pro-features/approval) `Copier`: Manually review and approve each trade before it is copied.
* [**Delayed execution**](/features/pro-features/delayed-execution) `Copier`: Adds a configurable random delay before opening or closing trades.
* [**Masaniello**](/features/pro-features/masaniello) `Copier`: Advanced money-management system that calculates the optimal position size.
* [**Margin Cap**](/features/pro-features/margin-cap) `Copier`: Limits the percentage of account balance used as margin across open positions.
* [**News filter**](/features/pro-features/news-filter) `Copier`: Block copying new positions around scheduled economic releases.
* [**Loss-Protected Exit**](/features/pro-features/loss-protected-exit) `Copier`: Do not replicate a master close while the slave position is in loss, optionally moving the Take Profit to breakeven instead.

## Account & copier features

Can be added at either level. When set on both, the copier-level setting wins for that copier.

* [**Trading windows**](/features/pro-features/trading-windows) `Account & Copier`: Schedule exactly when trades can be opened and closed.
* [**Trailing stop**](/features/pro-features/trailing-stop) `Account & Copier`: Automatically updates the stop-loss as a position gains profit.
* [**Break Even**](/features/pro-features/break-even) `Account & Copier`: Moves the stop-loss to entry price once a profit threshold is reached.
* [**Risk per trade**](/features/pro-features/risk-per-trade) `Account & Copier`: Controls the monetary risk exposure for each individual trade.

## Related

* [Risk per trade: Tick value](/features/pro-features/risk-per-trade/risk-per-trade-tick-value)


# Dedicated IP

{% hint style="warning" %}
This feature is **NOT** calculated as part of the Pro features: it has a separate cost.
{% endhint %}

A **Dedicated IP** is an IP address reserved exclusively for your use. It is not shared with other users, which helps avoid issues that can occur with shared access. Each Dedicated IP costs **$6 per month**. You can purchase one or more based on your needs and assign them to your trading accounts. This is especially useful if you manage multiple accounts or need a consistent connection for compliance or operational reasons.

{% hint style="warning" %}
Dedicated IPs are billed **monthly, not daily**, and the amount is never prorated. The cycle follows the **calendar month**, so every IP you still hold is charged again on the 1st. An IP ordered on the 28th costs the full $6 for that month, and if you release an IP and order another one within the same month, both are charged.
{% endhint %}

{% hint style="info" %}
This feature doesn't require a Pro account because the fee is already covered with the order of the dedicated IP. It can also be used with both Basic and Pro accounts.
{% endhint %}

{% hint style="info" %}
An alternative to the Dedicated IP is the [My Home IP](/tutorials/my-home-ip) feature. The purpose is the same, but the difference is that you provide your own IP, either from your home connection or through a VPS.
{% endhint %}

## **How to Use a Dedicated IP**

1. Choose the region (or multiple regions) where your accounts are located.
2. Select the number of IPs you want to purchase.
3. Click **Save** to place your order.

<figure><img src="/files/qxx6HQh5BdJQ3QjOXrUm" alt=""><figcaption></figcaption></figure>

4. Go to your account overview.
5. Click on the **Features** button.
6. Add the **Dedicated IP Pro** feature.

<figure><img src="/files/sPxgFWVYgbcBPh98BCnA" alt=""><figcaption></figcaption></figure>

7. Select the correct region from the list.
8. Click **Save** to confirm.

For simplicity, the system displays an ID instead of the actual IP address.

<figure><img src="/files/u1xR09BGOt2kySTVS6B3" alt=""><figcaption></figcaption></figure>

* You can use the same dedicated IP for multiple accounts.\
  In this case, the **Usage** field will increase depending on how many accounts are linked to it.
* Depending on the platform or account type, the proxy will use either:
  * an IPv4 address (x.x.x.x) or
  * an IPv6 address (x:x:x:x:x:x:x:x)
* The IP address is shown in the account overview under the **Proxy** label (hover with your mouse).

<figure><img src="/files/vye4qqo7qifJlkxiCQ0x" alt=""><figcaption></figcaption></figure>

## Limitations

* If you require **more than 20 Dedicated IPs within a single region**, please reach out to our support team. We can manually review your request and increase the limit to meet your operational needs.
* Using a Dedicated IP may introduce a **slight increase in latency** due to the additional routing layer. For most users, especially those employing **swing trading, day trading, or scalping strategies**, this added latency is negligible and does not impact performance. However, if you rely on **high-frequency trading (HFT)**, where execution speed is critical, we strongly recommend **testing the setup in a demo environment** first. This ensures you can evaluate performance and make an informed decision before committing real capital.
* Please be aware that, although rare, there may be instances where our infrastructure provider **revokes an assigned IP address**. In such cases, we will automatically assign you a **new Dedicated IP** to ensure uninterrupted service. While we strive to maintain long-term continuity, these changes are beyond our direct control.


# TP/SL Management

{% hint style="warning" %}
To use this feature, you must enable **'Copy Stop Loss'** and/or **'Copy Take Profit'** in the copier.
{% endhint %}

The **TP/SL Management** feature gives you complete control over how Take Profit (TP) and Stop Loss (SL) values are handled on copied trades. This feature is highly customizable, allowing you to set fixed TP/SL values, adjust them dynamically, or remove them entirely, depending on your trading strategy.

<figure><img src="/files/RyadLR2VdpETFERzP3F0" alt=""><figcaption></figcaption></figure>

## Settings

{% hint style="info" %}
The standard behavior of the copier is to keep the slave accounts fully synchronized with the master account. Therefore, when a position is closed on the master account, it is also closed on the slave accounts.

If you want to override the TP/SL values on the slave accounts, it is important to also enable the [**Exit Signal Override**](/features/basic-features/exit-signal-override) feature. When this option is enabled, positions on the slave accounts will use their own exit logic, regardless of what happens on the master signal.
{% endhint %}

* **Fixed TP / SL (in points):** Sets a fixed Take Profit and/or Stop Loss distance for all copied trades, regardless of the master trade values.
* **Additional TP / SL (in points):** Adds or subtracts points from the existing TP or SL of the master trade. This is useful for adding extra safety or complying with prop firm rules.
* **Remove TP / SL:** Removes the Take Profit and/or Stop Loss from copied trades on the slave account. Useful if exits are managed manually or by another strategy.
* **Adjust with Master Distance:** Applies the same distance from the entry price as used on the master trade. *Example:* If the master TP is 500 points away from entry, the slave TP will also be set 500 points away.
* **Lock TP / SL:** Locks the Take Profit and Stop Loss after the trade is opened on the slave account.\
  This prevents any later changes from the master account.
* **Master TP/SL Priority:** When enabled, the master account's TP/SL values take priority over the configured fixed TP/SL values. The fixed values are only applied as a fallback when the master has no TP/SL set. If the master later adds TP/SL, the slave accounts will be updated accordingly.
* **Block Trade Without TP/SL:** When enabled, trades will not be opened on slave accounts if no TP/SL is available (neither from the master nor from configured values). This is especially important for prop firm accounts where every trade must have a TP/SL.
* **Per-Symbol Configuration:** Allows different TP and SL rules to be defined for specific trading symbols. Symbol-specific rules always override global settings.


# Keep alive trade

The **Keep Alive Trade** Pro Feature is made to help prevent your account from being closed due to inactivity. It's especially useful for keeping **demo accounts active** or staying **compliant during prop firm challenges**.

When there are no trades from your main strategy, this feature will automatically open a small trade just to keep the account active. The trade uses the **smallest possible lot size (usually 0.01)** and is **closed again as soon as possible**, so it only affects the **minimum possible amount (typically just the broker fee)**.

<figure><img src="/files/TQCZJUIveqxKqQtr2Bxk" alt=""><figcaption><p>Keep alive trade options</p></figcaption></figure>

## Settings

* **Symbol**: The trading symbol refers to the specific financial instrument (such as a currency pair, stock, or commodity) on which the keep-alive trades will be executed.
* **Close after:** Specify how long the position should remain open, in seconds. (Default: 0 seconds, which means the position closes immediately.)
* **Cron expressions**: Cron expressions are used to schedule the timing and frequency of the keep-alive trades. These expressions define the exact moments when the trades will be executed, based on a recurring schedule. In the example above it will be executed every week on Wednesday at 8:30 AM (UTC). Multiple cron expressions are possible. Please refer also to our [cron expression examples and documentation](/tutorials/cron-expressions).

{% hint style="info" %}
Make sure the cron expression is correct; otherwise, the system will not open the position.
{% endhint %}


# Progressive trade sizing

The Progressive Trade Sizing feature automatically adjusts the trade size on the slave account if previous trades resulted in a loss (a strategy also known as Martingale). Here's a simple explanation:

1. The copier looks at recent trades on the **slave account** and groups them by symbol (e.g., XAUUSD, BTCUSD).
2. If the latest trade for a symbol had a loss, the Progressive Trade Sizing will kick in.
3. It will increase the lot size for the next trade by applying a multiplier to the **slave account's actual lot size from the first losing trade** in the streak (default multiplier is 2).
4. If the next trade is profitable, the system will reset after the configured number of cycles, and the process will start over if another loss occurs.

{% hint style="info" %}
The progressive multiplier is applied to the **slave account's actual traded lot size**, not the master account's lot. This ensures risk management stays aligned with the slave account where you control the sizing.
{% endhint %}

## Settings

<figure><img src="/files/4fmAzQBLNsCxVwS7achS" alt=""><figcaption><p>Progressive Trade Sizing settings</p></figcaption></figure>

* **Look back in days**: This setting controls how many days of past trades the copier should analyze (range: **1–7 days**). For example, if it's set to 5 days, it will only look at trades within the last 5 days to decide if Progressive Trade Sizing should be applied. **Trades placed before enabling this feature are not taken into consideration.**
* **Multiplier**: This is the factor by which the trade size increases after a loss (range: **0.001–999.999**, default: **2.0**). For example, if the multiplier is set to 2, the trade size will double after a loss.
* **Limit levels**: This sets the maximum number of times the trade size can increase (range: **1–100**, default: **3**). For example, if it's set to 3 levels, the trade size can only be multiplied 3 times after consecutive losses. Once the limit is reached, the lot size is capped at `base lot × multiplier^limitLevels` until the streak resets.
* **Cycles**: The number of consecutive profitable trades at the elevated level required before the trade volume resets to the base size (range: **1–10**, default: **1**). For example, if set to 2, you need 2 consecutive winning trades at the multiplied level before it drops back to the original lot size. Default is 1, meaning a single winning trade resets immediately (original behavior).
* **Last loss greater than (%)**: This setting defines the minimum percentage loss (relative to the account balance) that triggers the Progressive Trade Sizing (range: **0.00–100.00%**, default: **0%**). For example, if it's set to 1%, the trade size will only increase if the last trade had a loss greater than 1% of the account balance. Losses below this threshold are **ignored entirely** - they neither count toward the losing streak nor reset it.


# Trading windows

The **Trading Windows** feature lets you schedule exactly when trades can be opened and whether any open trades should be closed outside these scheduled times.

## Overview

You can create one or more “windows,” each defined by the following:

* A **Start Time** and **End Time** in **UTC (Coordinated Universal Time)**. If you're not familiar with UTC, you can use this link to convert from your local time zone: <https://dateful.com/convert/utc>
* An optional set of **Active Days** (e.g., Monday through Friday)

Trades are only allowed to open during these windows, unless otherwise specified. You can also choose whether to automatically close any open trades when a window ends.

## Configuration Options

1. **Close Open Trades After Window Ends**
   * If switched on, any trades still open when a window finishes will be closed immediately (e.g., at 16:00 if your window ends at 16:00).
2. **Temporarily skip until next window**
   * This option is only applicable to copiers.
   * When trades occur outside a window and this setting is on, they’re queued up to be opened automatically at the start of the next window. If it’s off, those outside trades are simply ignored.
3. **Symbol-Specific Settings**
   * If you want different schedules for different symbols (e.g., EUR/USD vs. GBP/USD), you can create separate configurations for each symbol. Symbol-specific settings override any general settings.
4. **Copier vs. Account**
   * If you’re running multiple “copiers” under the same account, each copier can override the account-wide schedule. That means the copier’s windows apply to trades it places, rather than the account-wide schedule.

## How It Works

### When a Window Ends

If **Close Open Trades After Window Ends** is enabled and the clock passes your end time, any positions still open are immediately closed. For example, if your window is 09:00–17:00 on weekdays, any open positions at **17:00** are closed.

### Opening New Trades

* **Inside Window**: Trades open as normal.
* **Outside Window**:
  * **Temporarily skip until next window** = ON means those trades wait until the next scheduled window.
  * If that’s OFF, then those trades are ignored permanently.

### Active Days

Each window can be active on specific days (e.g., Monday through Friday). If it’s not set, the window applies every day. For example, a window with **Start Time** = 00:00, **End Time** = 23:59, **Active Days** = Monday–Friday means trading is allowed 24 hours a day during weekdays, but stops on weekends (Saturday, Sunday).

## Example Scenario

You define:

* **Close Open Trades After Window Ends**: ON
* **Temporarily skip until next window**: ON
* **Window**: Start Time 08:00, End Time 16:00, Active Days = Monday–Friday

**Result:**

* Any trade that tries to open after 16:00 (or before 08:00) waits until the next weekday at 08:00.
* If a position is still open when you pass 16:00, it’s closed automatically.
* No trading occurs overnight or on weekends.


# Trailing stop

## Overview

A **Trailing stop** automatically updates your stop-loss level as a position gains profit. Once the trade reaches a specific **activation threshold**, the stop-loss will follow the price at a specified distance (or step), ensuring you lock in profits without needing to manually update your stop-loss each time.

By using a Trailing stop, you can:

* **Protect Gains**: Secure partial profits as the market moves in your favor.
* **Limit Risk**: Prevent placing a stop-loss too close, avoiding premature exits.
* **Automate Risk Management**: Reduce the need for constant monitoring and manual adjustments.

<figure><img src="/files/YQTkDtVJUkdNdeoiHLAo" alt=""><figcaption><p>Trailing Stop</p></figcaption></figure>

{% hint style="warning" %}
You have to use this feature at the correct level:

* For a master account or an account where you place trades manually, you have to set it at the account level.
* For an account that receives trades through a copier (such as a slave account), you have to set it on the copier.
  {% endhint %}

{% hint style="info" %}
We use points rather than pips for our break even and trailing stop functions because points provide a consistent, absolute measure of price movement across different assets. This approach simplifies setting stop levels since points represent a fixed unit regardless of an asset’s decimal format.

*Examples:*

* **XAU/USD (Gold):**\
  One pip is typically 0.10 (10 cents). So a 40-pip movement equals 4.0 points. Using points standardizes the stop level regardless of the pip value.
* **EUR/USD:**\
  One pip is generally 0.0001. In pairs quoted with four decimals, 1 pip equals 1 point, so a 40-pip move equals 40 points.
  {% endhint %}

## How It Works

* **Initial Stop Loss (optional):** Set an initial stop loss in points from the entry price. A value of **0** means no stop loss will be applied until the trailing logic activates.
* **Activation Threshold (points):** The number of points in profit needed before the trailing stop kicks in. The position has to exceed this profit threshold for trailing adjustments to begin.
* **Activation Threshold (percent):** Defines the activation threshold as a percentage of the take profit. For example, if TP is 1000 points and this is set to 50, trailing stop activates at 500 points profit. A value of 0 means this activation method is deactivated. Requires TakeProfit to be set on the trade. If both `activationThresholdPoints` and `activationThresholdPercentage` are active (>0), the maximum (most conservative) value will be used.
* **Trailing Step (points):** Defines how much the stop-loss moves each time the price moves further in your favor. For example, if your trailing step is 10 points, every time the price advances by 10 additional points, the stop-loss will shift accordingly. A value of 0 means this method is deactivated.
* **Trailing Step (percent):** Defines the trailing step as a percentage of the take profit. For example, if TP is 1000 points and this is set to 10, the trailing step equals 100 points. A value of 0 means this method is deactivated. Requires TakeProfit to be set on the trade. If both `trailingStepPoints` and `trailingStepPercentage` are active (>0), the maximum (most conservative) value will be used.
* **Minimum Distance:** Prevents the stop-loss from getting too close to the market price (which might trigger early). This sets a buffer to avoid tight stops.
* **Symbol-Specific Overrides:** You can configure each symbol with its own **initialStopLossPoints**, **trailingStepPoints**, **trailingStepPercentage**, **minimumDistancePoints**, **activationThresholdPoints** or **activationThresholdPercentage** if you need a different approach for each instrument.

{% hint style="info" %}
**Why use percentages on slave / portfolio accounts?**

When the same trailing stop configuration is applied across positions of very different sizes (e.g., a portfolio of slave accounts receiving trades with different Take Profit levels), a fixed value in points is rarely appropriate for all of them. Using `activationThresholdPercentage` and `trailingStepPercentage` lets you express both the activation threshold and the trailing distance as a fraction of each trade's own Take Profit distance, so the trailing stop scales automatically with the size of each trade. Points and percentages can also be combined: when both are set (>0), the most conservative (larger) value is used.
{% endhint %}

## Configuration

### Enabling the Feature (Account-Level)

1. Navigate to your **Account** settings in MetaCopier.
2. Locate the **Features** section and click **Add Feature** (or edit if already existing).
3. Select **Trailing stop** from the feature options (or use the feature ID if you configure via API).
4. Enter your desired values:
   * **Initial Stop Loss Points**
   * **Trailing Step Points** and/or **Trailing Step Percentage**
   * **Minimum Distance Points**
   * **Activation Threshold Points** and/or **Activation Threshold Percentage**
5. Click **Save** to apply changes.

### Enabling the Feature (Copier-Level)

1. Go to **Copiers** under the selected account.
2. Open the **Features** list for the chosen copier.
3. Either create or edit a **Trailing stop** feature.
4. Fill in the fields (same as above) and **Save**.

### Per-Symbol Configuration

1. If you want to **override** any of the above settings on a symbol-by-symbol basis, you can add **symbol-specific** entries under the **Symbols Configuration** section.
2. Click **Add Symbol Configuration** and specify:
   * **Symbol** (e.g., `EURUSD`)
   * **Initial Stop Loss Points**
   * **Trailing Step Points** and/or **Trailing Step Percentage**
   * **Minimum Distance Points**
   * **Activation Threshold Points** and/or **Activation Threshold Percentage**
3. Save your changes. MetaCopier will apply this custom logic **only** to that symbol; all other symbols will use the default account or copier settings.

## Example Use Cases

### 1. Basic Trailing stop (points)

* **Initial Stop Loss Points:** 0 (No stop loss initially)
* **Trailing Step Points:** 10
* **Trailing Step Percentage:** 0 (disabled)
* **Minimum Distance Points:** 20
* **Activation Threshold Points:** 30
* **Activation Threshold Percentage:** 0 (disabled)

**Behavior:** Once the position is **30 points** in profit, the trailing stop sets a stop-loss that **trails** by 10 points (but never moves closer than 20 points from the current price).

### 2. Percentage-based Trailing stop (portfolio / slave accounts)

* **Initial Stop Loss Points:** 0
* **Trailing Step Points:** 0 (disabled)
* **Trailing Step Percentage:** 10
* **Minimum Distance Points:** 20
* **Activation Threshold Points:** 0 (disabled)
* **Activation Threshold Percentage:** 50

**Behavior:** Both the activation threshold and the trailing distance scale with the take profit of each individual trade:

* If a trade has a Take Profit of 1000 points: trailing activates at **500 points** profit (50% of TP) and trails by **100 points** (10% of TP).
* If another trade has a Take Profit of 200 points: trailing activates at **100 points** profit and trails by **20 points**.

This way the same copier-level configuration adapts to every trade size automatically, which is the recommended approach for slave accounts in a live portfolio setup.

### 3. Combined points + percentage

* **Trailing Step Points:** 10
* **Trailing Step Percentage:** 5
* **Activation Threshold Points:** 30
* **Activation Threshold Percentage:** 50

**Behavior:** For each trade, the larger (most conservative) of the two values is used both for the activation threshold and for the trailing step. This is useful when you want a safety floor in points but also want the configuration to scale on trades with larger Take Profit distances.

### 4. Symbol Override

* **Global Setting**
  * **Initial Stop Loss Points:** 50
  * **Trailing Step Points:** 10
  * **Minimum Distance Points:** 20
  * **Activation Threshold Points:** 30
* **Symbol-Specific Override (e.g., EURUSD)**
  * **Initial Stop Loss Points:** 20
  * **Trailing Step Points:** 0
  * **Trailing Step Percentage:** 5
  * **Minimum Distance Points:** 15
  * **Activation Threshold Points:** 0
  * **Activation Threshold Percentage:** 40

In this scenario, **EURUSD** uses a percentage-based configuration to better match its volatility relative to the take profit of each trade, while other symbols use the global points-based settings.


# Break Even

## Overview

A **Break Even** feature automatically sets the stop-loss to the entry price (or slightly in profit) once a position reaches a specified number of points in profit. This ensures you’re **no longer risking your initial capital** if the market reverses while locking in a small profit or minimizing the chance of turning a winning trade into a losing one.

By using Break-even, you can:

* **Protect Profits**: Secure at least the initial investment once the trade is in profit.
* **Limit Risk**: Eliminate your exposure or set a tiny cushion just above break-even.
* **Automate Risk Management**: Reduce the need to monitor positions constantly to move the stop-loss manually.

<figure><img src="/files/D8ZysaYwHM2HaaK2t6DM" alt=""><figcaption><p>Break Even</p></figcaption></figure>

{% hint style="warning" %}
You have to use this feature at the correct level:

* For a master account or an account where you place trades manually, you have to set it at the account level.
* For an account that receives trades through a copier (such as a slave account), you have to set it on the copier.
  {% endhint %}

{% hint style="info" %}
We use points rather than pips for our break even and trailing stop functions because points provide a consistent, absolute measure of price movement across different assets. This approach simplifies setting stop levels since points represent a fixed unit regardless of an asset’s decimal format.

*Examples:*

* **XAU/USD (Gold):**\
  One pip is typically 0.10 (10 cents). So a 40-pip movement equals 4.0 points. Using points standardizes the stop level regardless of the pip value.
* **EUR/USD:**\
  One pip is generally 0.0001. In pairs quoted with four decimals, 1 pip equals 1 point, so a 40-pip move equals 40 points.
  {% endhint %}

## How It Works

1. **Trigger in Points:** The profit threshold (in points) at which the Break Even logic activates. When the position moves this far into profit, the stop-loss automatically shifts to reduce/eliminate your risk.
2. **Stop Loss in Points:** The exact stop-loss placement (in points from the entry price) once Break Even is triggered. A typical setup is to place the stop-loss **exactly at** the entry price or **a few points** above/below it to ensure a tiny buffer in profit.
3. **Reverse (legacy toggle):** If enabled and no dedicated reverse fields are set, the break-even logic operates in reverse using the Trigger/Stop Loss values above. When the dedicated reverse fields below are configured, this toggle is ignored.
4. **Reverse Trigger in Points:** The number of points the trade must move **against** the position (in loss) to trigger the reverse break-even. When set together with **Reverse Stop Loss in Points**, both normal and reverse break-even run **simultaneously** on the same position. Leave empty to disable.
5. **Reverse Stop Loss in Points:** The distance in points from the entry price at which the **take profit** will be placed after the reverse break-even is triggered.
6. **Symbol-Specific Settings:** You can configure Break Even settings on a **per-symbol basis**, ensuring that more volatile instruments or special cases have tailored values.

{% hint style="info" %}
**Simultaneous Mode:** You can now run both normal break-even (move SL when in profit) and reverse break-even (move TP when in loss) at the same time on the same slave/account. Simply configure the dedicated **Reverse Trigger in Points** and **Reverse Stop Loss in Points** fields alongside the normal trigger and stop loss values.
{% endhint %}

## Configuration

### Enabling the Feature (Account-Level)

1. In MetaCopier, navigate to your **Account** and open **Features**.
2. Click **Add Feature** (or edit an existing one) and choose Break Even.
3. Configure:
   * **Trigger in Points** (e.g., `30`)
   * **Stop Loss in Points** (e.g., `20`)
4. Click **Save** to apply the feature to the account.

### Enabling the Feature (Copier-Level)

1. Go to **Copiers** under the desired account.
2. Access the **Features** list for a specific copier.
3. Create or edit a Break Even feature with your desired **Trigger** and **Stop Loss** values.
4. Click **Save**.

### Per-Symbol Configuration

1. If you want different Break Even logic for a specific symbol, go to **Symbols Configuration** under the Break Even settings.
2. Click **Add Symbol Configuration** to open a dialog for that symbol, then adjust the **Trigger in Points** and **Stop Loss in Points**.
3. Save your changes to apply them. MetaCopier will use the **symbol-specific** settings for that instrument only.

## Example Use Cases

1. **Basic Break Even**
   * **Trigger in Points:** 30
   * **Stop Loss in Points:** 0\
     **Behavior**: Once the position is **30 points** in profit, the stop-loss is set exactly at the entry price, removing all risk.
2. **Lock Small Profit**
   * **Trigger in Points:** 40
   * **Stop Loss in Points:** 10\
     **Behavior**: When the position gains 40 points, the stop-loss is placed **10 points** into profit. If the market reverses, you still exit with a 10-point gain.
3. **Per-Symbol Override**
   * **Global** Break Even: `Trigger = 30`, `Stop Loss = 5`
   * **EURUSD** Override: `Trigger = 25`, `Stop Loss = 10`\
     **Behavior**: Every symbol uses a global Break Even of 30/5, but EURUSD triggers Break Even sooner (at 25 points) and locks a bigger profit margin (10 points).
4. **Simultaneous Normal + Reverse Break Even**
   * **Trigger in Points:** 30
   * **Stop Loss in Points:** 5
   * **Reverse Trigger in Points:** 40
   * **Reverse Stop Loss in Points:** 15\
     **Behavior**: When the position gains 30 points of profit, the stop-loss moves to 5 points above entry (normal break-even). Independently, if the position moves 40 points into loss, the take profit is set to 15 points from entry (reverse break-even). Both protections are active simultaneously on the same position.

## Best Practices & Tips

* **Start with a Demo**: Test your Break Even thresholds on a practice account to see if they suit market volatility.
* **Combine with Trailing Stop**: After Break Even triggers, a trailing stop can lock in additional gains.
* **Avoid Overly Tight Stop**: Setting `Stop Loss in Points` too close (e.g., 1 point above entry) can cause unnecessary stop-outs in choppy markets.
* **Monitor Volatility**: More volatile symbols may need higher trigger thresholds to avoid premature stop-outs.


# HFT mode

The HFT mode is designed to minimize execution latency, optimizing trade execution speed. This feature reduces processing overhead and network delays, achieving a **latency improvement** **up to 200 ms**, making it ideal for high-speed trading strategies.

{% hint style="warning" %}
Please remember to add the HFT mode feature to both the master and the slave
{% endhint %}


# Socket

**The Socket Feature** keeps your account connected in real time, so you receive updates instantly. This means changes to your open positions, trade history, equity, balance, and other key information are shown immediately without any delay.

The built-in **Trading Terminal**, which normally syncs every few seconds, will also benefit from this feature and update in real time when the socket is enabled.

To activate it, simply add the Socket Feature to the specific account where you want to receive real-time updates.

<figure><img src="/files/ttVPxQHDatSZwpwRME4b" alt=""><figcaption><p>Socket feature</p></figcaption></figure>

For more information, see the Socket API

{% content-ref url="/pages/4o86VypMher3hgrHoBzB" %}
[API](/socket-api/api)
{% endcontent-ref %}


# Approval

The **Approval** feature on MetaCopier.io adds an extra layer of control to trade copying, allowing users to manually review and approve trades before they are executed on the slave accounts.

When this feature is enabled, any trade opened on the **Master Account** will not be automatically copied to the **Slave Account**. Instead, it will first require manual approval from the user. Once the trade is reviewed and approved, it will then be executed on the **Slave Account** as per the predefined copying settings.

This feature is particularly useful for traders who want to maintain a level of discretion over their copied trades. It provides additional risk management, ensuring that only selected trades are executed on the **Slave Account**, preventing unwanted or high-risk positions from being copied automatically.

## How It Works

* **User Interface:** In the WebApp, approval requests will appear in the **Accounts Page**, allowing users to review and take action directly.

<figure><img src="/files/BWiVxrGknVJXv0JvDkLO" alt=""><figcaption><p>Approval button in the WebApp</p></figcaption></figure>

* **Telegram Approval Notification**: If you want to receive Telegram notifications when approval is required, please add the slave account in the [Telegram notification settings](/features/basic-features/telegram).


# Delayed execution

The delayed execution feature in MetaCopier provides users with greater control over trade execution timing by introducing a random delay before opening and closing trades.

## How It Works

When enabled, trades on the copier (slave account) will not be copied immediately after execution on the master account. Instead, a delay is introduced based on user-defined settings. Users can specify a **minimum** and **maximum** delay in seconds (with millisecond resolution), and the system will randomly select a delay within this range before executing the trade.

## Key Benefits

* **Greater Control**: Users can introduce variability in trade execution timing.
* **More Flexibility**: Ensures that trade execution is spread out rather than instant.
* **Customizable Per Symbol**: Different delay settings can be configured for different trading pairs.

## Technical Details

### Delay Settings

| Parameter           | Description                                                    | Range (Seconds) |
| ------------------- | -------------------------------------------------------------- | --------------- |
| **Min Delay Open**  | Minimum delay before opening a trade. (millisecond resolution) | 0 - 3600        |
| **Max Delay Open**  | Maximum delay before opening a trade (millisecond resolution)  | 0 - 3600        |
| **Min Delay Close** | Minimum delay before closing a trade (millisecond resolution)  | 0 - 3600        |
| **Max Delay Close** | Maximum delay before closing a trade (millisecond resolution)  | 0 - 3600        |

If a fixed delay is needed, users can set the same value for both **Min** and **Max**. Otherwise, the system will randomly select a value between them.


# Risk per trade

{% hint style="info" %}
This feature can be added at either the copier level or the account level. If you want to control the risk across all positions collectively, please refer to the [Risk Limits](/features/basic-features/risk-limits).
{% endhint %}

The **Risk Per Trade** feature allows you to control the monetary risk exposure **for each trade** executed by the **copier or on an account**. You can define risk in two ways:

* **Relative Risk**: A percentage of the current account balance (e.g., `2.5` = 2.5%).
* **Absolute Risk**: A fixed amount in the account currency (e.g., `50` = 50 USD).

If both values are set to `0`, the risk limiting is disabled - no risk caps or auto-close will apply to your trades. However, the **tick value service continues to run** in the background, collecting tick value data from your trades. This is important if you use `riskPercent` via the [TradingView Webhook](/tutorials/tradingview-webhook#risk-per-trade-sizing) or [Telegram Signal Integration](/tutorials/telegram-signal-integration) - in those cases, you can leave both values at `0` (no risk limiting) while still benefiting from automatic tick value detection for lot size calculation.

<figure><img src="/files/dPWtHysBQrrAWfhyo3G2" alt="Risk per trade configuration" width="375"><figcaption><p>Risk per trade configuration</p></figcaption></figure>

## Configuration

* **Correct lot size based on SL**: Enable this to automatically calculate the lot size **based on the stop-loss distance**. This ensures the actual risk per trade aligns with the configured value. **This only applies when a stop loss is defined on the master trade**. This option is only available on a copier, not at the account level
* **Auto-close on risk threshold:** Only applies when **'Correct lot size based on SL'** is enabled. If set to true (default), the system will automatically close the position when the defined risk threshold is reached, acting as a hard risk limit supervisor. If set to false, the system will NOT auto-close the position when the risk threshold is reached, allowing the stop loss to execute naturally. Use this option when you want precise lot sizing based on SL but prefer the trade to hit the SL rather than being closed by the risk supervisor. **Note:** If the position has no stop loss set, the system will still auto-close regardless of this setting. This option is only available on a copier, not at the account level.
* **Tick value automatic adjustement:** To accurately compute risk, you must specify the **tick value,** the monetary value of a 1-point price move per 1.0 lot. You can take a look at [Risk per trade - Tick value](/features/pro-features/risk-per-trade/risk-per-trade-tick-value) to calculate the tick value manually. Alternatively, enable the "tick value automatic adjustment" to allow the system to detect the tick value from live trades and history trades. **The automatic tick value calculation requires some trades to be executed before it becomes effective**. Available on both copier level and account level. On account level, this setting applies to trades opened directly on the account via the [TradingView Webhook](/tutorials/tradingview-webhook) or [Telegram Connector](/tutorials/telegram-signal-integration) (`riskPercent` / `riskAmount` sizing).
* **Tick value (manual):** If the automatic detection is disabled or not yet reliable (e.g. very few or very small trades), you can enter the tick value manually here. See [Risk per trade - Tick value](/features/pro-features/risk-per-trade/risk-per-trade-tick-value) for how to calculate it. You can also override it per symbol. Available on both copier level and account level (for the TradingView Webhook / Telegram Connector flows).
* **Aggregate risk per symbol:** If enabled, aggregates risk calculation across all open positions for the same symbol. When true and multiple positions exist for a symbol (e.g., XAUUSD), the total risk will be calculated by summing all open positions for that symbol before checking against the risk limits. When false, each position is evaluated independently

{% hint style="info" %}
Is possible to override risk settings for individual symbols (e.g., set a different risk for `EURUSD`). These settings take precedence over the global configuration.
{% endhint %}

{% hint style="info" %}
**Account-level tick value settings only apply to trades that are opened directly on the account** (e.g. via TradingView Webhook or Telegram Connector). Trades that come from a copier use the tick value configured on that copier, not the one on the account.
{% endhint %}

## Related

Risk per trade caps the risk of a **single position**. If you instead need a target or a limit on the accumulated result of the whole account (or of one symbol) over the whole run, use the [Overall target](/features/basic-features/overall-target). Both features can be combined and both support per symbol overrides.


# Risk per trade - Tick value

{% hint style="warning" %}
**Important: Manual Tick Value Input (When Auto-Detection Might Be Inaccurate)**

MetaCopier can automatically detect the tick value (also called **point value**) based on your open trades and trade history.\
However, this detection might sometimes be **inaccurate** or **delayed**, especially if:

* You have **very small or very few trades** open
* Positions are far from market price or not moving
* Profits are affected by **swap**, **commission**, or **latency**

In these cases, we recommend entering the tick value manually for accuracy and full control over your risk-per-trade setup.
{% endhint %}

## How to Manually Calculate the Tick Value (Point Value)

If you're unsure what tick value to use, you can calculate it yourself from any **closed trade**.

#### What is tick value?

The tick value is the **cash value of 1 point per 1.0 lot, in your account currency**.

MetaCopier uses this value to size trades so that the maximum loss (if the stop loss is hit) does not exceed your configured risk amount (e.g., $10 or 2% of balance)

## How to calculate the tick value (step by step)

If you prefer to enter the tick value manually (instead of using automatic detection), you can calculate it from any closed trade using the method below.

#### You’ll need:

* Entry price
* Exit price
* Profit (in account currency)
* Trade volume (in lots)
* The symbol’s **point size**
  * e.g. 0.01 for **gold** (XAUUSD), 0.0001 for most forex pairs, 1.0 for many indices

You can download the symbol details (e.g., point size) here:

<div align="center"><img src="/files/vXoK7eEwGzdPrhjH61Qy" alt=""></div>

#### Formula

```
distance     = |entry price – exit price|
pointsMoved  = distance ÷ point size
tick value   = |profit| ÷ volume ÷ pointsMoved
```

### Example: XAUUSD (Gold)

You opened a 0.50 lot trade and earned $48.04 profit.

| Entry   | Exit    | Volume | Profit |
| ------- | ------- | ------ | ------ |
| 3372.31 | 3371.18 | 0.50   | 48.04  |

1. **Distance** = 3372.31 − 3371.18 = **1.13**
2. **Point size** = 0.01
3. **Points moved** = 1.13 ÷ 0.01 = **113**
4. **Tick value** = 48.04 ÷ 0.50 ÷ 113 ≈ **0.85**

So the correct tick value is **0.85 USD per point per 1.0 lot**

### Where to input it

You can configure the tick value in your **Risk Per Trade** settings:

* Globally (applies to all instruments)
* Or as a **per-symbol override** (e.g. only for XAUUSD, NAS100, etc.)

### Tips for accuracy

* Use **closed trades** (not floating profit)
* Make sure volume is in **lots**, not units (e.g. 0.50 not 50,000)
* Always use the correct **point size** (e.g. 0.01 for XAUUSD)
* Average over several trades if needed
* Don't confuse **points** with **pips** - they are not always the same

## Download the Excel Calculator

No need to do the math yourself, download our prebuilt Excel file and just fill in your numbers.

{% file src="/files/0auVrPqLvvcHoxtae1Ei" %}

The calculator computes the tick value for you based on your trade.


# Data collector

The Data Collector account feature automatically records key account metrics (equity, balance, and floating P\&L) over time, providing valuable insights into your account's performance. Configure the collection interval and select which metrics to track based on your needs.

Data is recorded only when values change (smart detection), optimizing storage while ensuring every data point is meaningful. View your collected data through an interactive dashboard with time period filters, line charts, and statistics.

Data retention is automatically limited to 90 days maximum, with older records cleaned up automatically.

<figure><img src="/files/i3J0VnUIlSog2nHqvN73" alt=""><figcaption></figcaption></figure>

## Configuration
* **Activate Data Collector**: Toggle to enable or disable the feature. When disabled, no new data is collected, but existing historical data is preserved.
* **Collection Interval (seconds)**: Defines how frequently the system checks for metric changes.
  * Minimum: 30 seconds
  * Default: 60 seconds
  * Recommended: Adjust based on your trading style (day traders: 30-60s, swing traders: 300-600s, position traders: 3600s)
* **Record Equity**: Enable to track your total account value including open positions over time.
* **Record Balance**: Enable to monitor your base account balance excluding floating profit/loss.
* **Record Floating P\&L**: Enable to track unrealized profit/loss from open positions.
* **Normalize Values:** When enabled, normalizes all values when fetching data via REST endpoint to hide real account size. Uses the first record's balance (or equity if balance not recorded, or floating PnL if neither recorded) as reference point and scales it to 100,000. The same scaling factor is then applied to ALL records, preserving relative performance and growth patterns while obscuring actual account values. Example: if first balance is 50,000, all values are doubled (factor 2.0), making first balance = 100,000, but subsequent balances scale proportionally. Data is always stored as-is without normalization. Use this feature when sharing performance data without exposing real capital.
* **Retention Days**: Fixed at 90 days (read-only). Older records are automatically deleted to optimize storage.

**Note**: At least one metric (Equity, Balance, or Floating P\&L) must be enabled for data collection to function. You can enable multiple metrics for comprehensive analysis.

## Data visualisation

<figure><img src="/files/lB1dqgF1tUeVB7bOwwjE" alt=""><figcaption></figcaption></figure>

<figure><img src="/files/MGlKrHIplCFxa2IfiRDO" alt=""><figcaption></figcaption></figure>

Alternatively, you can use the REST API to retrieve the data: <https://api.metacopier.io/rest/api/documentation/swagger-ui/index.html#/Account%20API/getAccountDataCollectorRecords>


# Masaniello

The **Masaniello** copier feature is an advanced money management system that automatically calculates the **optimal position size** for each copied trade based on a predefined series plan.

It is designed to help you reach a **target profit goal** over a fixed number of trades by distributing risk across the series in a structured way. Masaniello does not generate trading signals, it only controls how large each copied trade is opened.

This feature is ideal for traders who want:

* **Structured risk management**
* A predefined series plan (e.g., *10 trades, 6 wins needed*)
* Automatic lot sizing per trade
* Optional safety breakers (max loss streak, cooldown, etc.)

## Overview

Masaniello works with the concept of a **series**:

* A series contains **N events** (trades), for example `10`.
* Within those N trades, you expect **W wins**, for example `6`.
* You define a bankroll allocation (for example `5% of equity`).
* You define a target profit goal (for example `+50% of bankroll`).

The system then generates an internal staking table and calculates the **next lot size** automatically for each new trade.

## How it works

When Masaniello is enabled:

1. A **bankroll** is reserved for the current series (e.g., 5% of equity).
2. The system calculates a series plan based on:
   * Total events (N)
   * Expected wins (W)
   * Expected payout model (R-multiple or payout factor)
   * Target profit
3. Each time a copied trade closes, Masaniello updates the series result:
   * **WIN**
   * **LOSS**
   * **BREAKEVEN** (optional)
4. Based on the updated state, the next trade size is calculated automatically.
5. The series resets automatically depending on your reset rules:
   * target reached
   * bankroll depleted
   * series completed

Masaniello can also run with **symbol-specific overrides**, meaning each symbol can use different series settings.

## Settings

<figure><img src="/files/aCavE0s8YaHOxRjyfD9j" alt=""><figcaption></figcaption></figure>

### Core Series Settings

* **Total events**
  * Defines how many trades belong to one Masaniello series.
  * Example: `10` means a series contains 10 trades.
* **Expected wins**
  * Defines how many wins you expect out of the total events.
  * Example: `6` wins out of `10`.
* **Bankroll percentage**
  * Defines how much of your account is reserved as bankroll for the series.
  * Example: `5%`.
* **Bankroll base**
  * Defines which account value is used for bankroll calculation:
    * `BALANCE`
    * `EQUITY`
    * `FREE_MARGIN`
* **Target profit percentage**
  * Defines the profit target relative to the bankroll.
  * Example: if bankroll = $500 and target profit = `50%`, the target is +$250.

### Expected Payout Model

Masaniello needs a model to estimate how much profit a WIN produces.

* **Payout model**
  * `R_MULTIPLE`: profit is modeled as R-multiple (risk-based).
  * `PAYOUT_FACTOR`: profit is modeled as fixed payout factor (binary-style).
  * `REALIZED_R`: optional advanced mode using realized R multiples from real trades.
* **Expected R multiple**
  * Only used when payout model = `R_MULTIPLE`
  * Example: `1.0` means your average win is +1R.
* **Expected payout factor**
  * Only used when payout model = `PAYOUT_FACTOR`
  * Example: `0.75` means a WIN earns +75% of the risked amount.
* **Expected loss R multiple**
  * Defines the expected average loss in R.
  * Default is `-1.0` meaning a full loss of risk per losing trade.

### Lot / Position Size Control

These settings ensure that Masaniello produces broker-compatible lot sizes.

* **Minimum lot size**
  * Smallest lot allowed, even if the calculation is smaller.
* **Maximum lot size**
  * Hard cap to avoid excessive exposure.
* **Lot step**
  * Defines the rounding increment for the calculated lot size.
  * Example: `0.01` for Forex.
* **Lot rounding mode**
  * Defines how lots are rounded:
    * `DOWN` (recommended)
    * `UP`
    * `NEAREST`

### Trade Outcome Policy (Win/Loss/Break-even)

Masaniello must classify each closed trade as a WIN, LOSS, or BREAKEVEN.

* **Outcome policy**
  * `THRESHOLD`: uses win threshold percentage and threshold base
  * `SIGN`: profit > 0 = WIN, profit < 0 = LOSS, profit = 0 = BREAKEVEN
  * `R_BASED`: WIN depends on realized R (advanced mode)
* **Win threshold percentage**
  * Defines how much profit is required to classify as a WIN.
  * Example: `0` means any positive profit is a WIN.
  * Example: `10` means profit must be at least 10% of the threshold base.
* **Win threshold base**
  * Defines what the threshold percentage is applied to:
    * `RISK`
    * `NOTIONAL`
    * `ABSOLUTE`
* **Exclude break-even trades**
  * If enabled, trades closed at 0 profit/loss do **not** consume an event in the series.

### Partial Close Handling (Multiple TPs / Manual partial close)

When trades are partially closed, Masaniello must decide how the outcome is counted.

* **Partial win policy**
  * `IGNORE`: partial closes are ignored until the trade is fully closed (recommended)
  * `COUNT_AS_WIN`: any partial close with profit counts as WIN
  * `COUNT_AS_LOSS`: any partial close with loss counts as LOSS
  * `PROPORTIONAL`: outcome is counted fractionally (advanced)

### Reset Rules & Safety Breakers

These rules define when a series resets and adds additional safety controls.

* **Reset on target reached**
  * Resets the series immediately once target profit is reached.
* **Reset on bankroll depleted**
  * Resets the series if the bankroll is depleted before reaching the target.
* **Auto reset on series complete**
  * Resets automatically after total events are completed.
* **Max consecutive losses**
  * Safety breaker: force reset after X consecutive losses.
  * `0` disables this rule.
* **Cooldown after reset (minutes)**
  * Prevents immediate restart after a reset (useful for prop firm rules or aggressive strategies).
  * `0` disables cooldown.

### Auto-Tuning (Historical Win Rate)

Masaniello can automatically adjust `expectedWins` based on historical performance.

* **Use historical win rate**
  * If enabled, expectedWins is adjusted using past trades.
* **Statistics look-back days**
  * Defines how many days are used for historical stats.
  * `0` means only current series trades are used.
* **Minimum trades for historical win rate**
  * Minimum number of closed trades required before auto-tuning is applied.
  * Below this threshold, manual expectedWins is used.
* **Min / Max expected wins**
  * Clamps the auto-calculated expected wins into a safe range.
* **Win rate smoothing factor**
  * Defines how fast the system adapts to new results (0..1).
  * Higher values update faster.

## Per-Symbol Configuration

You can define symbol-specific Masaniello settings.\
Symbol settings override the general settings.

This is useful when:

* You trade different symbols with different volatility
* You want different risk plans per symbol
* You want to isolate series per symbol

## Example Scenario

You define:

* Total events = `10`
* Expected wins = `6`
* Bankroll = `5%` of equity
* Target profit = `50%` of bankroll
* Payout model = `R_MULTIPLE`
* Expected R multiple = `1.0`

Result:

* Masaniello reserves a bankroll for the series
* It calculates a stake plan across 10 trades
* Each copied trade receives the correct lot size for the current step
* The series resets automatically when:
  * target is reached
  * series completes
  * bankroll is depleted (optional)

## Notes & Limitations

* Masaniello assumes trades can be classified clearly as WIN / LOSS / BE.
* For strategies with many parallel trades, you should decide whether series state is handled:
  * per symbol (recommended)
  * global per copier account
* If your master trades do not use stop loss values, prefer:
  * `PAYOUT_FACTOR`
  * or a conservative expectedRMultiple


# Trade Guardrails

The Trade Guardrails account feature helps you protect your account by automatically enforcing safety rules on your open trades. It continuously monitors your positions and closes them automatically if they exceed your configured limits.

You can use Trade Guardrails to prevent positions from becoming too large, to limit total exposure on a single symbol, or to avoid keeping trades open longer than intended.

This feature is especially useful for traders who want an extra layer of protection when copying trades or running automated strategies.

**Compared to the basic copier features, Trade Guardrails are not limited to slave accounts only.**\
They can also be used on **master accounts**, where trades are opened, providing higher-level, account-wide protection by automatically reacting when risk limits are exceeded. Of course, they can also be used on **slave accounts** for additional safety.

### How it works

When Trade Guardrails is active, MetaCopier checks your open positions and applies the following protections:

* **Maximum position size**\
  Positions can be automatically closed if they exceed your maximum allowed trade size.
* **Optional per-symbol aggregation**\
  Instead of checking each position individually, you can also apply the limit to the total exposure per symbol.\
  This prevents exposure stacking when multiple trades are opened on the same market.
* **Maximum open time**\
  Positions can be closed automatically if they stay open longer than your allowed holding time.

If no limits are set, the feature will not close any trades.

<figure><img src="/files/DTH6YwY7K6PQyncQs0eO" alt=""><figcaption></figcaption></figure>

### Configuration

* **Activate Trade Guardrails**\
  Toggle to enable or disable the feature. When disabled, no trades are monitored or closed.
* **Maximum position size**\
  Defines the largest trade size that is allowed. If an open position exceeds this value, it may be closed automatically.
* **Aggregate per symbol (optional)**\
  When enabled, the system checks the total open exposure per symbol instead of checking each position individually.\
  This is recommended if you frequently open multiple trades on the same symbol.
* **Maximum open time (seconds)**\
  Defines how long a trade is allowed to stay open. If the time limit is exceeded, the position may be closed automatically.

### Symbol-specific rules (optional)

Trade Guardrails supports custom limits for individual symbols.

This allows you to define stricter or more flexible rules depending on the market you trade (for example, tighter rules on more volatile instruments).

Symbol-specific rules always take priority over the global settings.


# TradingView Webhook

The **TradingView Webhook** feature allows you to connect TradingView alerts directly to MetaCopier, enabling automatic trade execution based on your TradingView strategies and Pine Scripts.

When an alert is triggered in TradingView, it sends a webhook message to MetaCopier, which then executes the corresponding action (open, close, or modify a position) on your connected trading account - all without manual intervention.

This feature is ideal for traders who:

* Use TradingView for technical analysis and alerts
* Want to automate trading strategies built with Pine Script
* Need to execute trades across multiple accounts from a single TradingView alert

For a complete step-by-step setup guide, see the tutorial:

{% content-ref url="/pages/8l0L45n9J4XV58ceUwgV" %}
[Connect TradingView via Webhook](/tutorials/tradingview-webhook)
{% endcontent-ref %}


# Telegram Signal Integration

The **Telegram Signal Integration** feature allows you to automatically receive and execute trading signals from Telegram channels and groups. By connecting your Telegram account to MetaCopier, signals posted by signal providers are analyzed by AI and executed on your trading accounts without manual intervention.

MetaCopier connects to your Telegram account using the official Telegram API. When a message is received in a subscribed chat, the AI analyzes the content to detect trading signals (open, close, modify). If a valid signal is detected, it's executed on the linked trading account automatically.

This feature is ideal for traders who:

* Follow signal providers on Telegram
* Follow a provider that posts the signals in a single topic of a Telegram group
* Want to automate signal execution without being glued to their phone
* Need fast and consistent execution of received signals

For a complete step-by-step setup guide, see the tutorial:

{% content-ref url="/pages/qBBroQdwzvFiNyFlx4Oy" %}
[Telegram Signal Integration](/tutorials/telegram-signal-integration)
{% endcontent-ref %}


# Margin Cap

{% hint style="info" %}
This feature can be added at the copier level. It is especially useful for prop firm traders who must comply with strict margin usage rules.
{% endhint %}

The **Margin Cap** feature allows you to set a maximum percentage of your account balance that can be used as margin across all open positions. When a new trade signal arrives, MetaCopier automatically calculates the maximum lot size that can be opened without exceeding the configured margin cap, taking into account existing open positions.

This eliminates the need to manually recalculate your maximum lot size after every trade.

## How It Works

When a new trade is about to be copied, the system calculates:

```
Remaining margin = (Margin Cap % × Account Balance) − Used Margin
Max lots = (Remaining margin × Leverage) / (Symbol Price × Contract Size)
```

{% hint style="info" %}
**Leverage detection.** The leverage used in the calculation is automatically detected per symbol. Many brokers apply a lower leverage to specific instruments (for example XAUUSD at 1:30 on a 1:100 account). MetaCopier reads this per-symbol leverage directly from the trading platform and uses it instead of the account leverage when available. If your broker does not expose the per-symbol leverage, you can force the correct value using the **Leverage** field described below.
{% endhint %}

### Example

For a **$100,000** account with **1:30 leverage** and a **20% margin cap**, trading **XAUUSD** at **$4,541.20** (contract size = 100):

1. **Maximum usable margin**: 0.20 × $100,000 = **$20,000**
2. **Effective buying power**: $20,000 × 30 = **$600,000**
3. **Notional value per lot**: $4,541.20 × 100 = **$454,120**
4. **Max lot size**: $600,000 ÷ $454,120 ≈ **1.32 lots**

If existing trades are already using $12,000 in margin (12%):

1. **Remaining margin**: $20,000 − $12,000 = **$8,000**
2. **Max lot size for new trade**: ($8,000 × 30) ÷ $454,120 ≈ **0.53 lots**

## Configuration

<figure><img src="/files/i9vzsl5HPHBX0rIJKApY" alt=""><figcaption><p>Margin cap configuration</p></figcaption></figure>

* **Margin cap percentage**: The maximum percentage of account balance that may be used as margin. A value of `0` disables the feature.
* **Behavior when cap is reached**:
  * **Reduce lot size** (default): Automatically calculates the maximum lot size that fits within the remaining available margin and opens the trade at a reduced size.
  * **Skip trade**: Rejects / skips the trade entirely if it would cause the margin cap to be exceeded.
* **Scope**:
  * **Cumulative** (default): The margin cap applies to the sum of all open positions. For example, all trades together must not exceed 20% margin usage. This is the most common prop firm rule.
  * **Per trade**: Each individual trade must not exceed the specified margin percentage on its own, regardless of other open positions.
* **Per-symbol configuration**: Optionally define different margin caps per symbol or asset class. Symbol-specific rules always take priority over the global setting. This is useful for prop firms that enforce margin caps per asset class (e.g., 20% for Forex, 10% for Indices).
* **Leverage** (optional override):
  * **Empty or `0`** (default): Auto-detect. MetaCopier uses the broker per-symbol leverage when reported (e.g. XAUUSD 1:30 on a 1:100 account), and falls back to the account leverage otherwise.
  * **Greater than `0`**: Force this leverage value (e.g. `30` for 1:30) regardless of what the broker reports. Useful when the broker does not expose per-symbol leverage for metals/CFDs and the auto-detection ends up using the wrong (account-wide) value. The override can also be set per symbol via the per-symbol configuration above.

{% hint style="info" %}
If both Margin Cap and other lot-sizing features (Max Lot Size, Risk Per Trade, Multiplier) are active, the most restrictive limit applies. The Margin Cap acts as a final safety net after other lot size calculations.
{% endhint %}

## Use Cases

**Prop Firm Compliance**

Many prop firms enforce strict margin usage rules such as:

* "Maximum 20% margin used across all open trades"
* "Maximum 20% margin used per asset class"
* "Maximum 10% margin per individual trade"

The Margin Cap feature ensures MetaCopier automatically respects these limits without requiring manual intervention.

**General Risk Management**

Even outside of prop firms, the Margin Cap provides an additional safety layer by preventing over-leveraging due to accumulated copied trades.


# Loss-Protected Exit

## Overview

**Loss-Protected Exit** is a copier-level safeguard for slave accounts. When the master account issues a close (including a bulk "Close All"), MetaCopier checks the current unrealized P\&L of the corresponding slave position. If the position is in loss, the close is **not** replicated. Optionally, the slave position's Take Profit is moved to the entry price (breakeven) so the position stays managed and eventually closes flat.

Close signals for positions that are at breakeven or in profit continue to replicate normally.

{% hint style="warning" %}
Enabling this feature means your slave accounts may keep positions open **after the master has flattened**. Positions stay alive until the breakeven Take Profit triggers or you close them manually. Make sure your strategy is compatible with carrying these residual positions.
{% endhint %}

{% hint style="info" %}
This feature is set on the **copier**, not on the master account. It only applies to slave-side execution.
{% endhint %}

## Why use it

Typical use cases:

* You copy a master that exposes a **"Close All"** button and want to protect slaves against an accidental click.
* You run **prop-firm slave accounts** where taking losses in bulk is unacceptable.
* You operate **large fleets of slave accounts** (hundreds or thousands) where a single master mistake would propagate at scale.
* Your trading rule is: *"never close a position while it is in negative P\&L."*

## How it works

1. When the master closes a position, MetaCopier locates the mirrored position on the slave account.
2. The feature reads the slave position's **current unrealized P\&L** (`Profit` field on the broker side).
3. If the loss is **strictly worse** than the configured tolerance, the close is blocked.
4. Optionally, the Take Profit of the slave position is set to the entry price (± an optional offset for commission/swap).
5. The position now runs autonomously on the slave account. It will close by itself once price reaches the breakeven Take Profit, or you can close it manually from the account.

Once the breakeven Take Profit triggers (or you close the position manually), the slot is released and normal copying resumes.

## Settings

* **Enabled**: Master toggle for the feature.
* **Tolerance (% of balance)**: Losses smaller than *this percentage of the slave account balance* are considered acceptable and the close is replicated normally. Percent is the recommended unit because it scales across accounts of any size. Set to `0` to disable the percent rule.
* **Tolerance (account currency)**: Losses smaller than *this absolute amount in the account's currency* are considered acceptable and the close is replicated normally. Useful for prop-firm-style fixed rules. Set to `0` to disable the absolute rule.
* **Set TP at entry price (breakeven)**: When enabled, the slave position's Take Profit is moved to the entry price the moment a close is blocked. Recommended: **on**.
* **Overwrite existing TP**: Advanced. When enabled, the breakeven Take Profit replaces any existing Take Profit. When disabled, an existing Take Profit that is already at-or-better than breakeven is preserved.
* **Breakeven offset (points)**: Advanced. Points added on the favorable side of the entry price so the position truly closes flat after commissions and swap.
* **Per-Symbol Configuration**: Different tolerance and breakeven values can be defined per symbol. Symbol-specific rules always override the general settings.

{% hint style="info" %}
**Tolerance semantics:** If both tolerance fields are set, the **larger tolerance wins** (most permissive). If both are set to `0`, **any loss** blocks the close. This is the strict "never close in loss" mode.
{% endhint %}

## Example use cases

1. **Strict "never close in loss"**
   * Tolerance (%): `0`
   * Tolerance (currency): `0`
   * Set TP at entry price: **on**
   * **Behavior:** Any loss blocks the master close. Every blocked position gets a breakeven Take Profit and closes flat when price returns.
2. **Small-spread tolerance across mixed account sizes**
   * Tolerance (%): `0.05` (0.05% of balance)
   * Tolerance (currency): `0`
   * Set TP at entry price: **on**
   * **Behavior:** Micro-losses caused by spread ticks are ignored (close replicates normally). Larger losses are blocked and re-managed. Scales cleanly from small to large slave accounts.
3. **Prop-firm fixed cap**
   * Tolerance (%): `0`
   * Tolerance (currency): `5` (5 USD)
   * Set TP at entry price: **on**
   * Breakeven offset (points): `10`
   * **Behavior:** Only losses larger than 5 USD are protected. Blocked positions get a Take Profit 10 points beyond entry to cover commission and swap.
4. **Per-symbol override for volatile instruments**
   * Global: Tolerance (%) = `0.05`
   * XAUUSD override: Tolerance (%) = `0.2`
   * **Behavior:** Every symbol uses a tight 0.05% tolerance except gold, which gets a wider 0.2% cushion to absorb its larger spread.

## Limitations

* The feature acts on the **slave side only**. It cannot prevent the master broker from closing master-side positions.
* On **netting-mode** slave accounts (single position per symbol) the feature does not apply, because netting brokers close by opposite volume rather than by ticket.
* On **pending orders** the feature has no effect: pending orders have no unrealized P\&L.
* When a connector does not support Take Profit modification, the close is still blocked but the breakeven Take Profit is not written; a warning is surfaced in the account status feed.
* If the master flips a position (close and reverse), and Loss-Protected Exit blocks the close, the slave may briefly carry both the original position and the new reverse position as a hedged pair.

## Best practices

* Start with the **strict setup** (`0` / `0` tolerances, breakeven TP on) on a demo copier to verify the behavior end-to-end.
* Use **percent tolerance** rather than absolute currency when you copy to slaves of different sizes.
* Set a small **breakeven offset** (a few points) on symbols with meaningful commission or swap so protected orphans genuinely close flat.
* Use **per-symbol overrides** to widen the tolerance on high-spread instruments (gold, indices, crypto).
* Monitor the account **logs**: every blocked close and every breakeven-TP write is recorded there.


# News filter

{% hint style="info" %}
This feature is added at the **copier** level. It reads the same data as the [Economic calendar](/features/economic-calendar).
{% endhint %}

The **News filter** stops new positions from being copied on a symbol while a calendar event that affects that symbol is inside its blackout window. Spikes around a release are where slippage, widened spreads and requotes live, and a copied entry into that spike rarely matches the master's fill.

{% hint style="warning" %}
The filter **never blocks a close**. Closes, partial closes and exits are always copied, so the slave is never left holding a position the master has already exited.
{% endhint %}

## How it works

1. The copier knows which currencies a symbol depends on. `EURUSD` depends on EUR and USD, `XAUUSD` on USD, and you can override this with your own symbol mappings.
2. From the calendar, every event that matches your event selection and touches one of those currencies is turned into a blackout window: `blackout before` minutes ahead of the release until `blackout after` minutes past it.
3. While a symbol is inside such a window, new opens on that symbol are skipped and, if enabled, written to the log.
4. Outside the window the copier behaves exactly as it does without the feature.

## Event selection

Both news features share the same event selection block.

* **Minimum impact:** High, Medium, Low or Holiday. High only is the usual choice, everything else quickly blocks most of the trading day.
* **Include global events:** Events without a currency (OPEC, G20, geopolitics) apply to every symbol. Enabled by default.
* **Include bank holidays:** Treats bank holidays as events. Off by default, holidays are handled separately, see below.
* **Category blacklist:** Event categories to ignore. Bond auctions (`bnd`) are ignored by default because they are noise for a trade copier.
* **Currency whitelist:** If set, only these currencies count. Empty means the currencies are derived from the symbol, which is what you normally want.
* **Event title blacklist / whitelist:** Case insensitive title fragments, one per line. A whitelist is the sharpest tool available here: filling it with `Non-Farm`, `CPI` and `Rate Decision` reduces the filter to the three releases that actually matter to you.
* **Symbol mappings:** Manual `pattern = currencies` overrides, evaluated top to bottom, for instruments whose name does not reveal its currencies, for example `US30 = USD`.

## Settings

* **Blackout before / after (minutes):** The window around the release. Maximum 240 minutes on each side. Longer windows are indistinguishable from switching the copier off.
* **Skip market orders:** Market opens are skipped during the window. Enabled by default.
* **Skip pending orders:** Pending orders (limit, stop) are skipped as well. Off by default, since a pending order placed before the window is usually intentional.
* **Block modifications:** Stop loss and take profit changes are blocked during the window. Off by default.
* **Log skipped trades:** Writes every skipped copy to the account log with the symbol, the event and the remaining window.

## Bank holidays

Liquidity on a bank holiday is thin, and thin liquidity turns an ordinary trade size into an outsized risk.

* **Enable holiday mode:** Turns on the holiday handling.
* **Holiday countries:** ISO-2 country codes whose holidays count. Empty means the countries are derived from the traded currencies.
* **Holiday action:** **Reduce size** (default), **Skip new opens** or **None**.
* **Size factor:** The percentage of the normal lot size used when the action is Reduce size. Default 50 %.

## Warnings

The filter can tell you before it acts, through the notification channels of the project.

* **Warn before (minutes):** One warning per entry, for example 360 and 60 for a six hour and a one hour heads-up. Empty disables the warnings.
* **Warn only if exposed:** Stay silent when nothing is open on the affected symbols. Enabled by default, otherwise a busy calendar produces a lot of irrelevant messages.
* **Daily agenda:** One digest per day at a fixed UTC time instead of many single warnings.
* **Notification targets:** Where the warnings go. Empty means every notification channel of the project.

Warnings created by this feature also appear under **Pending alerts** in the Economic calendar.

## Per-symbol configuration

You can define a different configuration for individual symbols, for example a 30 minute window on `XAUUSD` and 15 minutes everywhere else.

{% hint style="info" %}
A per-symbol entry **replaces the whole configuration** for that symbol, it does not merge field by field. Set every value you want that symbol to use.
{% endhint %}

## Notes

* The filter applies to opens. It does not close anything. If you want existing positions protected, add [News protection](/features/pro-features/news-protection) on the account.
* A skipped open is not caught up later. The trade idea is gone, exactly as it would be with any other filter.


# News protection

{% hint style="info" %}
This feature is added at the **account** level, not on a copier, because it acts on positions that already exist regardless of where they came from.
{% endhint %}

**News protection** closes open positions shortly before a calendar event that affects their currencies, and can re-open them once the release is over. Where the [News filter](/features/pro-features/news-filter) keeps you out of a spike, News protection gets you out of it.

Attaching the feature is the switch. There is no separate enable flag to look for on the account.

## How it works

1. From the calendar, every event that matches your event selection is checked against the currencies of your open positions.
2. `Close before` minutes ahead of the release, the affected positions are closed. Pending orders on those symbols are cancelled as well if you enabled it.
3. `Re-open after` minutes past the release, the positions are re-opened according to the re-open mode, provided the guards below allow it.

{% hint style="warning" %}
Closing a position realises its profit or loss and pays the spread again on the way back in. News protection trades a known cost for an unknown one. On a strategy that holds through releases on purpose, it will cost more than it saves.
{% endhint %}

## Event selection

News protection uses the same event selection block as the News filter: minimum impact, global events, bank holidays, category blacklist, currency whitelist, title blacklist and whitelist and symbol mappings. See [News filter](/features/pro-features/news-filter#event-selection) for the details of each option.

## Closing

* **Close before (minutes):** How far ahead of the release the positions are closed. Default 5, maximum 120. Too early and you give up the move you were in, too late and the spread is already widening.
* **Cancel pending orders:** Pending orders on affected symbols are cancelled too. Off by default.
* **Close only losing positions:** Leaves winners running and only takes the losers out of the way. Off by default.
* **Minimum profit to close:** Only close positions whose floating profit is at least this amount in account currency. Useful when you want to bank something rather than protect everything.

## Re-opening

* **Re-open mode:**
  * **Resync with master** (default): The position is restored from the master's current state, so a master that closed during the release does not get re-opened on your account.
  * **Same volume:** The position is re-opened with the volume it had before the close.
  * **None:** Nothing is re-opened. The close is final.
* **Re-open after (minutes):** How long to wait after the release. Default 10, maximum 240. The first minutes after a release are usually the worst possible entry.
* **Only re-open while the master still holds the position:** Enabled by default. Without it you can end up in a trade the master has already left.
* **Maximum spread (points):** Skip the re-open while the spread is still wider than this.
* **Maximum adverse move (pips):** Skip the re-open when the price has already run against the original direction by more than this. Leaving it empty means no limit, which defeats the purpose of protecting.
* **Re-open expiry (minutes):** A pending re-open older than this is dropped instead of fired late. Default 10, maximum 1440. This is the failsafe for the case where the market, the connection or the account was unavailable at the intended time.

{% hint style="info" %}
A re-open can be refused by any of these guards. That is the intended behaviour: not re-entering is a valid outcome, and every refusal is logged and can be notified.
{% endhint %}

## Warnings

* **Warn before (minutes):** One warning per entry. Defaults to 60 minutes, so you are told an hour before anything is closed. Empty disables the warnings.
* **Warn only if exposed:** Stay silent when nothing is open on the affected symbols. Enabled by default.
* **Imminent notice:** One last message right before the close runs. Enabled by default.
* **Daily agenda:** One digest per day at a fixed UTC time instead of many single warnings.
* **Notification targets:** Where the messages go. Empty means every notification channel of the project.

Warnings created by this feature also appear under **Pending alerts** in the [Economic calendar](/features/economic-calendar).

## Per-symbol configuration

You can define a different configuration for individual symbols, for example closing `XAUUSD` 15 minutes ahead while everything else closes 5 minutes ahead.

{% hint style="info" %}
A per-symbol entry **replaces the whole configuration** for that symbol, it does not merge field by field. Set every value you want that symbol to use.
{% endhint %}

## Combining it with the News filter

The two features solve different halves of the same problem and work well together:

* [**News filter**](/features/pro-features/news-filter) on the copier keeps new trades from being opened into the event.
* **News protection** on the account clears the positions that were already open.

Without the filter, the copier may re-open a position seconds after News protection closed it, because from the copier's point of view nothing changed.


# Signal sharing

## Introduction

Welcome to the Signal Sharing feature! If you want to share your trading activity with friends, colleagues, or the MetaCopier community, this guide will help you understand how it works. We'll walk you through all the features and settings step by step.

### How Signal Sharing Works

The Signal Sharing feature has two main roles:

* **Signal Provider** – Shares trading activity with others.
* **Signal Follower** – Copies trading activity from a provider.

If you only want to follow trades, go straight to the [**Signal Follower**](#signal-follower) section. If you want to share your trading operations with others, keep reading.

## Requirements

There are no special requirements. You just need to have a trading account added to MetaCopier to start using Signal Sharing.

## Signal provider

As a Signal Provider, you can share your trading operations with others. The use of the Signal Provider is free: there are no monthly or setup costs. Before you start, ensure that your trading account is added on the **Accounts** page.

<figure><img src="/files/4HUiQiNSzr1l2N6GcC9E" alt=""><figcaption><p>Account overview page</p></figcaption></figure>

Next, in the left-side navigation menu, open the **"Signal Provider"** page.

<figure><img src="/files/kStA9v5wupCBTeODJpCq" alt=""><figcaption><p>Signal provider page</p></figcaption></figure>

Now, you can add a new provider. Below, you'll find all the configuration settings. Adjust them according to your preferences to set up your signal provider.

The upper part of the configuration settings includes the general settings.

<figure><img src="/files/1A7uBdaFzf88Vvda5d1y" alt=""><figcaption><p>General Settings</p></figcaption></figure>

This is followed by the billing and marketplace options.

<figure><img src="/files/40Tw6gsKEufiNwPlctUX" alt=""><figcaption><p>Billing and Marketplace settings</p></figcaption></figure>

Then contact information and follower requirements.

<figure><img src="/files/dogfxA1NgHoRkmieRlUk" alt=""><figcaption><p>Contact information, follower requirements and permissions</p></figcaption></figure>

Finally, the permissions that determine who is allowed to follow when the signal is private.

<figure><img src="/files/8A7b4ijO1JuVMtMkq17X" alt=""><figcaption><p>Follower permissions</p></figcaption></figure>

### Settings

* **Name**: The display name for your signal provider profile. Choose a name that reflects your trading style or focus, so followers can easily recognize and identify your signals.
* **Description**: A short summary of your trading strategy or approach. Use this field to give potential followers an idea of what to expect from your signals, including any specific methods, goals, or markets you specialize in.
* **Trading profile link:** Include a link to your verified trading performance on a trusted analytics platform such as **MyFXBook** or **FX Blue**.
* **Monthly Subscription Fee**: The amount charged to followers on a monthly basis for access to your signals. Set a competitive price based on the value and insights you provide, or leave it blank if you want to offer free access. This value can be edited later, but only lowered (see the note below).
* **Profit Sharing Fee:** An optional fee based on the profits generated by followers using your signals. This allows you to earn a percentage of your followers' profits, providing an incentive tied directly to performance. This value can be edited later, but only lowered (see the note below).
* **Billing Model for Profit Sharing** (This can only be set during creation)**:**
  * **Monthly Profit:** Charge the profit sharing fee on all profits generated each month. This is calculated monthly regardless of previous losses.
  * **High Watermark:** Charge the profit sharing fee only when followers reach a new peak in their cumulative profit. This ensures followers only pay fees when their total performance surpasses all previous highs, regardless of deposits or withdrawals. If a follower has a losing month, they won't pay fees again until their account reaches a new all-time high.
* **Copier:** Select the specific account you want to use for sharing signals.
* **Allow Override Copier Settings:** Enable this option if you want followers to customize certain copier settings, such as risk parameters or trade sizes. Allowing overrides gives followers flexibility while using your signals.
* **Use MetaCopier as Payment Provider:** Select this option to have MetaCopier manage payments on your behalf. When enabled, MetaCopier collects payments from followers, either through a subscription fee or profit-sharing arrangement, and transfers the funds to you. Please note that MetaCopier retains a 30% service fee from each transaction. For users with significant transaction volume, we offer more favorable terms. If you process a high volume of transactions, please contact us to discuss customized pricing. KYC/KYB verification is required for this payment option. The fee covers:
  * **Payment provider processing fees**
  * **Credit card fees & crypto fees**
  * **Applicable taxes** based on the follower’s country
  * **Administrative and compliance costs**, including transaction handling and payouts
  * **Currency conversion fees** (if applicable)
  * **Chargeback and dispute handling**
  * **Payouts** will be processed in the currency defined in the project
* **Is Public:** Mark this setting if you want your signal provider profile to be visible and searchable by other users. If set to private, only users with direct access will be able to view and follow your signals. Please note that it may take **up to 12 hours** for your signal to appear in the marketplace, and the account must have at least 10 trades in its history.
* **Make visible in marketplace:** If the signal is not public, enable this option to make your signal visible in the marketplace for discovery. This allows users to find your signal through the marketplace while maintaining controlled access. Please note that it may take **up to 12 hours** for your signal to appear in the marketplace, and the account must have at least 10 trades in its history.
* **Allow reselling:** Enable this option to allow subscribers to resell your signal to their own customers. When enabled, your subscribers can act as intermediaries, offering your signal to others while potentially adding their own markup or fees. This creates a reseller network for your signal. This option can only be set during creation. **Important:** resellers cannot further resell the signal. If a reseller enables the “Allow reselling” option, it will be automatically disabled by the system.
* **Cover follower costs:** Enable this option to cover the MetaCopier subscription costs for your followers. When enabled, all follower accounts using your signal will have their base MetaCopier subscription fees charged to your project instead, allowing them to use MetaCopier at no cost. This applies to all follower accounts but does not include signal provider performance fees or any other charges. The option is available only during creation and can be enabled only if the signal provider **has more than 100 planned followers**.
* **Max covered accounts per follower project:** When "Cover follower costs" is enabled, you can limit how many follower accounts per follower project you will sponsor. For example, with a value of `1` and a follower who connects 5 of their own accounts to your signal, only the **first account** (by subscription date) will be covered by you; the remaining 4 will be billed to the follower's project as usual. Use `0` (default) to cover all follower accounts without any per-project cap. The cap selects the oldest follower-features by creation date, and **can be updated at any time** — changes take effect immediately for the current billing period.
* **Make history public:** Enable this option to make your trading history publicly visible to potential followers. When enabled, users can view your historical trades before subscribing. This transparency can help build trust and attract more followers.
* **Allow Customers:** If the signal is private, specify the email addresses of customers you wish to grant access. Only users with these listed email addresses will be able to view and subscribe to your private signals.
* **Contact information:** Provide your preferred contact details so that interested followers can reach you if needed. This may include your **email address**, **website**, **Telegram**, **Discord**, or any other communication channels you use for support and inquiries.
* **Minimum account balance:** Specify the minimum account balance a follower must have in order to subscribe to your signal. This helps ensure that followers use appropriate capital to mirror your trading strategy effectively and safely.
* **Allowed broker patterns:** Enter one or more broker patterns separated by commas. You may use full broker names or partial matches with [wildcards/regex](/tutorials/regex) (e.g., `ICMarketsSC-Live.*`, `Pepperstone-Live`). Followers will only be able to subscribe if their broker name matches one of the allowed patterns.

Now, your signal provider should be successfully configured with your account. From this point on, your signal can be followed by others.

<figure><img src="/files/RdL46OoRZzvTiq8Lx4kY" alt=""><figcaption><p>Example signal provider</p></figcaption></figure>

{% hint style="warning" %}
The monthly subscription fee and the profit-sharing fee can be edited after the signal provider has been created, but only **downwards**. You can lower either fee at any time, while an increase is rejected with an error. This protects followers, so they don't get any unexpected charges.

If you need to increase a fee, please contact MetaCopier support. We'll review your request, and if the change doesn't negatively affect customers, we may approve and update it. Alternatively you can create a new signal provider with the higher fees.

On a **white label** platform the brand owner sets the pricing and can raise the monthly subscription fee freely. The profit-sharing fee can also be raised, but only if it is not currently 0. A profit-sharing fee of 0 can never be raised, because the followers signed up without it. In that case create a new signal provider.
{% endhint %}

{% hint style="warning" %}
If a follower pays the invoice using trial credit, such transactions are not eligible for a payout to the signal provider.
{% endhint %}

### Earnings examples

Let’s look at a few examples to understand how much money you can earn with a signal provider. In the first example, assume that **one follower** starts following your signal in the middle of the month. For simplicity, let’s also assume that the month has **30 days** and there is **no profit-sharing fee**.

|                          | Calculation                   | Result        |
| ------------------------ | ----------------------------- | ------------- |
| Monthly Subscription Fee |                               | 50 USD        |
| Days of subscription     |                               | 15 days       |
| Prorated earnings        | (50 USD / 30 days) \* 15 days | 25 USD        |
| MetaCopier Fee           | 30% of 25 USD                 | 7.50 USD      |
| **Net Earnings**         | 25 USD - 7.50 USD             | **17.50 USD** |

Another example: assume you have **10 followers**, all of whom **started following at the beginning of the month:**

|                                    | Calculation                   | Result      |
| ---------------------------------- | ----------------------------- | ----------- |
| Monthly Subscription Fee           |                               | 50 USD      |
| Days of subscription               |                               | 30 days     |
| Prorated earnings                  | (50 USD / 30 days) \* 30 days | 50 USD      |
| MetaCopier Fee                     | 30% of 50 USD                 | 15 USD      |
| Net Earnings                       | 50 USD - 15 USD               | 35 USD      |
| **Net earnings with 10 followers** | 10 \* 35 USD                  | **350 USD** |

### Cover follower costs

The **Cover follower costs** option lets you, as a signal provider, take over the MetaCopier base account fee of your followers' accounts. It is intended for providers who want to lower the entry barrier for their followers, for example when you bring your own audience from a Telegram channel or a community and want them to be able to copy your signals without paying the MetaCopier base fee themselves.

#### What is covered (and what is not)

When the option is enabled, the **base MetaCopier account fee** of each covered follower account is moved from the follower's project to **your** project. The fee is the standard shared-account price of **0.27 USD per day**, which corresponds to approximately **8.10 USD per account per month** (30 days, pro-rated daily).

The option does **not** cover:

* Your **monthly subscription fee** (if any). Followers continue to pay this for access to your signal.
* Your **profit-sharing fee** (if any).
* Any other follower-side charges such as **dedicated IP** or **PRO features**.

#### How followers and your project are billed

For every follower account that is covered, the daily account fee is:

* **Removed** from the follower's monthly invoice for the days the account was active in that month.
* **Added** to your project's monthly invoice for the same days.

Billing is computed daily. If a follower starts following your signal on the 16th of a 30-day month, only the remaining 15 days of that month are charged to your project for that account.

#### Concrete example without a cap

Assume **Cover follower costs** is enabled and **Max covered accounts per follower project** is set to `0` (the default, meaning no cap).

During a 30-day month three followers have accounts connected to your signal:

| Follower   | Accounts following your signal | Active days in the month | Cost added to your invoice    |
| ---------- | ------------------------------ | ------------------------ | ----------------------------- |
| Follower A | 1 account                      | 30                       | 30 × 0.27 = **8.10 USD**      |
| Follower B | 2 accounts                     | 30 each                  | 2 × 30 × 0.27 = **16.20 USD** |
| Follower C | 1 account (joined on day 16)   | 15                       | 15 × 0.27 = **4.05 USD**      |
| **Total**  | **4 covered accounts**         |                          | **28.35 USD**                 |

On their own invoices the followers see **0 USD** for the MetaCopier base fee on the days their accounts were covered. They still see and pay any signal subscription fee or profit-sharing fee that you charge.

#### Limiting your exposure with "Max covered accounts per follower project"

If you do not want to subsidise every single account that a follower connects, use the **Max covered accounts per follower project** setting. The value defines how many accounts **per follower's project** you are willing to sponsor; any additional accounts are billed to the follower as usual.

Same scenario as above, but with **Max covered accounts per follower project = 1**:

| Follower                 | Accounts following | Covered by you (oldest first) | Billed to the follower          |
| ------------------------ | ------------------ | ----------------------------- | ------------------------------- |
| Follower A               | 1                  | 1                             | 0                               |
| Follower B               | 2                  | 1 (the older account)         | 1                               |
| Follower C               | 1                  | 1                             | 0                               |
| **Total covered by you** |                    | **3 accounts**                | 1 account stays with Follower B |

The cap is applied **per follower project**, and within each project the oldest follower-feature (by creation date) is covered first. You can change this value at any time and the new cap takes effect immediately for the current billing period.

#### You stay in control of who you sponsor

Under **Signal Provider → Followers** you can suspend or remove any follower account at any time. As soon as the follower is removed, no further days are charged to your project for that follower account, and only the days when the cover was actually in place appear on your next invoice.

To see what the cover actually costs you, use the **Follower cost report** described below. It breaks the amount down per month and per follower account.

#### Activation

Because this option directly affects your invoicing, it can only be activated by MetaCopier. To enable it, please contact support. The recommended use case is signal providers who expect a significant number of followers (typically more than 100) and want to offer them free MetaCopier access as part of their own value proposition. Once activated, the option cannot be toggled off and on again on the same signal provider. If you want to stop covering follower costs, you can either remove the affected followers or create a new signal provider without the option.

### Functions

By clicking on the settings menu, you can access various functions related to your signal.

<figure><img src="/files/ylgmiviNItAjPOoyQpuv" alt=""><figcaption><p>Signal provider functions</p></figcaption></figure>

#### Follower

In the follower menu, you can view all accounts that are currently following your signal.

<figure><img src="/files/N2rkUy0QaJ3O9Ss972qD" alt=""><figcaption><p>Accounts that are following your signal</p></figcaption></figure>

In the follower settings, you can review the settings for specific accounts. You also have the option to suspend a follower, giving you full control.

<figure><img src="/files/6gPIJajpQVaozzfMAv9P" alt=""><figcaption><p>Follower settings</p></figcaption></figure>

#### Performance report

Here, you can download an Excel report containing all accounts and their details for a specific month. The report includes identification, balance, equity, net profit, and other relevant information.

#### Earnings report

The Earnings Report shows the net amount you have earned by selling your signal and receiving payouts through MetaCopier. Earnings are credited to your project balance. At the end of each month, the system pays out the project balance while reserving approximately 50 USD (or equivalent), which remains on the project balance to cover upcoming MetaCopier invoices. Please note that if the option 'Use MetaCopier as payment provider' is set to false, this report will be empty. Below is an example.

{% hint style="warning" %}
The earnings report only includes paid fees. If the customer does not pay the invoice, the profit sharing will not be included
{% endhint %}

<figure><img src="/files/oUerl9xIA2ypplvxfW4s" alt=""><figcaption><p>Earnings report</p></figcaption></figure>

#### Follower cost report

The Follower Cost Report is the counterpart to the Earnings Report: it shows what **you paid** for your followers, not what you earned. It is only available when **Cover follower costs** is enabled on the signal provider.

The report opens on the current month and lets you switch to any earlier month since your first follower joined. For the selected month you see:

* **Total for the month** — what the cover costs you for that month
* **Covered followers** — how many follower accounts you paid for, and the rate per account and day
* **Total, all months** — what the cover has cost you since the beginning

Below the summary, one row per covered follower account shows the follower's email, the account number and broker, the number of days the account was covered in that month, and the resulting cost. Rows are sorted by cost, highest first. The table can be exported to Excel.

{% hint style="info" %}
The current month is marked as **month-to-date** and is not invoiced yet. Its value still changes until the invoice for that month is generated on the 1st.
{% endhint %}

Follower accounts that cost you nothing are not listed. This is the case when the account is outside your **Max covered accounts per follower project** cap and is therefore billed to the follower instead. Follower emails follow the same visibility rules as the Followers view: on a public signal the email is partially masked, on a private signal the full email is shown for customers on your allow-list, and otherwise the row is identified by account number only.

### Payout terms

Your earnings will be credited to your project at the beginning of each month, after the follower has paid the invoice. Payouts will then be sent automatically via Wise at the beginning of each month. Please note that a KYC verification and provider agreement are required before any payout can be processed.

#### **Key Details**

* **Minimum payout threshold:** $50 USD
* **Reserved balance:** $50 USD (or equivalent) will be reserved in the project balance and is not included in the payout. This reserve is used to cover possible upcoming invoices and to avoid charging the credit card on file after a payout has been made.
* **Accepted payout methods:** Wise
* **Fees and commissions:** Any bank, transfer, or processing fees will be deducted from the payout amount.
* **Payout schedule:** Payouts are processed monthly, following a **30-day holding period** to account for possible refunds or chargebacks.
* **Payouts** will be processed in the currency defined in the project

{% hint style="info" %}
Payouts are made from a **EUR account**. If your destination account is in a different currency (e.g., **USD**), the payout amount depends on the exchange rate. The rate applied is fixed on the **first day of the month** and used for that month's payout, so the amount you receive may be higher or lower than expected due to exchange rate fluctuations.
{% endhint %}

### Personal verification

To be eligible for a personal verification, you must first meet the following requirements:

* You must be a signal provider with at least one payout completed. This step also requires successful KYC verification.
* The signal must have a minimum trading history of 6 months.
* The signal must not use high-risk or prohibited strategies such as Martingale, Grid Trading, Hedging, or similar systems.

If all of these requirements are met, you can contact us for the verification process.

### Policy & Limitations

* **The use of multiple signal providers connected to the same master account is not allowed**. If different settings are required, the master account must be added separately for each configuration.
* **Public signals must be unique**. If multiple providers with different settings are required, they must be configured as private signals.
* Non-compliance with the above limitations may result in the suspension or deletion of the account without prior notice.
* Signal providers with no trades executed within the last four months will be deleted without prior notice.

***

## Signal follower

To start receiving trading operations from signal providers, you first need to add a trading account to your project. Once your trading account is set up, you can enable the **Signal Follower** feature.

{% hint style="success" %}
To start following a signal, you must first fund your project with the subscription amount. After that, renewals are charged automatically from your project balance or credit card. **Please note: the trial balance will expire as soon as you add a signal follower.**
{% endhint %}

<figure><img src="/files/Lu1W7h70nRKhhD4GTw8C" alt=""><figcaption></figcaption></figure>

Select then "**Signal follower**"

<figure><img src="/files/fou21Wj0QC6vBqkygf3O" alt=""><figcaption></figcaption></figure>

In the window, you can select your signal provider. Be sure to review the **description** and **fees section**, if applicable.

Please note that the total cost of following a signal includes:

* A **MetaCopier account fee** (approximately **$8 per month**).
* Any **subscription fee** and/or **profit-sharing fee** set by the signal provider.

Make sure to check these details before subscribing.

<figure><img src="/files/oCo7OH093jP3urTwGNTE" alt=""><figcaption><p>Signal follower settings</p></figcaption></figure>

If the signal provider allows it, you can customize certain settings in the copier. For example, you can **reduce your risk by 50%** by setting the **multiplier to 0.5**. Adjust these settings based on your trading strategy and risk tolerance.

<figure><img src="/files/yacgp1KAACsTVdc51z3U" alt=""><figcaption></figcaption></figure>

You're all set! As soon as the signal provider executes a trade, it will be automatically copied to your account.

If needed, you can also set a [risk limit](/features/basic-features/risk-limits) or enable additional features to better manage your trades.

{% hint style="info" %}
Additional features or specific configuration settings are only possible if the signal provider allows it.
{% endhint %}

### Disable min volume safety skip

Independently of whether the signal provider allows you to change the copier settings, you can always switch off the [**Min volume safety skip threshold**](/features/basic-features/copiers#settings) for your own account.

This safety check skips a trade when your broker's minimum lot size would force the calculated position to be opened much larger than intended. That protects you from oversized trades, but it also means some signals are not copied at all.

Enable **Disable min volume safety skip** in the signal follower settings if you prefer to receive every trade, even when the lot size has to be raised to your broker's minimum. The threshold is then forced to 0 for your account only; the signal provider's own copier and all other followers are not affected.

{% hint style="warning" %}
Only enable this if you are aware that individual trades can then be opened significantly larger than the signal provider's proportional size, especially on brokers with a high minimum lot size.
{% endhint %}

### Limitations

* If you are following a signal with profit sharing, please use a dedicated account exclusively for this purpose. Do not use this account for other expert advisors (EAs) or manual trading, as the profit calculation includes all trades executed on the account.
* If the signal provider has enabled a profit-sharing fee, only one signal follower is allowed per account.
* There is no distinction between demo and live accounts when following a signal. In both cases, all applicable fees, including profit-sharing fees and monthly subscription fees, are calculated and billed in the same way, meaning that using a demo account does not exempt you from any charges associated with the signal.

***

## Marketplace

The Marketplace is your gateway to both public and private Signal Providers. You can explore strategies that are available to everyone as well as those that have been shared with you directly. Each signal includes detailed performance metrics that make it easier to evaluate results, understand risk levels, and select the providers that best match your trading style.

<figure><img src="/files/ap1GlsXwjr6Ux2ffxtLE" alt=""><figcaption><p>Signal Marketplace</p></figcaption></figure>

{% hint style="warning" %}
**High Risk Warning:** Trading foreign exchange, cryptocurrencies, and other financial instruments involves substantial risk and may not be suitable for all investors. Past performance is not indicative of future results. You should carefully consider your investment objectives, level of experience, and risk appetite before engaging in any trading activity. The possibility exists that you could sustain a loss of some or all of your initial investment and therefore you should not invest money that you cannot afford to lose. You should be aware of all the risks associated with trading and seek advice from an independent financial advisor if you have any doubts. Signal providers' past performance does not guarantee future profits, and all trading involves significant risk of loss.
{% endhint %}

***

## Legal & Compliance

#### **Do followers (subscribers) sign agreements with MetaCopier?**

Yes. During onboarding, followers must accept MetaCopier’s General Terms & Conditions (GTC), Risk Disclosure, and platform terms. This clearly defines responsibilities, risks, and confirms that MetaCopier operates solely as a technology provider.

#### **Does the signal provider sign a contract with MetaCopier?**

Yes. Signal providers sign a Provider Agreement. By doing so, they confirm that they are legally authorized to distribute trading signals and responsible for meeting all regulatory obligations within their jurisdiction.

#### **Who is responsible for risk disclosure, suitability checks, and trade execution?**

* **MetaCopier** provides the general platform-level risk disclosure.
* **Providers** are responsible for regulatory compliance related to distributing their signals.
* **Followers and their brokers** are responsible for trade execution, account suitability, and any account-level requirements.
* MetaCopier does *not* execute trades or manage assets.

#### **Does MetaCopier offer compliance guidelines for regulated entities?**

No. MetaCopier does not provide regulatory guidance. Regulated entities must rely on internal compliance and their jurisdiction’s regulatory framework.


# HFT support

High-frequency trading (HFT) is a type of algorithmic trading that utilizes algorithms to execute a large number of trades at extremely high speeds. It aims to capitalize on minor price discrepancies in financial markets, often maintaining positions for only seconds or milliseconds.

## Configuration

MetaCopier offers a lightning-fast copy trading system. It uses multi-threading and non-blocking processes to copy trades across multiple accounts simultaneously without slowing down, making it ideal for high-frequency trading (HFT).

To use MetaCopier.io for HFT, simply follow the setup steps in the [quick start guide](/tutorials/quick-start-guide).

## Recommendation

For **HFT strategies** or strategies with **small profit targets**, we recommend enabling the following features to reduce latency and ensure accurate trade replication.

#### HFT Mode

* **Enable:** `HFT mode` on the account
* **Why:** HFT mode reduces processing overhead and network delays, improving end-to-end execution latency by up to **80 ms**.

#### Exit Signal Override

* **Enable:** `Exit signal override` on the copier
* **Settings:**
  * **Ignore for seconds:** `0`
  * **Only if TP/SL are set:** `Enabled`
* **Why:** Setting *Ignore for seconds* to `0` ignores exit signals from the master indefinitely. This prevents premature trade closures and allows positions on the slave account to close only at **TP or SL**.

#### TP/SL Management

* **Enable:** `TP/SL Management` on the copier
* **Settings:**
  * **Adjust with master distance:** `Enabled`
* **Why:** This ensures the slave account’s TP and SL maintain the same distance from the entry price as the master trade. This is essential for strategies with tight profit targets.

By applying these settings, slave accounts can more accurately mirror master trades, minimize latency issues, and improve performance for HFT and small-profit strategies.

## Pending Orders

By default, open orders are omitted from being copied. This is our recommendation and works perfectly for most use cases. If, for some reason, this feature is required for your project, please let us know and we will activate the option for you.

<figure><img src="/files/umEPZey82tj8cifFDfl5" alt=""><figcaption><p>Skip pending orders option</p></figcaption></figure>

## Best Possible Performance

For the best possible performance, we recommend a dedicated project where the resources are reserved only for you.

<figure><img src="/files/vyle4ZWuuzzJDobdXVbQ" alt=""><figcaption><p>Dedicated project example</p></figcaption></figure>

## Remarks

* HFT is commonly used on prop firm's demo accounts (for example, to pass challenges). However, most HFT strategies do not work on live accounts due to slippage. Thus, if you plan to use it with live accounts, make sure to test it with a low lot size.
* Some platforms use REST APIs, which are not suitable for HFT trading. If you plan to use high-frequency trading (HFT) on these platforms, always test on a demo account first before using real funds.


# Specifications

Here, you will find detailed information about the different account types offered by MetaCopier and about the platform.

## Latency

Latency is the time it takes to connect to your broker and receive a response (Round Trip Time), which is crucial in trading. Lower latency results in faster replications.

MetaCopier provides different regions to cover most brokers. The picture below shows the latency for different locations.

<figure><img src="/files/4VzSEPu1t1sCOFb6b4Ga" alt=""><figcaption><p>Global Latency Test (Source Bunny.net)</p></figcaption></figure>

{% hint style="info" %}
The latency in the picture represents the total time for a round trip (both directions). For example, if we set up two accounts in London, it would take 2.5ms to receive the trade from the master account and another 2.5ms to send it to the slave account, making the total latency of 5ms.

MetaCopier has an internal execution time of 5ms. So, using the previous example, the total time from the master account to the slave account would be around 10ms. After that, there's the broker's execution time to actually place the order, which can vary depending on server performance, current system load and market conditions.
{% endhint %}

## Master/slave compatibility

In the following table, you can see which accounts can be used as a master and/or a slave.

<table><thead><tr><th>Platform</th><th data-type="checkbox">Master</th><th data-type="checkbox">Slave</th></tr></thead><tbody><tr><td>MetaTrader 4</td><td>true</td><td>true</td></tr><tr><td>MetaTrader 5</td><td>true</td><td>true</td></tr><tr><td>cTrader</td><td>true</td><td>true</td></tr><tr><td>DXtrade</td><td>true</td><td>true</td></tr><tr><td>TradeLocker</td><td>true</td><td>true</td></tr><tr><td>MatchTrader</td><td>true</td><td>true</td></tr><tr><td>Tradingview</td><td>true</td><td>false</td></tr><tr><td>Telegram</td><td>true</td><td>false</td></tr><tr><td>Binance</td><td>true</td><td>true</td></tr><tr><td>Bitget</td><td>true</td><td>true</td></tr><tr><td>BloFin</td><td>true</td><td>true</td></tr><tr><td>Bybit</td><td>true</td><td>true</td></tr><tr><td>OKX</td><td>true</td><td>true</td></tr><tr><td>TradeStation</td><td>true</td><td>true</td></tr><tr><td>Tradovate</td><td>true</td><td>true</td></tr><tr><td>Alpaca</td><td>true</td><td>true</td></tr><tr><td>Gate.io</td><td>true</td><td>true</td></tr><tr><td>Bitunix</td><td>true</td><td>true</td></tr><tr><td>Hyperliquid</td><td>true</td><td>true</td></tr></tbody></table>

{% hint style="info" %}
**Tradingview** and **Telegram** are not trading platforms themselves - they act as signal sources that feed orders into MetaCopier through the [TradingView webhook](/tutorials/tradingview-webhook) or the [Telegram signal integration](/tutorials/telegram-signal-integration). They can therefore be used as a master but never as a slave, since execution always happens on a real broker account.
{% endhint %}

## Order types compatibility

​Our trading platform supports various order types for copying trades. **By default, limit orders are not copied, as we recommend this setting for most situations**.​

**We advise against copying limit orders** because it offers no significant advantages and may cause issues. For example, if a pending order activates on the follower's account but not on the master's account, it can lead to an unmanaged trade on the follower's account, posing risks and making it hard to manage.​

On the following page, you can find all the details about pending orders.

{% content-ref url="/pages/h6rIZe4tv4FyGqGQfuUK" %}
[Pending orders](/pending-orders)
{% endcontent-ref %}

Accounts can be set up as either master or follower for copying trades.

<table><thead><tr><th>Platform / Order types</th><th data-type="checkbox">Market</th><th data-type="checkbox">Limit</th><th data-type="checkbox">Stop-Limit</th><th data-type="checkbox">TP/SL</th></tr></thead><tbody><tr><td>MetaTrader 4</td><td>true</td><td>true</td><td>true</td><td>true</td></tr><tr><td>MetaTrader 5</td><td>true</td><td>true</td><td>true</td><td>true</td></tr><tr><td>cTrader</td><td>true</td><td>true</td><td>true</td><td>true</td></tr><tr><td>DXtrade</td><td>true</td><td>false</td><td>false</td><td>true</td></tr><tr><td>TradeLocker</td><td>true</td><td>false</td><td>false</td><td>true</td></tr><tr><td>MatchTrader</td><td>true</td><td>false</td><td>false</td><td>true</td></tr><tr><td>Binance</td><td>true</td><td>false</td><td>false</td><td>true</td></tr><tr><td>Bitget</td><td>true</td><td>false</td><td>false</td><td>true</td></tr><tr><td>BloFin</td><td>true</td><td>false</td><td>false</td><td>true</td></tr><tr><td>Bybit</td><td>true</td><td>false</td><td>false</td><td>true</td></tr><tr><td>OKX</td><td>true</td><td>false</td><td>false</td><td>true</td></tr><tr><td>TradeStation</td><td>true</td><td>false</td><td>false</td><td>true</td></tr><tr><td>Tradovate</td><td>true</td><td>false</td><td>false</td><td>true</td></tr><tr><td>Alpaca</td><td>true</td><td>false</td><td>false</td><td>true</td></tr><tr><td>Gate.io</td><td>true</td><td>false</td><td>false</td><td>true</td></tr><tr><td>Bitunix</td><td>true</td><td>false</td><td>false</td><td>true</td></tr><tr><td>Hyperliquid</td><td>true</td><td>false</td><td>false</td><td>true</td></tr></tbody></table>

{% hint style="info" %}
Some prop firms require that Take Profit (TP) and Stop Loss (SL) values are included when the order is placed, rather than added in separate steps.

With MetaTrader 4/5, cTrader, and TradeLocker, TP and SL are included directly in the initial order.

With DXtrade, TP and SL are set through multiple requests.
{% endhint %}

## Partial closes

Partial closes are supported on all platforms. This means you can close a portion of an open trade while keeping the remaining position active. For example, if you have a 1.0 lot trade open, you can choose to close 0.5 lots to secure partial profit, while the remaining 0.5 lots continue to run on the market.

This feature gives you more flexibility in managing risk and locking in profits without fully exiting your position. It can be especially useful for strategies that scale out gradually, or when you want to reduce exposure while still keeping some of the trade open in case the market continues in your favor.

## Soft limits

MetaCopier is designed to scale seamlessly, accommodating millions of accounts without hard restrictions. To maintain optimal performance and prevent misuse, we have established the following soft limits:

### Customer limits

| Description | Limit |
| ----------- | ----- |
| Projects    | 30    |

### Project limits

| Description   | Limit |
| ------------- | ----- |
| Accounts      | 100   |
| Strategies    | 100   |
| Dedicated IPs | 20    |

### Account limits

| Description | Limit |
| ----------- | ----- |
| Copiers     | 50    |
| Risk limits | 10    |
| Labels      | 10    |

If your requirements exceed these limits, please contact us to discuss adjustments.

## Contract Sizes

{% hint style="info" %}
MetaCopier does these calculations automatically, so there’s usually no need to configure anything. This explanation shows why you might see different lot sizes when trading the same instrument on different platforms. In most cases, the contract size will be the same.
{% endhint %}

When trading the same instrument on different platforms or broker accounts, you may notice variations in the lot size needed to achieve the same risk. This is often due to differences in **contract size**, which is the number of units of the underlying asset that each lot represents. A larger contract size means each lot covers more of the underlying asset and therefore requires a smaller lot size to maintain the same risk exposure.

### Example

* **Master account**
  * **Metatrader 5**
  * **Contract Size:** 1 for US30
  * **Meaning:** 1 lot = 1 unit of the underlying asset (for simplicity)
* **Slave account**
  * **TradeLocker**
  * **Contract Size:** 100 for US30
  * **Meaning:** 1 lot = 100 units of the underlying asset

Because TradeLocker’s contract size is 100, it handles 100 times more of the US30 index per lot than Metatrader 5 does. This difference explains why, if you open **1 lot on Metatrader**, you would need **0.01 lots on TradeLocker** to risk the same amount.

## MetaTrader

### One Time Passwords

MetaTrader supports One-Time Passwords (OTP) as an additional layer of account security. However, this feature is currently **not supported by MetaCopier**. If OTP is enabled on your MetaTrader account, you will need to **disable it** in order to successfully connect your account to MetaCopier.

### **Netting Accounts**

MetaTrader netting accounts are fully supported by MetaCopier. You can connect and use them just like hedging accounts, benefiting from all platform features and full support. Copying between different account types is also supported. You can copy from a netting account to a hedging account, or from a hedging account to a netting account.

## cTrader

### Position-Linked Pending Orders (Scale-In)

cTrader allows users to attach pending orders (e.g. BuyLimit, SellLimit) directly to an existing open position. When these pending orders are triggered, they increase the volume of the existing position rather than creating a new separate position.

{% hint style="warning" %}
**This feature is not supported by MetaCopier.** Position-linked pending orders may cause unexpected behavior in the copier logic, such as excessive modify events or incorrect trade detection. If you use this feature on a master account, the linked pending orders will not be correctly replicated to follower accounts.

We recommend using standard (unlinked) pending orders or market orders instead.
{% endhint %}

### Blocked APIs

Some prop firms restrict access to the FIX API and Open API to prevent automated trading, bots, and high-frequency strategies that may increase their financial risk or take advantage of their evaluation process. These restrictions are usually in place to encourage manual trading, reduce system load, and avoid potential misuse. If you encounter an error message in the logs such as "CHANNEL\_IS\_BLOCKED", it is likely related to this restriction. In that case, please contact your broker for more information or clarification.

## DXtrade

### Market Data (Quotes)

<mark style="color:red;">**Market data (quotes/ask/bid) is disabled by default on DXtrade.**</mark> You need to contact the broker where your account is hosted to request activation of market data access via the API. Without this, MetaCopier features that rely on real-time quotes (such as breakeven, deviation/slippage protection, and risk per trade lot sizing) will not work.

### Blocked APIs

The following prop firms have blocked access to their APIs, therefore it is not possible to add accounts in Metacopier. If possible, we suggest to use another compatible platform.

<table><thead><tr><th width="217">Prop firm</th><th>URL</th><th data-hidden></th></tr></thead><tbody><tr><td>MyFundedFX</td><td>https://webtrader.myfundedfx.com/</td><td></td></tr><tr><td>FTMO</td><td>https://dxtrade.ftmo.com/</td><td></td></tr><tr><td>Eightcap (Prop)</td><td>https://prop.dx-eightcap.com/</td><td></td></tr><tr><td>Darwinex</td><td>https://dxtrade.darwinex.com/</td><td></td></tr></tbody></table>

## TradeLocker

TradeLocker may take up to 2 minutes to load all symbol configurations and enable trading.

<figure><img src="/files/6tCUPSDBdxTeO6rae6IS" alt=""><figcaption><p>TradeLocker loading symbols</p></figcaption></figure>

## MatchTrader

{% hint style="warning" %}
**MatchTrader is currently supported as a beta feature**, as the platform does not officially support third-party integrations and provides only limited API access.

If you're unable to add your account, please consider contacting your broker to ask whether API access is permitted and if any relevant documentation is available.

If possible, we also recommend considering alternative platforms that offer more stable and reliable support.
{% endhint %}

{% hint style="warning" %}
**Important:** MatchTrader uses different lot size values compared to other platforms. Before trading, verify that a lot size of 0.05 (for example) corresponds to the expected value in your account currency.
{% endhint %}

MatchTrader currently does not provide the **broker ID / Partner ID** required to connect via the API (but they are working on it). You can request this information from your broker or try the following tip.

Open the MatchTrader WebUI in your browser, then inspect the source code of the WebUI. Depending on your browser, follow these steps (or search in Google if you are not sure):

#### In **Google Chrome**:

1. Right-click anywhere on the page.
2. Select **"View Page Source"** from the context menu, or use the keyboard shortcut **Ctrl + U** (Windows/Linux) or **Cmd + Option + U** (Mac).

#### In **Mozilla Firefox**:

1. Right-click anywhere on the page.
2. Select **"View Page Source"** from the context menu, or use the keyboard shortcut **Ctrl + U** (Windows/Linux) or **Cmd + U** (Mac).

#### In **Internet Explorer**:

1. Right-click anywhere on the page.
2. Select **"View Source"** from the context menu, or press **Alt + Ctrl + U**.

Within the source code, look for the term **"brokerId"**. You should find something like this:

```
coIntegration: {
        managerUrl: '/manager',
        brokerId: '2',
        coUrl: ''
    },
```

In this case, the broker ID is **2**. In the screenshot below, you can see a working configuration for a challenge at E8 Markets. Use it as a reference if needed.

<figure><img src="/files/kCzayreUDKQQHpOnmI7G" alt=""><figcaption><p>MatchTrader example configuration</p></figcaption></figure>

## Binance

Important information regarding Binance. Please read it carefully:

* <mark style="color:red;">**Only USDT perpetuals are supported and tested.**</mark>
* <mark style="color:red;">**Only futures trading is supported; the spot market is not available.**</mark>
* One Way and Hedge mode is supported
* <mark style="color:red;">**Hedge mode is recommended**</mark>
* Check if the master and slave are configured the same, such as One Way or Hedge mode, leverage, and so on.
* Binance does not support multiple positions for the same symbol, only a single aggregated position. If there are multiple positions on the master account, they will be merged into one. In this case, the ticket number of the oldest position on the master account will be used for tracking purposes.
* Since Binance only supports **one aggregated position per symbol**, MetaCopier adapts TP/SL management as follows:
  * **For Buy Positions:**
    * The **highest Take Profit (TP)** among all master positions is applied.
    * The **lowest Stop Loss (SL)** among all master positions is applied.
  * **For Sell Positions:**
    * The **lowest Take Profit (TP)** among all master positions is applied.
    * The **highest Stop Loss (SL)** among all master positions is applied.
* Price differences between a normal Broker and Binance
  * There can be significant price differences between a normal broker and **Binance** (a direct market exchange). This is due to variations in liquidity, spreads, and pricing models used by brokers versus exchanges.
  * To ensure accurate risk management, we highly recommend enabling the [Pro features](/features/pro-features#tp-sl-management) feature in MetaCopier and activating the **"Adjust with master distance"** option. This ensures that Take Profit (TP) and Stop Loss (SL) levels are adjusted dynamically based on the price difference between the master and slave accounts, improving trade execution reliability.
* <mark style="color:red;">**Check the profit of the trades and adjust the multiplier to align the profit on the slave account, since Binance works differently compared to a traditional forex broker.**</mark>
* When adding a copier to the Binance account, the option **"Hide comment"** must be activated. Manual trading or positions opened by other systems on the slave account are not recommended while this option is active, because a position can still be misclassified.
* For EU residential users, deployment from New York will not work, it will appear disconnected, as the New York region is restricted to U.S. residents. Please select a different region.

### **How to generate an API Key and Secret Key on Binance**

{% hint style="warning" %}
For EU residential users, deployment from New York will not work, it will appear disconnected, as the New York region is restricted to U.S. residents. Please select a different region.
{% endhint %}

{% hint style="warning" %}
If the default security cannot be disabled, the API key must be restricted to a source IP. To do this, you have two options:

* Buy a dedicated proxy and attach it to an existing MT4, MT5, or similar account so the IP will be visible in the green "PROXY" label.
* If you do not have any accounts yet in your project, then the default security in Binance must be disabled so that you can deploy the Binance account with your dedicated IP. After deploying, the dedicated IP will be visible in the green "PROXY" label. You can then copy it and restrict the API key using this dedicated IP.

Please note that if a dedicated IP is used, there will be no redundancy in case of connection issues and the connection to the account could be lost. We recommend not using a dedicated IP with Binance.
{% endhint %}

To connect your Binance account to MetaCopier, you can generate your API keys using one of the following methods:

1. **Automatic Key Generation&#x20;**<mark style="color:red;">**(not recommended)**</mark> – Use the button in our web app to generate your API Key and Secret Key automatically.<br>

   <figure><img src="/files/pniy5RDFAKn3qXhnkcp5" alt=""><figcaption></figcaption></figure>

   **Important notice:** You can only generate **one** API key, and you must **deactivate** the default **security:**

   <figure><img src="/files/tLT7NnLsQRvF5ur6BEGL" alt=""><figcaption></figcaption></figure>
2. **Manual Key Generation&#x20;**<mark style="color:green;">**(recommended)**</mark> – If you prefer, you can manually create and configure your API keys by following the steps below to ensure secure setup.

#### **Step 1: Log in to Binance**

1. Go to the [Binance website](https://www.binance.com/).
2. Click **Log In** and enter your credentials (email and password).
3. Complete the **2FA authentication** (if enabled).

#### **Step 2: Navigate to API Management**

1. Click on your **profile icon** (top-right corner).
2. Select **Account -> API Management** from the dropdown menu.
   1. <https://www.binance.com/en/my/settings/api-management>

#### **Step 3: Create a new API Key**

1. Under **API Key Management**, click **Create API**.
2. Choose **System-generated API Key** or **Self-generated API Key**.
3. Enter a **label/name** for your API key (e.g., "MetaCopier").
4. Click **Next** and complete the security verification (email/SMS/Google Authenticator).

#### **Step 4: Configure API key permissions**

1. **Copy and store your API Key and Secret Key securely.**
   * The **Secret Key is shown only once**-make sure to save it.
2. **Edit API restrictions**:
   * Enable **"Enable Futures"**
   * Enable **"Enable Spot & Margin Trading"**
3. Click **Save** to finalize the setup.

#### **Step 5: Connect to MetaCopier**

1. Log in to **MetaCopier**.
2. Create an binance account
3. Enter the API key and Secret key in the password field using the format: **apikey|secretkey**

#### **Security tips**

* Do **not** share your **Secret Key** with anyone.

## Bybit

Important information regarding Bybit. Please read it carefully:

* <mark style="color:red;">**Only USDT perpetuals are supported and tested.**</mark>
* <mark style="color:red;">**Only futures trading is supported; the spot market is not available.**</mark>
* Only Unified Trading is supported
* One Way and Hedge mode is supported
* <mark style="color:red;">**Hedge mode is recommended**</mark>
* Check if the master and slave are configured the same, such as One Way or Hedge mode, leverage, and so on.
* Bybit does not support multiple positions for the same symbol, only a single aggregated position. If there are multiple positions on the master account, they will be merged into one. In this case, the ticket number of the oldest position on the master account will be used for tracking purposes.
* Since Bybit only supports **one aggregated position per symbol**, MetaCopier adapts TP/SL management as follows:
  * **For Buy Positions:**
    * The **highest Take Profit (TP)** among all master positions is applied.
    * The **lowest Stop Loss (SL)** among all master positions is applied.
  * **For Sell Positions:**
    * The **lowest Take Profit (TP)** among all master positions is applied.
    * The **highest Stop Loss (SL)** among all master positions is applied.
* Price differences between a normal Broker and Bybit
  * There can be significant price differences between a normal broker and **Bybit** (a direct market exchange). This is due to variations in liquidity, spreads, and pricing models used by brokers versus exchanges.
  * To ensure accurate risk management, we highly recommend enabling the [Pro features](/features/pro-features#tp-sl-management) feature in MetaCopier and activating the **"Adjust with master distance"** option. This ensures that Take Profit (TP) and Stop Loss (SL) levels are adjusted dynamically based on the price difference between the master and slave accounts, improving trade execution reliability.
* <mark style="color:red;">**Check the profit of the trades and adjust the multiplier to align the profit on the slave account, since Bybit works differently compared to a traditional forex broker.**</mark>
* When adding a copier to the Bybit account, the option **"Hide comment"** must be activated. Manual trading or positions opened by other systems on the slave account are not recommended while this option is active, because a position can still be misclassified.

### **How to generate an API Key and Secret Key on Bybit**

To connect your Bybit account to MetaCopier, you can generate your API keys by following these steps:

**Step 1: Log in to Bybit**

* Go to the [Bybit website](https://www.bybit.com/).
* Click **Log In** and enter your credentials (email and password).
* Complete any 2FA authentication if prompted.

**Step 2: Navigate to API Management**

* Click on your **profile icon** in the top-right corner.
* Select **API** from the dropdown menu.
* Or directly visit: <https://www.bybit.com/app/user/api-management>

**Step 3: Create a New API Key**

* Click **Create New Key**.
* Choose **System-generated API Key**
* Enter a label/name for your API key (e.g., "MetaCopier").
* Select API Trasaction.
* Select Read-Write
* Select No IP restriction
* Select "Unified Trading" (Trade) and Assets (Assets)
* Click **Submit** and complete the verification steps (email/SMS/2FA).
* API keys that are not bound to IP addresses are valid for **three (3) months**

<figure><img src="/files/VHP6YmMgfTneoTpSJOiT" alt=""><figcaption></figcaption></figure>

**Step 4: Connect to MetaCopier**

* Log in to MetaCopier.
* Create a Bybit account
* Enter your **API Key** and **Secret Key** in the password field using the format:

  ```
  apikey|secretkey
  ```
* If the account can not connect try using a different region

**Security Tips**

* Do **not** share your Secret Key with anyone.

## Bitget

{% hint style="warning" %}
**Bitget is currently supported as a beta feature.**
{% endhint %}

Important information regarding Bitget. Please read it carefully:

* <mark style="color:red;">**Only USDT perpetuals are supported and tested.**</mark>
* <mark style="color:red;">**Only futures trading is supported; the spot market is not available.**</mark>
* One Way and Hedge mode is supported
* <mark style="color:red;">**Hedge mode is recommended**</mark>
* Check if the master and slave are configured the same, such as One Way or Hedge mode, leverage, and so on.
* Bitget does not support multiple positions for the same symbol, only a single aggregated position. If there are multiple positions on the master account, they will be merged into one. In this case, the ticket number of the oldest position on the master account will be used for tracking purposes.
* Since Bitget only supports **one aggregated position per symbol**, MetaCopier adapts TP/SL management as follows:
  * **For Buy Positions:**
    * The **highest Take Profit (TP)** among all master positions is applied.
    * The **lowest Stop Loss (SL)** among all master positions is applied.
  * **For Sell Positions:**
    * The **lowest Take Profit (TP)** among all master positions is applied.
    * The **highest Stop Loss (SL)** among all master positions is applied.
* Price differences between a normal Broker and Bitget
  * There can be significant price differences between a normal broker and **Bitget** (a direct market exchange). This is due to variations in liquidity, spreads, and pricing models used by brokers versus exchanges.
  * To ensure accurate risk management, we highly recommend enabling the [Pro features](/features/pro-features#tp-sl-management) feature in MetaCopier and activating the **"Adjust with master distance"** option. This ensures that Take Profit (TP) and Stop Loss (SL) levels are adjusted dynamically based on the price difference between the master and slave accounts, improving trade execution reliability.
* <mark style="color:red;">**Check the profit of the trades and adjust the multiplier to align the profit on the slave account, since Bitget works differently compared to a traditional forex broker.**</mark>
* When adding a copier to the Bitget account, the option **"Hide comment"** must be activated. Manual trading or positions opened by other systems on the slave account are not recommended while this option is active, because a position can still be misclassified.

### **How to generate an API Key and Secret Key on Bitget**

To connect your Bitget account to MetaCopier, you can generate your API keys by following these steps:

**Step 1: Log in to Bitget**

* Go to the [Bitget website](https://www.bitget.com/).
* Click **Log In** and enter your credentials (email and password).
* Complete any 2FA authentication if prompted.

**Step 2: Navigate to API Management**

* Click on your **profile icon** in the top-right corner.
* Select **API Management** from the dropdown menu.
* Or directly visit: <https://www.bitget.com/account/newapi>

**Step 3: Create a New API Key**

* Click **Create API Key**.
* Choose **System-generated API Key**.
* Enter a label/name for your API key (e.g., "MetaCopier").
* Enter a passphrase (you will need this later).
* Under permissions, enable **Trade** and **Read** for Futures.
* Select **No IP restriction** (or bind to your dedicated IP if applicable).
* Click **Submit** and complete the verification steps.

**Step 4: Connect to MetaCopier**

* Log in to MetaCopier.
* Create a Bitget account.
* Enter your **API Key**, **Secret Key**, and **Passphrase** in the password field using the format:

  ```
  apikey|secretkey|passphrase
  ```
* If the account can not connect try using a different region.

**Security Tips**

* Do **not** share your Secret Key or Passphrase with anyone.

## BloFin

{% hint style="warning" %}
**BloFin is currently supported as a beta feature.**
{% endhint %}

Important information regarding BloFin. Please read it carefully:

* <mark style="color:red;">**Only USDT perpetuals are supported and tested.**</mark>
* <mark style="color:red;">**Only futures trading is supported; the spot market is not available.**</mark>
* One Way and Hedge mode is supported
* <mark style="color:red;">**Hedge mode is recommended**</mark>
* Check if the master and slave are configured the same, such as One Way or Hedge mode, leverage, and so on.
* BloFin does not support multiple positions for the same symbol, only a single aggregated position. If there are multiple positions on the master account, they will be merged into one. In this case, the ticket number of the oldest position on the master account will be used for tracking purposes.
* Since BloFin only supports **one aggregated position per symbol**, MetaCopier adapts TP/SL management as follows:
  * **For Buy Positions:**
    * The **highest Take Profit (TP)** among all master positions is applied.
    * The **lowest Stop Loss (SL)** among all master positions is applied.
  * **For Sell Positions:**
    * The **lowest Take Profit (TP)** among all master positions is applied.
    * The **highest Stop Loss (SL)** among all master positions is applied.
* Price differences between a normal Broker and BloFin
  * There can be significant price differences between a normal broker and **BloFin** (a direct market exchange). This is due to variations in liquidity, spreads, and pricing models used by brokers versus exchanges.
  * To ensure accurate risk management, we highly recommend enabling the [Pro features](/features/pro-features#tp-sl-management) feature in MetaCopier and activating the **"Adjust with master distance"** option. This ensures that Take Profit (TP) and Stop Loss (SL) levels are adjusted dynamically based on the price difference between the master and slave accounts, improving trade execution reliability.
* <mark style="color:red;">**Check the profit of the trades and adjust the multiplier to align the profit on the slave account, since BloFin works differently compared to a traditional forex broker.**</mark>
* When adding a copier to the BloFin account, the option **"Hide comment"** must be activated. Manual trading or positions opened by other systems on the slave account are not recommended while this option is active, because a position can still be misclassified.

### **How to generate an API Key and Secret Key on BloFin**

To connect your BloFin account to MetaCopier, you can generate your API keys by following these steps:

**Step 1: Log in to BloFin**

* Go to the [BloFin website](https://blofin.com/).
* Click **Log In** and enter your credentials (email and password).
* Complete any 2FA authentication if prompted.

**Step 2: Navigate to API Management**

* Click on your **profile icon** in the top-right corner.
* Select **API** from the dropdown menu.
* Or directly visit: <https://blofin.com/account/apis>

**Step 3: Create a New API Key**

* Click **Create API**.
* Enter a label/name for your API key (e.g., "MetaCopier").
* Enter a passphrase (you will need this later).
* Under permissions, enable **Trade** for Futures.
* Select **No IP restriction** (or bind to your dedicated IP if applicable).
* Click **Submit** and complete the verification steps.

**Step 4: Connect to MetaCopier**

* Log in to MetaCopier.
* Create a BloFin account.
* Enter your **API Key**, **Secret Key**, and **Passphrase** in the password field using the format:

  ```
  apikey|secretkey|passphrase
  ```
* If the account can not connect try using a different region.

**Security Tips**

* Do **not** share your Secret Key or Passphrase with anyone.

## OKX

{% hint style="warning" %}
**OKX is currently supported as a beta feature.**
{% endhint %}

Important information regarding OKX. Please read it carefully:

* <mark style="color:red;">**Only USDT perpetuals are supported and tested.**</mark>
* <mark style="color:red;">**Only futures trading is supported; the spot market is not available.**</mark>
* <mark style="color:red;">**The account must be in Trade mode (not Simple mode). Switch this in OKX settings under Trading → Account mode.**</mark>
* One Way and Hedge mode is supported
* <mark style="color:red;">**Hedge mode is recommended**</mark>
* Check if the master and slave are configured the same, such as One Way or Hedge mode, leverage, and so on.
* OKX does not support multiple positions for the same symbol, only a single aggregated position. If there are multiple positions on the master account, they will be merged into one. In this case, the ticket number of the oldest position on the master account will be used for tracking purposes.
* Since OKX only supports **one aggregated position per symbol**, MetaCopier adapts TP/SL management as follows:
  * **For Buy Positions:**
    * The **highest Take Profit (TP)** among all master positions is applied.
    * The **lowest Stop Loss (SL)** among all master positions is applied.
  * **For Sell Positions:**
    * The **lowest Take Profit (TP)** among all master positions is applied.
    * The **highest Stop Loss (SL)** among all master positions is applied.
* Price differences between a normal Broker and OKX
  * There can be significant price differences between a normal broker and **OKX** (a direct market exchange). This is due to variations in liquidity, spreads, and pricing models used by brokers versus exchanges.
  * To ensure accurate risk management, we highly recommend enabling the [Pro features](/features/pro-features#tp-sl-management) feature in MetaCopier and activating the **"Adjust with master distance"** option. This ensures that Take Profit (TP) and Stop Loss (SL) levels are adjusted dynamically based on the price difference between the master and slave accounts, improving trade execution reliability.
* <mark style="color:red;">**Check the profit of the trades and adjust the multiplier to align the profit on the slave account, since OKX works differently compared to a traditional forex broker.**</mark>
* When adding a copier to the OKX account, the option **"Hide comment"** must be activated. Manual trading or positions opened by other systems on the slave account are not recommended while this option is active, because a position can still be misclassified.

### **How to generate an API Key and Secret Key on OKX**

To connect your OKX account to MetaCopier, you can generate your API keys by following these steps:

**Step 1: Log in to OKX**

* Go to the [OKX website](https://www.okx.com/).
* Click **Log In** and enter your credentials (email and password).
* Complete any 2FA authentication if prompted.

**Step 2: Navigate to API Management**

* Click on your **profile icon** in the top-right corner.
* Select **API** from the dropdown menu.
* Or directly visit: <https://www.okx.com/account/my-api>

**Step 3: Create a New API Key**

* Click **Create API Key**.
* Enter a label/name for your API key (e.g., "MetaCopier").
* Enter a passphrase (you will need this later).
* Under permissions, select **Trade**.
* Select **No IP restriction** (or bind to your dedicated IP if applicable).
* Click **Submit** and complete the verification steps.

**Step 4: Connect to MetaCopier**

* Log in to MetaCopier.
* Create an OKX account.
* Enter your **API Key**, **Secret Key**, and **Passphrase** in the password field using the format:

  ```
  apikey|secretkey|passphrase
  ```
* If the account can not connect try using a different region.

**Security Tips**

* Do **not** share your Secret Key or Passphrase with anyone.

## TradeStation

{% hint style="warning" %}
**TradeStation is currently supported as a beta feature.**
{% endhint %}

Important information regarding TradeStation. Please read it carefully:

* <mark style="color:red;">**Only equities and futures are supported and tested.**</mark>
* TradeStation uses **OAuth2 authentication**. MetaCopier handles the client credentials - you only need to authorize your TradeStation account.
* Demo (paper trading) and Live environments are supported. The environment is detected automatically when you select your account, so there is no need to choose it manually.
* When adding a copier to the TradeStation account, the option **"Hide comment"** must be activated. Manual trading or positions opened by other systems on the slave account are not recommended while this option is active, because a position can still be misclassified.
* <mark style="color:red;">**Professional market data subscribers:**</mark> If your TradeStation account is configured as a professional market data subscriber, your refresh token may be set to expire with a 24-hour absolute lifetime. In that case you must re-authenticate manually every 24 hours to avoid interruptions. If this applies to you, please contact us so we can support you with the setup.

### **How to connect your TradeStation account**

To connect your TradeStation account to MetaCopier:

**Step 1: Create a TradeStation account in MetaCopier**

* Log in to MetaCopier.
* Create a new TradeStation account.

**Step 2: Authorize via OAuth**

* Click the "Get token" button to start the OAuth flow.
* You will be redirected to TradeStation's login page in your web browser.
* Log in with your TradeStation credentials and authorize MetaCopier to access your account.
* After authorization, the refresh token will be set automatically.
* Select your account from the dropdown list. The environment (Demo or Live) is set automatically based on the selected account.

**Security Tips**

* MetaCopier only stores a refresh token - your TradeStation username and password are never stored.

## NinjaTrader

NinjaTrader is powered by Tradovate's infrastructure. To connect a NinjaTrader account to MetaCopier, use the **Tradovate connector** with your Tradovate/NinjaTrader credentials. The setup steps and requirements are the same as described in the Tradovate section below.

## Tradovate

{% hint style="warning" %}
**Tradovate is currently supported as a beta feature.**
{% endhint %}

Important information regarding Tradovate. Please read it carefully:

* <mark style="color:red;">**Only futures trading is supported and tested.**</mark>
* Tradovate uses **OAuth2 authentication**. MetaCopier handles the client credentials - you only need to authorize your Tradovate account.
* Demo and Live environments are supported.
* When adding a copier to the Tradovate account, the option **"Hide comment"** must be activated. Manual trading or positions opened by other systems on the slave account are not recommended while this option is active, because a position can still be misclassified.
* **API access is not always a paid add-on.** Many brokers and prop firms running on Tradovate (or NinjaTrader) enable API access automatically and free of charge for their clients. **Always try to connect first.** Only if the connection fails with an API access error do you need to purchase the **"API Access" add-on** from your Tradovate account settings.
* <mark style="color:red;">**Market data (quotes/ask/bid) is disabled by default.**</mark> Tradovate requires you to contact their support to activate market data access for your API account. Without this activation, MetaCopier features that rely on real-time quotes (such as breakeven, deviation/slippage protection, and risk per trade lot sizing) will not work.

### **How to connect your Tradovate account**

To connect your Tradovate account to MetaCopier:

**Step 1: Create a Tradovate account in MetaCopier**

* Log in to MetaCopier.
* Create a new Tradovate account.
* Select **Demo** or **Live** as the server environment.

**Step 2: Authorize via OAuth**

* Click the "Get token" button to start the OAuth flow.
* You will be redirected to Tradovate's login page in your web browser.
* Log in with your Tradovate credentials and authorize MetaCopier to access your account.
* After authorization, the access token will be set automatically.
* Select your account from the dropdown list.

**Step 3: Only if the connection fails - enable API Access**

If the authorization or the account list fails with an API access / permission error, your account does not have API access yet:

* Log in to your Tradovate account.
* Open your account settings and subscribe to the **"API Access" add-on**.
* If you trade with a broker or prop firm built on Tradovate or NinjaTrader, contact their support first - many of them enable API access for free, so the paid add-on is not needed.
* Once API access is active, repeat Step 2.

**Security Tips**

* MetaCopier only stores an access token - your Tradovate username and password are never stored.

### Profit Calculation

Tradovate's API does **not** provide per-position unrealized P\&L (profit). The position endpoint only returns entry price, quantity, and direction - but no current market value or profit field.

To display profit for open positions, MetaCopier uses two strategies depending on market data availability:

* **With market data enabled:** If real-time quotes (WebSocket market data) are activated on your Tradovate account, MetaCopier calculates per-position profit precisely using live bid/ask prices.
* **Without market data (default):** When market data is not activated, MetaCopier uses the account-level `openPnL` value from Tradovate's cash balance snapshot, which is refreshed every 30 seconds. If you have a single open position, the full `openPnL` is assigned to that position. If you have multiple positions in different contracts, the `openPnL` is distributed proportionally by lot size.

{% hint style="info" %}
The profit displayed without market data is an approximation based on account-level data. For precise per-position profit, activate market data access by contacting Tradovate support.
{% endhint %}

## Alpaca

{% hint style="warning" %}
**Alpaca is currently supported as a beta feature.**
{% endhint %}

Important information regarding Alpaca. Please read it carefully:

* <mark style="color:red;">**Only US equities and crypto are supported and tested.**</mark>
* Paper (paper trading) and Live environments are supported.
* When adding a copier to the Alpaca account, the option **"Hide comment"** must be activated. Manual trading or positions opened by other systems on the slave account are not recommended while this option is active, because a position can still be misclassified.

### **How to generate an API Key and Secret Key on Alpaca**

To connect your Alpaca account to MetaCopier, you can generate your API keys by following these steps:

**Step 1: Log in to Alpaca**

* Go to the [Alpaca website](https://alpaca.markets/).
* Click **Log In** and enter your credentials.

**Step 2: Navigate to API Keys**

* In your dashboard, navigate to the **API Keys** section.
* Or directly visit: <https://app.alpaca.markets/paper/dashboard/overview>

**Step 3: Generate API Keys**

* Click **Generate New Keys** (or **Regenerate** if keys already exist).
* Note your **API Key ID** and **Secret Key**.
* The **Secret Key is shown only once** - make sure to save it.

**Step 4: Connect to MetaCopier**

* Log in to MetaCopier.
* Create an Alpaca account.
* Select **Paper** or **Live** as the server environment.
* Enter your **API Key** and **Secret Key** in the password field using the format:

  ```
  apikey|secretkey
  ```

**Security Tips**

* Do **not** share your Secret Key with anyone.

## Gate.io

{% hint style="warning" %}
**Gate.io is currently supported as a beta feature.**
{% endhint %}

Important information regarding Gate.io. Please read it carefully:

* <mark style="color:red;">**Only USDT perpetuals are supported and tested.**</mark>
* <mark style="color:red;">**Only futures trading is supported; the spot market is not available.**</mark>
* One Way and Hedge mode is supported
* <mark style="color:red;">**Hedge mode is recommended**</mark>
* Check if the master and slave are configured the same, such as One Way or Hedge mode, leverage, and so on.
* Testnet and Live environments are supported.
* Gate.io does not support multiple positions for the same symbol, only a single aggregated position. If there are multiple positions on the master account, they will be merged into one. In this case, the ticket number of the oldest position on the master account will be used for tracking purposes.
* Since Gate.io only supports **one aggregated position per symbol**, MetaCopier adapts TP/SL management as follows:
  * **For Buy Positions:**
    * The **highest Take Profit (TP)** among all master positions is applied.
    * The **lowest Stop Loss (SL)** among all master positions is applied.
  * **For Sell Positions:**
    * The **lowest Take Profit (TP)** among all master positions is applied.
    * The **highest Stop Loss (SL)** among all master positions is applied.
* Price differences between a normal Broker and Gate.io
  * There can be significant price differences between a normal broker and **Gate.io** (a direct market exchange). This is due to variations in liquidity, spreads, and pricing models used by brokers versus exchanges.
  * To ensure accurate risk management, we highly recommend enabling the [Pro features](/features/pro-features#tp-sl-management) feature in MetaCopier and activating the **"Adjust with master distance"** option. This ensures that Take Profit (TP) and Stop Loss (SL) levels are adjusted dynamically based on the price difference between the master and slave accounts, improving trade execution reliability.
* <mark style="color:red;">**Check the profit of the trades and adjust the multiplier to align the profit on the slave account, since Gate.io works differently compared to a traditional forex broker.**</mark>
* When adding a copier to the Gate.io account, the option **"Hide comment"** must be activated. Manual trading or positions opened by other systems on the slave account are not recommended while this option is active, because a position can still be misclassified.

### **How to generate an API Key and Secret Key on Gate.io**

To connect your Gate.io account to MetaCopier, you can generate your API keys by following these steps:

**Step 1: Log in to Gate.io**

* Go to the [Gate.io website](https://www.gate.io/).
* Click **Log In** and enter your credentials (email and password).
* Complete any 2FA authentication if prompted.

**Step 2: Navigate to API Management**

* Click on your **profile icon** in the top-right corner.
* Select **API Management** from the dropdown menu.
* Or directly visit: <https://www.gate.io/myaccount/api_key_manage>

**Step 3: Create a New API Key**

* Click **Create API Key**.
* Enter a label/name for your API key (e.g., "MetaCopier").
* Under permissions, enable **Futures Trade** and **Futures Read**.
* Select **No IP restriction** (or bind to your dedicated IP if applicable).
* Click **Submit** and complete the verification steps.

**Step 4: Connect to MetaCopier**

* Log in to MetaCopier.
* Create a Gate.io account.
* Select **Testnet** or **Live** as the server environment.
* Enter your **API Key** and **Secret Key** in the password field using the format:

  ```
  apikey|secretkey
  ```
* If the account can not connect try using a different region.

**Security Tips**

* Do **not** share your Secret Key with anyone.

## Bitunix

{% hint style="warning" %}
**Bitunix is currently supported as a beta feature.**
{% endhint %}

Important information regarding Bitunix. Please read it carefully:

* <mark style="color:red;">**Only USDT perpetuals are supported and tested.**</mark>
* <mark style="color:red;">**Only futures trading is supported; the spot market is not available.**</mark>
* One Way and Hedge mode is supported
* <mark style="color:red;">**Hedge mode is recommended**</mark>
* Check if the master and slave are configured the same, such as One Way or Hedge mode, leverage, and so on.
* Only the Live environment is supported (no testnet available).
* Bitunix does not support multiple positions for the same symbol, only a single aggregated position. If there are multiple positions on the master account, they will be merged into one. In this case, the ticket number of the oldest position on the master account will be used for tracking purposes.
* Since Bitunix only supports **one aggregated position per symbol**, MetaCopier adapts TP/SL management as follows:
  * **For Buy Positions:**
    * The **highest Take Profit (TP)** among all master positions is applied.
    * The **lowest Stop Loss (SL)** among all master positions is applied.
  * **For Sell Positions:**
    * The **lowest Take Profit (TP)** among all master positions is applied.
    * The **highest Stop Loss (SL)** among all master positions is applied.
* Price differences between a normal Broker and Bitunix
  * There can be significant price differences between a normal broker and **Bitunix** (a direct market exchange). This is due to variations in liquidity, spreads, and pricing models used by brokers versus exchanges.
  * To ensure accurate risk management, we highly recommend enabling the [Pro features](/features/pro-features#tp-sl-management) feature in MetaCopier and activating the **"Adjust with master distance"** option. This ensures that Take Profit (TP) and Stop Loss (SL) levels are adjusted dynamically based on the price difference between the master and slave accounts, improving trade execution reliability.
* <mark style="color:red;">**Check the profit of the trades and adjust the multiplier to align the profit on the slave account, since Bitunix works differently compared to a traditional forex broker.**</mark>
* When adding a copier to the Bitunix account, the option **"Hide comment"** must be activated. Manual trading or positions opened by other systems on the slave account are not recommended while this option is active, because a position can still be misclassified.

### **How to generate an API Key and Secret Key on Bitunix**

To connect your Bitunix account to MetaCopier, you can generate your API keys by following these steps:

**Step 1: Log in to Bitunix**

* Go to the [Bitunix website](https://www.bitunix.com/).
* Click **Log In** and enter your credentials (email and password).
* Complete any 2FA authentication if prompted.

**Step 2: Navigate to API Management**

* Click on your **profile icon** in the top-right corner.
* Select **API Management** from the dropdown menu.

**Step 3: Create a New API Key**

* Click **Create API Key**.
* Enter a label/name for your API key (e.g., "MetaCopier").
* Under permissions, enable **Futures Trade**.
* Select **No IP restriction** (or bind to your dedicated IP if applicable).
* Click **Submit** and complete the verification steps.

**Step 4: Connect to MetaCopier**

* Log in to MetaCopier.
* Create a Bitunix account.
* Select **Live** as the server environment.
* Enter your **API Key** and **Secret Key** in the password field using the format:

  ```
  apikey|secretkey
  ```
* If the account can not connect try using a different region.

**Security Tips**

* Do **not** share your Secret Key with anyone.

## Hyperliquid

{% hint style="warning" %}
**Hyperliquid is currently supported as a beta feature.**
{% endhint %}

Important information regarding Hyperliquid. Please read it carefully:

* <mark style="color:red;">**Only USDC perpetuals are supported and tested.**</mark>
* <mark style="color:red;">**Only perpetual futures trading is supported; the spot market is not available.**</mark>
* <mark style="color:red;">**Hedge mode is recommended**</mark>
* Testnet and Live environments are supported.
* Hyperliquid does not support multiple positions for the same symbol, only a single aggregated position. If there are multiple positions on the master account, they will be merged into one. In this case, the ticket number of the oldest position on the master account will be used for tracking purposes.
* Since Hyperliquid only supports **one aggregated position per symbol**, MetaCopier adapts TP/SL management as follows:
  * **For Buy Positions:**
    * The **highest Take Profit (TP)** among all master positions is applied.
    * The **lowest Stop Loss (SL)** among all master positions is applied.
  * **For Sell Positions:**
    * The **lowest Take Profit (TP)** among all master positions is applied.
    * The **highest Stop Loss (SL)** among all master positions is applied.
* Price differences between a normal Broker and Hyperliquid
  * There can be significant price differences between a normal broker and **Hyperliquid** (a direct market exchange). This is due to variations in liquidity, spreads, and pricing models used by brokers versus exchanges.
  * To ensure accurate risk management, we highly recommend enabling the [Pro features](/features/pro-features#tp-sl-management) feature in MetaCopier and activating the **"Adjust with master distance"** option. This ensures that Take Profit (TP) and Stop Loss (SL) levels are adjusted dynamically based on the price difference between the master and slave accounts, improving trade execution reliability.
* <mark style="color:red;">**Check the profit of the trades and adjust the multiplier to align the profit on the slave account, since Hyperliquid works differently compared to a traditional forex broker.**</mark>
* When adding a copier to the Hyperliquid account, the option **"Hide comment"** must be activated. Manual trading or positions opened by other systems on the slave account are not recommended while this option is active, because a position can still be misclassified.

### **How to connect your Hyperliquid account**

To connect your Hyperliquid account to MetaCopier, you need to generate an API wallet:

**Step 1: Log in to Hyperliquid**

* Go to the [Hyperliquid website](https://app.hyperliquid.xyz/).
* Connect your wallet (MetaMask or other supported wallets).

**Step 2: Generate an API Wallet**

* Navigate to **Settings** → **API Wallets**.
* Click **Generate API Wallet**.
* Set the desired permissions (ensure trading is enabled).
* Note your **API Wallet Private Key** - this is shown only once.

**Step 3: Connect to MetaCopier**

* Log in to MetaCopier.
* Create a Hyperliquid account.
* Select **Testnet** or **Live** as the server environment.
* Enter your credentials in the following fields:
  * **Private Key** (required): Your API wallet private key.
  * **Wallet Address** (optional): The wallet address you want to trade on behalf of. If left empty, it will be derived from the private key automatically.
  * **Vault Address** (optional): The address of a vault or sub-account to trade through. Only needed if you want to trade on behalf of a vault.

The supported formats are:

```
privateKey
privateKey|walletAddress
privateKey|walletAddress|vaultAddress
```

{% hint style="info" %}
**Vault and sub-account trading:** Vaults and sub-accounts do not have their own private keys. To trade on behalf of a vault or sub-account, sign with the master account's API wallet and provide the vault/sub-account address in the Vault Address field. The Wallet Address must also be provided when using a vault.
{% endhint %}

**Security Tips**

* Do **not** share your API Wallet Private Key with anyone.
* Consider setting up a sub-account for API trading to limit risk exposure.

## Custom comment

See [#copy-original-comment](#copy-original-comment "mention")

## Copy original comment

With **MetaCopier**, it is possible to replicate the original trade comment or set a custom comment to slave accounts. However, <mark style="color:red;">**we strongly recommend not enabling this option**</mark> unless it is truly necessary.

Only activate it if you specifically need the original comment to appear on the slave side. As an alternative, we suggest using **Magic Numbers** to identify which Expert Advisor (EA) opened each position. This approach is cleaner and generally more reliable.

MetaCopier uses a different method than most other solutions for tracking open positions. Instead of relying entirely on a centralized system, it stores tracking information **directly in the broker’s comment field**. This ensures a higher level of **reliability and fault tolerance**.

Because the tracking data is embedded locally, MetaCopier remains stable and accurate even during database failures, network interruptions, or system crashes. This design helps prevent common problems such as **orphan trades**, where positions are left open unintentionally, or **duplicate trades**.

These issues are well known in many competing systems, but thanks to MetaCopier’s architecture, they are effectively avoided, offering a more secure and dependable trade copying experience.


# Pending orders

### **Why our trading platform doesn’t copy limit (pending) orders by default**

Our trade copying platform is designed to provide seamless and efficient execution of trades across multiple accounts. By default, **we do not copy limit (pending) orders**, as this approach is optimal for most traders.

{% hint style="warning" %}
**We do not recommend using pending orders for copy trading.**

A very common misconception is that placing a pending order (Buy Limit, Sell Limit, Buy Stop, Sell Stop) on the follower account guarantees a fill at the exact requested price, and therefore a "better" open price than a market order. **This is not true** on the vast majority of retail brokers.

Almost all Forex/CFD brokers execute orders in **market execution mode**. In this mode, a pending order is only a **trigger**: as soon as the market touches the requested price, the order is converted into a market order and filled at the **next available price**, which may be worse (slippage) or, in case of a gap, completely different from the requested price. The broker decides the final execution price, and by sending the order the trader implicitly accepts it.

So the price you set in a pending order is the **trigger price**, not the **fill price**. A guaranteed price only exists on real exchanges (stocks, futures) or on the rare brokers that still offer instant execution with requotes, neither of which applies to typical retail Forex/CFD trading. Copying the master's market order as a follower market order produces essentially the **same fill quality** as placing a pending order at the master's open price, without the extra risks described below.
{% endhint %}

#### **Understanding market execution vs. limit orders in a copying service**

In a traditional trading environment, traders place **limit orders** when they want to buy or sell an asset at a specific price rather than at the current market price. However, in a **trade copying** system, this approach introduces unnecessary complexity and risk for several reasons:

1. **The core principle of a copy trading service is market execution**
   * In a trade copier, the master account executes a trade, and the copier replicates that trade **at the market price at the moment of execution**.
   * This ensures that all follower accounts enter the trade as soon as possible, minimizing slippage and execution differences.
   * Limit orders, on the other hand, require waiting for a price level to be reached, which **adds delay and uncertainty to execution consistency**.
2. **No significant difference in triggering mechanism**
   * Whether a trade is executed because a limit order was triggered on the master account or because the copier sends a market order **immediately when the master order executes**, the outcome is almost identical.
   * The time difference between a pending order activation and a market execution trigger is usually in milliseconds, making the execution nearly the same in practical terms.
   * Copying limit orders would **not improve execution speed** or precision in a meaningful way.
3. **Unmanaged trades and risk exposure for followers**
   * If a limit order is copied and placed on a follower’s account, there is a risk that **the limit order gets triggered on the follower's account but not on the master account** (due to differences in market conditions, spreads, or liquidity).
   * This would result in an **unmanaged trade** on the follower’s side, which may not be closed properly or may not have a stop loss/take profit set in sync with the master account.
   * This can lead to unintended losses or inconsistencies in the trading strategy.
4. **Execution variability due to broker differences**
   * Different brokers have different pricing, liquidity, and order execution speeds.
   * A pending order may be filled on the follower’s broker while it remains unfilled on the master’s broker, causing **desynchronization** between master and follower trades.
   * Market execution eliminates this problem because all orders are copied in real-time based on actual executions.
5. **High-frequency trading (HFT) exception**
   * The only scenario where copying limit orders might be necessary is in **high-frequency trading (HFT) strategies** that rely on ultra-fast execution with very small stop loss and take profit targets.
   * These strategies may benefit from pre-placed limit orders to minimize slippage.
   * If you use an HFT strategy and fully understand the risks, you can [contact us](/metacopier/support) to manually enable this feature.

For the vast majority of traders, **copying market execution orders is the most efficient and reliable approach**. It ensures that followers always execute trades at the closest possible price to the master account, minimizing discrepancies. Copying limit orders **adds unnecessary risks without meaningful benefits**.

If you still want to copy pending orders despite the points above, contact us and we will unlock the feature for your project.


# Quick start guide

MetaCopier.io is a cloud solution to copy trades between your trading accounts. Please follow these steps to sign up, create a project, connect your trading accounts, and start copying trades. If you prefer, we also offer a video tutorial.

{% embed url="<https://www.youtube.com/watch?v=9ehPKO8_NJ0>" %}
Video tutorial to copy trades from MetaTrader to DXtrade
{% endembed %}

## Sign up

Click on the profile icon in the upper right corner.

<figure><img src="/files/XHKNPOgpB40yOApuhsG1" alt=""><figcaption></figcaption></figure>

Look for the option to "Sign In" and click on it.

<figure><img src="/files/3sLp5548GvOkp9w8DmTa" alt=""><figcaption></figcaption></figure>

1. Enter your email and password
2. Or alternatively, use a preferred method such as Google, Microsoft, or Apple to log in.
3. When you don't have a MetaCopier account, use the '**Register**' option to create a new account.

<figure><img src="/files/WAymCYizhyNh7Eo8yhzf" alt=""><figcaption></figcaption></figure>

1. To register a new account you have to add your personal informations such as first name, last name email and password
2. At the end you can press the 'Register' button to create the account.

<figure><img src="/files/oivWQTskCjL4qCYTCmHK" alt=""><figcaption></figcaption></figure>

## Add Payment method

{% hint style="info" %}
A credit card is needed. It will only be charged after the trial period ends or if you start a project with dedicated resources.
{% endhint %}

Click on "Dashboard"

<figure><img src="/files/dhatKDlhu77tFu7jPwfB" alt=""><figcaption></figcaption></figure>

Select "Payment method"

<figure><img src="/files/YFwHjToVil432o7YyZWL" alt=""><figcaption></figcaption></figure>

1. Click on the '+' at the top left side
2. Then choose your currency.

<figure><img src="/files/4rJI2w142Etgkru0bVN5" alt=""><figcaption></figcaption></figure>

1. Now a new window will open where you need to enter all your card information
2. At the end click on 'Authorize'
3. Or you choose to pay with link

<figure><img src="/files/OIUcATIekY1sUR7P0nXD" alt=""><figcaption></figcaption></figure>

In the end, if everything worked, you should see your card on the 'Payment Method' tab.

## Create a project

{% hint style="info" %}
A project is a logical group which you can also share with other members.
{% endhint %}

Begin by clicking on 'Dashboard'.<br>

<figure><img src="/files/Nql7v6qhVQzfNMiiBjAN" alt=""><figcaption></figcaption></figure>

1. A new window will open. Confirm that you are on the 'Projects' section, which you can verify on the left side of the screen.
2. Now you should see a cross icon, click on that field.

<figure><img src="/files/JXDZrW9VzDGM4SGH6Le0" alt=""><figcaption></figcaption></figure>

1. Now you need to input all your information in the new window like the Project Name and the Credit Card. Note that the company name is optional
2. the currency must match the payment method.

<figure><img src="/files/51AXM4Vb4prNcnMwbyl7" alt=""><figcaption></figcaption></figure>

After completing all the steps, your project should be visible in the projects tab.

<figure><img src="/files/3Svk3X3ggyZ4MiDTT6Eo" alt=""><figcaption></figcaption></figure>

## Connect your accounts

Select your newly created project.

<figure><img src="/files/u57TGuMhK0JM3vzzXUJH" alt=""><figcaption></figcaption></figure>

In this window you can connect your accounts by clicking on the field with the cross

<figure><img src="/files/VTiDApQaVhRvgB3W3M9b" alt=""><figcaption></figcaption></figure>

A new window will open where you have to enter the data of the trading account.

<figure><img src="/files/58pgnYbhitSdcR0TLSe6" alt=""><figcaption></figcaption></figure>

In the next picture you can see that the account has been connected and activated. Continue with the next step to create a copier.

<figure><img src="/files/C8o8rEELV7qs11VAc1u4" alt=""><figcaption></figcaption></figure>

{% hint style="info" %}
MetaCopier.io is built on a modern architecture and scales horizontally. Therefore, there is essentially no limit to the number of accounts you can add. If you plan to add a large number of accounts, just [let us know](/metacopier/support) so that we can assist you in the best way.
{% endhint %}

## Create your first copier

{% hint style="warning" %}
**Mind the direction.** The copier is always created on the **slave**, the account that should **receive** the trades. Inside the copier you then select the **master**, the account the trades come **from**. Example: to copy from TradeStation to MT5, open the copier on the **MT5** account and select **TradeStation** as "From account". More details: [Copiers](/features/basic-features/copiers#copy-direction-master-and-slave).
{% endhint %}

1. Now that you have two accounts you can create your first copier, for that please follow the next steps
2. On both accounts you can see the button "copiers" at the bottom left please click on button from the account you want to copy your trades **to** (the slave, the destination account).
3. A window with a cross will open click on this cross.

<figure><img src="/files/uaWQudT8ZU2SRWVFIYJD" alt=""><figcaption></figcaption></figure>

1. In **"From account"** select the **master**, the account the trades are copied **from**.
2. Then look that the status is activated.
3. To close the window click on save

<figure><img src="/files/zipwHntG0EcNiA8wYd5g" alt=""><figcaption></figcaption></figure>

{% hint style="info" %}
To double check the direction afterwards, open **View current symbol mapping** on the copier. The column **"Copy from (master)"** must show the symbols of your master account.
{% endhint %}

If everything has worked, you should see a green one on the "copiers" button.

<figure><img src="/files/KycqZ0920Y9P1zq4XDOo" alt=""><figcaption></figcaption></figure>

The copier is now active :clap:


# Set up strategy

{% hint style="info" %}
A strategy is used to group together multiple source accounts and risk limits to simplify management.
{% endhint %}

## Create a strategy

Go to the "Your Projects" tab and select the project you have created. On the left side you should see "Strategies" click on it.

<figure><img src="/files/MzMZSNuHY9BjKbu251lE" alt=""><figcaption></figcaption></figure>

Then click on the box with the cross.

<figure><img src="/files/51cuq32BlGqAsJFRNG33" alt=""><figcaption></figcaption></figure>

1. A new window will open, in this window you have to enter the name of your strategy.
2. Then activate the strategy below.
3. Done that you have to save it.

<figure><img src="/files/y2s9W3L9mw0ORmSK8J1s" alt=""><figcaption></figcaption></figure>

Once you have done this, you should see your strategy on the previous screen.

<figure><img src="/files/Pwv5tdOPI1UgnVQqRmXz" alt=""><figcaption></figcaption></figure>

## Configure your strategy

Now we have a strategy but it is not yet configured, we will do that here, first we have to add a copier from where the strategy gets the trades. Click on "Copiers" to open the settings.

<figure><img src="/files/iOKUYkIKeMhm9GC7G3Mw" alt=""><figcaption></figcaption></figure>

Then a new window will open with a cross click on this cross.

<figure><img src="/files/2Z95AutMtMRUgQrXAHj3" alt=""><figcaption></figcaption></figure>

1. When you have clicked on the cross, a new field will open, in which you must first specify from which account he copies the trades.
2. Then you have to activate the Copier Status if its not activated it won't copy.
3. Click on the Save button to save your settings

<figure><img src="/files/DQ2zHJDTh1yqezyzxWlX" alt=""><figcaption></figcaption></figure>

## Copy trades with a strategy

After configuring the strategy, there should be a 1 above the "Copiers" button.

Now that you have created a strategy you can apply the strategy to your accounts, go to "Accounts" on the left side of the page.

<figure><img src="/files/KT7TdQvwhcJkv2wk96al" alt=""><figcaption></figcaption></figure>

Select an account on which you want to copy the trades of the strategy you created earlier. Click on "Copiers" so that we can add the "Strategy" and than you have to click on the cross which appears.

<figure><img src="/files/ZD7k4IL3z6VXyeubJmkL" alt=""><figcaption></figcaption></figure>

First switch from account to strategy, then you can select your strategy in the lower field, finally save. after this point you have successfully created and applied a strategy

<figure><img src="/files/3jmgFUKar1QCKmsbBheX" alt=""><figcaption></figcaption></figure>

## Strategy copier features

Just like account copiers, strategy copiers also support features. You can add features such as Block Hedging, Multiplier, Maximum Lot Size, Trailing Stop, Break-Even, Trading Windows, and more directly to a strategy copier.

To add a feature to a strategy copier, navigate to your strategy, open the copier settings, and click on "Features".

### Feature priority

When an account subscribes to a strategy, features can be defined at two levels:

1. **Strategy copier level** - applies to all accounts subscribed to the strategy
2. **Account copier level** - applies only to the specific account

If the same feature type is configured on both levels, the **account copier feature takes priority** and the strategy-level feature is ignored. This allows you to set sensible defaults at the strategy level while still giving individual accounts the ability to override them.

{% hint style="info" %}
**Additive features:** The **Copier filter**, **Permitted symbols**, and **Order type filter** are exceptions - they are applied from both levels simultaneously (combined), rather than one overriding the other.
{% endhint %}

### Example use case

You run a strategy with 50 subscribers. You want all of them to have a maximum of 5 open positions, so you add the "Max Open Positions" feature to the strategy copier. However, one subscriber has a larger account and wants to allow 10 open positions - they can add their own "Max Open Positions" feature on their account copier, which will override the strategy-level setting for that account only.


# Connect TradingView

If you're interested in using **TradingView** as a trading terminal and replicating trades to **cTrader, MetaTrader 4/5, TradeLocker, and DXtrade**, please follow this guide.

## Requirements

To follow this guide, you need:

* A [TradingView account](https://www.tradingview.com/pricing/?share_your_love=costigator) (the free version is also supported)
* A cTrader account which can be connected to TradingView, such as [IC Markets](https://www.icmarkets.com/global/de/open-trading-account/live?camp=69605), Pepperstone, or BlackBull (a demo account is also fine). Other brokers may also be compatible, but they have not been tested.
* A [MetaCopier.io account](https://metacopier.io/)

{% hint style="info" %}
Some solutions on the market let you use the TradingView Alert/Webhook feature, but they have limitations. To send a good number of alerts/webhooks without reconfiguring everything each time, you need a TradingView premium plan, which costs around $600 per year. That’s why we recommend using the solution in this guide because it doesn’t cost extra.
{% endhint %}

## Sign in to TradingView

To get started, you first need to log in to TradingView. If you don't have an account, you'll need to [create one](https://www.tradingview.com/pricing/?share_your_love=costigator).

<figure><img src="/files/INxbmL3Q4RNXqIfMeK6s" alt=""><figcaption><p>TradingView Homepage</p></figcaption></figure>

## Open a Chart

Once you're signed in, open a full chart. Then, navigate to the Trading Panel, which you can find at the bottom of the screen.

<figure><img src="/files/5xCiJVDDE6th2AvHau8x" alt=""><figcaption></figcaption></figure>

## Choose your Broker

1. Our reccomendation is to use a broker which is compatible with cTrader such as such as [IC Markets](https://www.icmarkets.com/global/de/open-trading-account/live?camp=69605), Pepperstone, or BlackBull. Other brokers and trading platforms may also be compatible, but they have not been tested.
2. If you've found your broker, click on it, and a new window will appear. For this documentation, we've used IC Markets as an example.
3. In the new window, you need to click on "Connect."

<figure><img src="/files/YHI0uW5IQlop98hYRpRo" alt=""><figcaption></figcaption></figure>

## Connect to Broker

As soon as you click on "Connect," you will be redirected to the broker's website, where you will need to log in.

<figure><img src="/files/l6h4CUl6OJOQ0i9nKpnw" alt=""><figcaption></figcaption></figure>

After entering your credentials, a new cTrader account with your broker will be opened. You will then have the option to sync with TradingView; click on it.

<figure><img src="/files/dYDgbhO2aJTLNUK4lToG" alt=""><figcaption></figcaption></figure>

{% hint style="info" %}
If you don't have any cTrader account listed please create first a new one and repeat this process
{% endhint %}

## Place your Trades

If you've completed all these steps and the symbol you want to trade is from the correct broker, you'll be able to place trades directly through TradingView.

<figure><img src="/files/yHzQE6ThJQPmc5pels4x" alt=""><figcaption></figcaption></figure>

## Copy trades to other accounts

Now that you have connected your TradingView account with a cTrader account, you can add this account to MetaCopier.io and copy the trades to other accounts. If this is your first time, please follow the [quick start guide](/tutorials/quick-start-guide).


# Connect TradingView via Webhook

{% hint style="warning" %}
The TradingView integration via Webhook is in beta. Please use it with a demo account to ensure everything works as expected.
{% endhint %}

{% hint style="warning" %}
Webhooks require some technical knowledge of **JSON formatting and general web request concepts**. If you are not familiar with these topics, we recommend using the more straightforward solution of [connecting TradingView with a **supported broker directly**](/tutorials/connect-tradingview).
{% endhint %}

TradingView webhooks allow you to send automated trading alerts directly to external systems. By connecting them to MetaCopier, you can automatically execute and copy trades based on TradingView alerts and Pine Scripts without manual intervention. This guide shows how to set up and use TradingView webhooks with MetaCopier.

{% hint style="info" %}
What is webhook? A **webhook** is a way for one platform to automatically send information to another platform in real time.

In the case of **TradingView and MetaCopier**, a webhook allows TradingView to send a message to MetaCopier whenever an alert is triggered. This message can contain trading instructions such as **open a trade, close a trade, or modify a position**. MetaCopier receives the message and executes the action on the connected trading account automatically.

In simple terms, a webhook acts like a **messenger that instantly delivers TradingView alerts to MetaCopier so trades can be executed automatically**.
{% endhint %}

## Requirements

To use TradingView webhooks with MetaCopier, you need the following:

* One trading account connected to MetaCopier
* A TradingView account

## Quick Start

### Enable the Feature

On the trading account where you want positions to be opened or closed, add the **“TradingView Webhook”** feature in MetaCopier:

<figure><img src="/files/M7L2MdNJh9LFdjPOwYks" alt=""><figcaption></figcaption></figure>

A new window with the **TradingView Webhook configuration** will open. For now, leave the **default settings** and save them. Each setting is explained in the [**Advanced Guide**](#advanced-guide) below.

<figure><img src="/files/LTPXK2yFqA8ZnUIKXEOY" alt=""><figcaption></figcaption></figure>

### **Configure a New Alert**

Open the TradingView webhook feature (edit button) and select the **Setup Guide** at the top.

<figure><img src="/files/9SFHTsj3vQrcV3fTl0vi" alt=""><figcaption></figcaption></figure>

A new window will open where you will find all the information required for the TradingView webhook.

<figure><img src="/files/MdOSOtXTOTdtXkrH3wHN" alt=""><figcaption></figcaption></figure>

In TradingView, open the desired chart (in this example, **XAUUSD**). Then, in the **top-right corner**, open the **Alerts** section and create a new alert with the "+" symbol.

<figure><img src="/files/Z4aQ5SGT3Afy7z7V6vHs" alt=""><figcaption></figcaption></figure>

A new window will open. The first step is to define the **Webhook URL**, which is where the alerts will be sent. Open the **Notifications** tab and enter the URL shown in the **MetaCopier Setup Guide** into the **Webhook URL** field.

<figure><img src="/files/k7Cyvdd4Eky31cYVLb8a" alt=""><figcaption></figcaption></figure>

Switch to the **Message** tab in TradingView, where you can define how the message sent to MetaCopier will be formatted. The message must be formatted as **JSON** and includes the instructions for MetaCopier. Below is a simple example that **opens a** **buy position for XAUUSD with 0.1 lot size.**

```json
{
  "secret": "your_secret_minimum_16_chars",
  "action": "open",
  "symbol": "XAUUSD",
  "orderType": "buy",
  "volume": 0.1
}
```

In TradingView, it will look like this. Please make sure that the rectangle containing the JSON message is **green**. If it is **orange**, it means the JSON contains formatting errors.

<figure><img src="/files/Ul27f8XR8LNsBu0Yypm5" alt=""><figcaption></figcaption></figure>

That’s all! Click **Create** to save the alert and make sure it is **active** in TradingView.

<figure><img src="/files/QD3naFSoeuDEVgvAiKK0" alt=""><figcaption></figcaption></figure>

Once the alert is triggered, MetaCopier will receive the notification and the defined order will be executed on your trading account.

<figure><img src="/files/jhgu5gXzGYMtTHRHXYX7" alt=""><figcaption></figcaption></figure>

In the **Log** section in TradingView, you can check the delivery status.

<figure><img src="/files/ADxjVwCHXd8YhVNpP6nZ" alt=""><figcaption></figcaption></figure>

And this is how it looks on the **trading account** after the **webhook** has been received.

<figure><img src="/files/nxOoHwJidCMADAwsEGSE" alt=""><figcaption></figcaption></figure>

## Webhook examples

Below are some **typical JSON messages** to help you set up your alerts correctly. As a starting point, we will use the example shown earlier:

```json
{
  "secret": "your_secret_minimum_16_chars",
  "action": "open",
  "symbol": "XAUUSD",
  "orderType": "buy",
  "volume": 0.1
}
```

To avoid specifying the **symbol** every time (for example, if you want to reuse the same format on multiple alerts or charts), you can use **TradingView placeholders**. These placeholders act like **variables** that TradingView automatically fills with the correct values when the alert is triggered, so you don’t need to hardcode them.

Let’s use the `{{ticker}}` placeholder to avoid defining the symbol name in every alert:

```json
{
  "secret": "your_secret_minimum_16_chars",
  "action": "open",
  "symbol": "{{ticker}}",
  "orderType": "buy",
  "volume": 0.1
}
```

When the alert is triggered, the symbol will automatically be replaced based on the chart used to create the alert (in our case, **XAUUSD**).

Now let’s define **take profit (TP)** and **stop loss (SL)** values.

```json
{
  "secret": "your_secret_minimum_16_chars",
  "action": "open",
  "symbol": "{{ticker}}",
  "orderType": "buy",
  "volume": 0.1,
  "stopLoss": 5050,
  "takeProfit": 5130
}
```

This works, but as you can imagine, the **TP/SL values are hardcoded** and must be defined each time.

{% hint style="info" %}
**Using Points Instead of Price**

By default, `stopLoss` and `takeProfit` are interpreted as absolute price levels. You can also specify them as a **distance in points** from the fill price by adding `stopLossType` and/or `takeProfitType`:

```json
{
  "secret": "your_secret_minimum_16_chars",
  "action": "open",
  "symbol": "{{ticker}}",
  "orderType": "buy",
  "volume": 0.1,
  "stopLoss": 500,
  "stopLossType": "points",
  "takeProfit": 1000,
  "takeProfitType": "points"
}
```

In this example, the SL is set **500 points below** the fill price and TP is set **1000 points above** (for a buy order). This is useful when you don't know the exact entry price in advance.
{% endhint %}

{% hint style="warning" %}
**How SL/TP reach your broker: `separateTpSlOrder`**

MT4 and MT5 do not support relative (points based) SL/TP at the platform level, so MetaCopier resolves them for you. The optional `separateTpSlOrder` flag controls how:

**`separateTpSlOrder: false` (default)**

SL and TP are **always sent together with the order**, so the position is never held unprotected.

* With `price` the levels are used exactly as you send them.
* With `points` MetaCopier fetches the current quote, calculates the levels from it, and sends them with the order. Once the real fill price is known, a follow up modify corrects the levels so the distance matches your request exactly even after slippage.
* If the levels are invalid (for example inside the broker's minimum stop distance), the broker rejects the whole order and **no position is opened**. You receive a clear error and the request is retried.
* If no quote is available for the symbol, the position is **not** opened and the request fails with `QUOTE_MISSING`.

**`separateTpSlOrder: true`**

The order is sent **without SL/TP** and the levels are attached afterwards through a separate modify order. This applies to both `price` and `points`.

* The position always opens, even when the levels are invalid.
* The modify is **not guaranteed** to succeed. If the broker rejects it (minimum stop distance, freeze level), the position stays open **without SL/TP**.

Also note that `points` means **broker points** (the smallest price increment of the symbol), not pips. On a 3 digit gold quote one point equals `0.001`, so `"stopLoss": 400` is only `$0.40` away from the entry price, which most brokers reject as too close.
{% endhint %}

{% hint style="success" %}
**Multiple Take Profits in a Single Alert (native multi-TP)**

If your strategy ladders out at several TP levels, you can send them **in one webhook call** using the `takeProfits` array. MetaCopier expands the request server-side into one position per TP level - atomically, in order, and without any risk of bursts being dropped by the broker.

```json
{
  "secret": "your_secret_minimum_16_chars",
  "action": "open",
  "symbol": "XAUUSD",
  "orderType": "buy",
  "volume": 0.06,
  "stopLoss": 4455,
  "tradeKey": "xau_long_001",
  "takeProfits": [
    { "takeProfit": 4470 },
    { "takeProfit": 4480 },
    { "takeProfit": 4495 }
  ]
}
```

In this example MetaCopier opens **3 positions**, each with the same SL but a different TP, splitting the parent `volume` equally (`0.02` each). Each leg gets its own unique `tradeKey` automatically (`xau_long_001_t1`, `xau_long_001_t2`, …) so you can later modify or close them individually.

**Per-leg sizing.** Each entry in `takeProfits` may override the default equal split:

```json
"takeProfits": [
  { "takeProfit": 4470, "volume": 0.03 },
  { "takeProfit": 4480, "volumePercent": 33.33 },
  { "takeProfit": 4495 }
]
```

* `volume` - absolute lot size for that leg.
* `volumePercent` - percentage of the parent sizing (works with `volume`, `riskPercent`, `riskAmount`, or `marginPercent`). Sum of percents must be ≤ 100.
* Omitted - receives an equal share of whatever sizing remains.

**Risk-based / margin-based parents.** When the parent uses `riskPercent` / `riskAmount` / `marginPercent` and the legs do not override sizing, the sizing is **divided equally** across legs so the total equals what you requested.

**Per-leg type.** A leg may set its own `takeProfitType` (`price` or `points`); otherwise it inherits from the parent.

**Constraints.**

* Maximum **20** take profit levels per request.
* When using `takeProfits`, the parent `tradeKey` must be ≤ **16 characters** (MetaCopier appends `_t<index>` to derive unique per-leg keys within the 20-char limit).
* The HTTP response stays backward compatible: the top-level `requestId` is the first leg's id, and `data.subRequestIds` lists every leg id for per-leg status tracking via `GET /requests/{requestId}/status`.

**Why use this instead of sending multiple webhooks?** A single request avoids the race between concurrent webhook calls hitting the broker. Each leg is reserved with a unique `tradeKey` and submitted through the same queue, so partial drops under bursts no longer happen.
{% endhint %}

To make them **dynamic**, you have two options:

* Use the [**MetaCopier TP/SL Management**](/features/pro-features#tp-sl-management) feature to set TP/SL values automatically after the order has been placed on the broker.
* Use [**Pine Script in TradingView**](https://www.tradingview.com/pine-script-docs/faq/alerts/#how-do-i-make-an-alert-available-from-my-script) to calculate these values dynamically and include them in the webhook message.

Let’s now see how to manage existing trades. To be able to **modify or close existing trades via webhook**, we first need to define a **unique identifier** when opening a position. This is done using the JSON property **`tradeKey`**. For example:

```json
{
  "secret": "your_secret_minimum_16_chars",
  "action": "open",
  "symbol": "{{ticker}}",
  "orderType": "buy",
  "volume": 0.1,
  "stopLoss": 5050,
  "takeProfit": 5130,
  "tradeKey": "xauusd_long_001"
}
```

To modify a specific position, you can create an **alert** with the following content:

```json
{
  "secret": "your_secret_minimum_16_chars",
  "action": "modify",
  "tradeKey": "xauusd_long_001",
  "stopLoss": 5060,
}
```

And to close it, you can use:

```json
{
  "secret": "your_secret_minimum_16_chars",
  "action": "close",
  "tradeKey": "xauusd_long_001"
}
```

## Webhook URL

MetaCopier operates in four regions: **New York, London, Berlin, and Singapore**. Each region has its own trading API to help minimize latency and improve execution speed.

In the **Setup Guide** described above, the correct **Webhook URL** is automatically generated for your trading account and region.

The Webhook URL has the following structure:

```
https://{region}.metacopier.io/rest/api/v1/webhooks/tradingview/accounts/{your-account-id}
```

| Region    | Host            |
| --------- | --------------- |
| New York  | `api-newyork`   |
| London    | `api-london`    |
| Berlin    | `api-berlin`    |
| Singapore | `api-singapore` |
| Global    | `api`           |

***

## Advanced Guide

This section covers all features, configuration options, and advanced usage.

### Feature Configuration

All configuration options for the TradingView Webhook feature:

```json
{
  "enableWebhook": true,
  "authMethod": "SECRET",
  "webhookSecret": "wh_abc123def456xyz789",
  "allowedActions": ["open", "close", "modify"],
  "allowCloseAll": false,
  "allowSymbolOnlyClose": false,
  "maxMatchCount": 3,
  "ipAllowlist": [],
  "requireTimestampForSecret": false,
  "timestampToleranceSeconds": 60,
  "dataRetentionDays": 30,
  "maxAllowedVolume": 0,
  "openRetry": true,
  "openRetryTimeoutInMinutes": 5
}
```

#### Configuration Reference

| Option                      | Type    | Default  | Description                                                                                                                                                             |
| --------------------------- | ------- | -------- | ----------------------------------------------------------------------------------------------------------------------------------------------------------------------- |
| `enableWebhook`             | boolean | `true`   | Enable/disable webhook processing                                                                                                                                       |
| `authMethod`                | string  | `SECRET` | `SECRET` or `HMAC`                                                                                                                                                      |
| `webhookSecret`             | string  | -        | Secret for SECRET auth (min 16, max 64 chars)                                                                                                                           |
| `hmacSecret`                | string  | auto     | Secret for HMAC auth (auto-generated, read-only)                                                                                                                        |
| `allowedActions`            | array   | all      | Allowed actions. Empty = all allowed                                                                                                                                    |
| `allowCloseAll`             | boolean | `false`  | Enable `closeAll` action                                                                                                                                                |
| `allowSymbolOnlyClose`      | boolean | `false`  | Allow close by symbol without filters                                                                                                                                   |
| `maxMatchCount`             | integer | `3`      | Max positions before requiring `force: true` (1-100)                                                                                                                    |
| `ipAllowlist`               | array   | `[]`     | Allowed IPs. Empty = all allowed                                                                                                                                        |
| `requireTimestampForSecret` | boolean | `false`  | Require timestamp for SECRET auth                                                                                                                                       |
| `timestampToleranceSeconds` | integer | `60`     | Max age of timestamp in seconds (10-300)                                                                                                                                |
| `dataRetentionDays`         | integer | `30`     | TTL for stored data (1-90 days)                                                                                                                                         |
| `maxAllowedVolume`          | number  | `0`      | Max volume in lots per trade (safety cap). Applies to all sizing modes (`volume`, `riskPercent`, `riskAmount`, `marginPercent`). `0` = deactivated (no cap)             |
| `openRetry`                 | boolean | `true`   | Retry a request that was rejected by the broker, left unanswered by the terminal, or could not be sent because the account was temporarily offline. `false` = send once |
| `openRetryTimeoutInMinutes` | integer | `5`      | Total retry window in minutes (1-60). Retries run every 30 seconds. Only used if `openRetry` is `true`                                                                  |

#### Retry Behaviour

A webhook request is not always answered immediately by the broker. The trading terminal waits up to 15 seconds for a confirmation. If nothing arrives within that time, or if the broker rejects the order (for example because the market is momentarily closed or the price moved away), MetaCopier can retry the request automatically.

A retry is also triggered when the request never reached the broker at all, for example because the account had just lost its broker connection, or because the connection was restored but the symbol list was still loading.

* Retries run every **30 seconds** until `openRetryTimeoutInMinutes` has elapsed.
* Every failed attempt writes an entry in the account logs, so a trade that is still being retried is visible immediately instead of only after the window has elapsed.
* Retries that follow a missing broker confirmation reuse the same internal request ID. MetaCopier resends the order only when it can determine that the previous attempt never opened a position, so a trade that did reach the broker is never opened twice.
* Once the window has elapsed, the request is marked as failed and a warning entry appears in the account logs.
* With `openRetry: false` the request is sent exactly once. This is the recommended setting for scalping and high-frequency strategies, where a fill two minutes late is worse than no fill at all.

{% hint style="info" %}
The webhook response (`202 Accepted`) is returned immediately when the alert arrives. Retries happen asynchronously in the background, so TradingView never has to wait.
{% endhint %}

### Authentication Methods

#### SECRET Authentication (Recommended)

Simple secret in the request body:

```json
{
  "secret": "wh_abc123def456xyz789",
  "action": "open",
  ...
}
```

**Optional Replay Protection**

Enable `requireTimestampForSecret: true` to require timestamp:

```json
{
  "secret": "wh_abc123def456xyz789",
  "timestamp": 1708771200,
  "action": "open",
  ...
}
```

Requests with timestamps older than `timestampToleranceSeconds` are rejected.

#### HMAC Authentication (Advanced)

For enhanced security using cryptographic signatures:

```json
{
  "signature": "a1b2c3d4e5f6...",
  "timestamp": 1708771200,
  "action": "open",
  ...
}
```

**Signature Calculation:**

```
HMAC-SHA256(hmacSecret, timestamp + "." + canonicalPayload)
```

Where:

* `timestamp` = Unix seconds (required, must be numeric)
* `canonicalPayload` = JSON with sorted keys, no whitespace, excluding `timestamp` and `signature` fields

{% hint style="info" %}
**Note**: HMAC auth requires a proxy service to compute the signature before sending to MetaCopier.
{% endhint %}

***

### All Actions

| Action        | Description                                                 |
| ------------- | ----------------------------------------------------------- |
| `open`        | Open a new position                                         |
| `close`       | Close position(s) by matching criteria                      |
| `cancelOrder` | Cancel pending order(s) ONLY (never touches live positions) |
| `modify`      | Update SL/TP or partial close                               |
| `closeAll`    | Close all positions (requires `allowCloseAll: true`)        |
| `store`       | Store custom data in Database                               |

***

### Open Action

Opens a new position.

```json
{
  "secret": "your_secret",
  "action": "open",
  "symbol": "EURUSD",
  "orderType": "buy",
  "volume": 0.1,
  "stopLoss": 1.0800,
  "stopLossType": "price",
  "takeProfit": 1.0950,
  "takeProfitType": "price",
  "openPrice": 1.0870,
  "tradeKey": "my_trade",
  "magicNumber": "150001",
  "orderId": "Long Entry",
  "comment": "TV_Signal"
}
```

#### Open Fields

| Field                  | Required | Type    | Description                                                                                                                                                                                                                                                                                                                                     |
| ---------------------- | -------- | ------- | ----------------------------------------------------------------------------------------------------------------------------------------------------------------------------------------------------------------------------------------------------------------------------------------------------------------------------------------------- |
| `symbol`               | ✅        | string  | Trading pair (e.g., `EURUSD`)                                                                                                                                                                                                                                                                                                                   |
| `orderType`            | ✅        | string  | Order type (see below)                                                                                                                                                                                                                                                                                                                          |
| `volume`               | ⚡        | number  | Lot size (must be positive). Required unless `riskPercent`, `riskAmount`, or `marginPercent` is used                                                                                                                                                                                                                                            |
| `riskPercent`          | ⚡        | number  | Risk as percentage of account balance (e.g., `1.0` = 1%). Requires `stopLoss`. See [Risk Per Trade Sizing](#risk-per-trade-sizing)                                                                                                                                                                                                              |
| `riskAmount`           | ⚡        | number  | Risk as fixed currency amount (e.g., `100` = $100). Requires `stopLoss`. See [Risk Per Trade Sizing](#risk-per-trade-sizing)                                                                                                                                                                                                                    |
| `marginPercent`        | ⚡        | number  | Size the position to use a percentage of your **free (available) margin** (e.g., `5.0` = 5%). Does **not** require a stop loss. See [Margin-Based Sizing](#margin-based-sizing)                                                                                                                                                                 |
| `stopLoss`             | ⬜        | number  | Stop loss value (interpretation depends on `stopLossType`)                                                                                                                                                                                                                                                                                      |
| `stopLossType`         | ⬜        | string  | `price` (default) for absolute price, `points` for relative distance from fill price                                                                                                                                                                                                                                                            |
| `takeProfit`           | ⬜        | number  | Take profit value (interpretation depends on `takeProfitType`)                                                                                                                                                                                                                                                                                  |
| `takeProfitType`       | ⬜        | string  | `price` (default) for absolute price, `points` for relative distance from fill price                                                                                                                                                                                                                                                            |
| `separateTpSlOrder`    | ⬜        | boolean | `false` (default): SL/TP are sent together with the order. `true`: the order is opened first and SL/TP are attached through a separate modify order, which the broker may reject. See the note in the Points section                                                                                                                            |
| `takeProfits`          | ⬜        | array   | Optional list of TP levels for **native multi-TP**. When provided, MetaCopier opens one position per level atomically. See [Multi Take Profit](#multi-take-profit)                                                                                                                                                                              |
| `openPrice`            | ⬜        | number  | Entry price (for pending orders)                                                                                                                                                                                                                                                                                                                |
| `pendingExpirySeconds` | ⬜        | number  | Native broker-side expiry (seconds from now) for pending orders (`buyLimit`/`sellLimit`/`buyStop`/`sellStop`) on MT4/MT5. The broker cancels the order automatically if it is not filled in time. Ignored for market orders and unsupported account types. `0`/omitted = good-till-cancelled. See [Pending Order Expiry](#pending-order-expiry) |
| `tradeKey`             | ⬜        | string  | Unique identifier for this trade (max 20 chars, no \`                                                                                                                                                                                                                                                                                           |
| `magicNumber`          | ⬜        | string  | Group identifier for the strategy. **Digits only, positive integer** (e.g. `"150001"`). Written to the broker's native magic number field, so it is never truncated. See [Truncation-Proof Grouping](#truncation-proof-grouping-magicnumber)                                                                                                    |
| `orderId`              | ⬜        | string  | Strategy order ID from `{{strategy.order.id}}` (no \`                                                                                                                                                                                                                                                                                           |
| `comment`              | ⬜        | string  | Trade comment (no \`                                                                                                                                                                                                                                                                                                                            |

{% hint style="warning" %}
**Comment Truncation:** MetaCopier prepends a short tracking prefix to the comment field (format: `TV|tradeKey|orderId|comment`). Since MT4/MT5 brokers typically limit the comment field to **25–31 characters**, everything beyond the limit is cut off by the broker. The identifiers sit at the end of the string, so `orderId` is the first part to disappear. A truncated `orderId` no longer matches, which silently breaks `matchMode: GROUP` for `close`, `cancelOrder` and `modify`.

To stay within the limit, use short `tradeKey` values and omit `orderId`. For group operations that must always work, use `magicNumber` instead (see below).
{% endhint %}

{% hint style="info" %}
**Seeing truncated comments?** Write to <support@metacopier.io> with your account and an affected ticket number. We can enable server-side comment restoration for your account. MetaCopier then remembers the comment it sent and returns the full text through the REST API, even though the broker itself only stores the shortened version. Note that the MetaTrader terminal still displays the shortened comment, which is a broker limit we cannot change.
{% endhint %}

{% hint style="danger" %}
**Pipe character restriction:** The `tradeKey`, `orderId`, and `comment` fields must **not** contain the pipe character (`|`). This character is used internally as a delimiter for position tracking. Requests containing `|` in these fields will be rejected with a 400 error.
{% endhint %}

#### Truncation-Proof Grouping (magicNumber)

`magicNumber` is **not** part of the comment. It is written to the broker's own magic number field (`ExpertId` on MT4/MT5, `label` on cTrader), a separate numeric field with no character limit that is read back unchanged. Group matching on `magicNumber` compares that exact value, so it cannot be affected by comment truncation.

`orderId` is only carried inside the comment and is matched as a substring of it. On brokers with a short comment field it will not survive.

|                       | `magicNumber`       | `orderId`                |
| --------------------- | ------------------- | ------------------------ |
| Stored in             | Native broker field | Position comment         |
| Truncation risk       | None                | High (25–31 char limit)  |
| Matched by            | Exact value         | Substring of the comment |
| Recommended for GROUP | ✅ Yes               | ⚠️ Fallback only         |

**Recommendation:** if you rely on `matchMode: GROUP` for `close`, `cancelOrder` or `modify`, map your strategy or entry name to a fixed integer and send it as `magicNumber`.

```json
{
  "secret": "your_secret_minimum_16_chars",
  "action": "open",
  "symbol": "EURUSD",
  "orderType": "buy",
  "volume": 0.1,
  "magicNumber": "150001"
}
```

```json
{
  "secret": "your_secret_minimum_16_chars",
  "action": "close",
  "matchMode": "GROUP",
  "magicNumber": "150001",
  "force": true
}
```

{% hint style="danger" %}
**`magicNumber` must be digits only.** The value is passed straight through to the broker's numeric magic number field, so anything containing letters, underscores or spaces (e.g. `"RSI_15M"`) is rejected and the position is **not** opened. The account log shows `MAGIC_NUMBER_ONLY_DIGITS_ALLOWED`; negative values are rejected with `MAGIC_NUMBER_MUST_BE_POSITIVE`.

Pick any positive integer as your strategy ID and keep the mapping on your side, for example `150001` = RSI 15M, `220001` = Grid EURUSD.
{% endhint %}

{% hint style="info" %}
Magic numbers are also visible to [copier filters](/features/basic-features/copier-filter), so choose values that do not collide with other strategies on the same account. On DXtrade, TradeLocker, MatchTrader and the crypto exchanges the magic number field is not available. Use `tradeKey` (EXACT) there.
{% endhint %}

#### Order Types

| Type        | Description      |
| ----------- | ---------------- |
| `buy`       | Market buy       |
| `sell`      | Market sell      |
| `buylimit`  | Buy limit order  |
| `selllimit` | Sell limit order |
| `buystop`   | Buy stop order   |
| `sellstop`  | Sell stop order  |

{% hint style="info" %}
Order types are case-insensitive.
{% endhint %}

### Risk Per Trade Sizing

Instead of specifying a fixed `volume`, you can let MetaCopier automatically calculate the lot size based on your risk tolerance and the **stop loss distance**. Two modes are available:

* **`riskPercent`** - risk a percentage of your account balance per trade
* **`riskAmount`** - risk a fixed currency amount per trade

#### How It Works

When you send `riskPercent` or `riskAmount` instead of `volume`, MetaCopier calculates the lot size using these formulas:

**Percentage mode:**

```
lots = (balance × riskPercent / 100) / (stopLossDistance × tickValue)
```

**Amount mode:**

```
lots = riskAmount / (stopLossDistance × tickValue)
```

The result is then rounded to the symbol's lot step and clamped to the symbol's min/max volume.

{% hint style="info" %}
**Volume cap applies here too.** If you set `maxAllowedVolume` (see [Configuration Reference](#configuration-reference)) to a value greater than `0`, the calculated lot size is capped to it after the risk calculation. Set it to `0` to deactivate the cap.
{% endhint %}

#### Requirements

To use `riskPercent` or `riskAmount`, the following features must be enabled on your trading account in MetaCopier:

1. **TradingView Webhook** feature
2. **Risk Per Trade** feature (provides tick value configuration and symbol settings)

The Risk Per Trade feature is needed for the **tick value** used in the lot size calculation. Tick values are collected automatically from your trades once both features are active.

{% hint style="info" %}
**You do not need to set a risk percentage or absolute risk amount in the Risk Per Trade feature settings.** Both values can be left at `0` - this disables the account-level risk limiting, but the **tick value service still runs** in the background. The webhook uses its own `riskPercent` or `riskAmount` parameter for lot size calculation, and only needs the tick value data from the Risk Per Trade feature.
{% endhint %}

{% hint style="info" %}
**Tick value can also be entered manually.** On the account-level Risk Per Trade feature you can either keep **Tick value automatic adjustement** enabled (the default, detects the tick value from live and history trades) or disable it and type the **Tick value** in directly, globally or per symbol. Use manual entry if you want to trade immediately without waiting for auto-detection, or when auto-detection is unreliable (very small or very few trades). See [Risk Per Trade - Tick Value](/features/pro-features/risk-per-trade/risk-per-trade-tick-value) for how to calculate it.
{% endhint %}

{% hint style="warning" %}
**Important**: When automatic detection is used, the tick value service needs data from at least one closed or open trade before it can calculate lot sizes. The trades must have some pips of profit or loss (not zero) so the system can detect the tick value in your account currency. If no tick value data is available yet and no manual tick value is configured, the webhook will return a `RISK_TICK_VALUE_UNAVAILABLE` error.
{% endhint %}

#### Rules

* `volume`, `riskPercent`, `riskAmount`, and `marginPercent` are **mutually exclusive** - provide exactly one
* `riskPercent` must be greater than `0` and at most `100`
* `riskAmount` must be greater than `0`
* `stopLoss` is **mandatory** when using `riskPercent` or `riskAmount` (the SL distance determines the lot size). It is **not** required for `marginPercent`
* Works with both `stopLossType: "price"` and `stopLossType: "points"`
* Works with all order types (market and pending)

#### Example: Risk 1% of Balance

```json
{
  "secret": "your_secret_minimum_16_chars",
  "action": "open",
  "symbol": "EURUSD",
  "orderType": "buy",
  "riskPercent": 1.0,
  "stopLoss": 50,
  "stopLossType": "points",
  "takeProfit": 100,
  "takeProfitType": "points"
}
```

If your account balance is $10,000, this risks $100 (1%). With a 50-point SL and the current tick value, MetaCopier calculates the appropriate lot size automatically.

#### Example: Risk 2% with Price-Based SL

```json
{
  "secret": "your_secret_minimum_16_chars",
  "action": "open",
  "symbol": "XAUUSD",
  "orderType": "buy",
  "riskPercent": 2.0,
  "stopLoss": 2300.00,
  "takeProfit": 2380.00,
  "tradeKey": "gold_long_001"
}
```

#### Example: Risk $100 Fixed Amount

```json
{
  "secret": "your_secret_minimum_16_chars",
  "action": "open",
  "symbol": "EURUSD",
  "orderType": "buy",
  "riskAmount": 100,
  "stopLoss": 50,
  "stopLossType": "points",
  "takeProfit": 100,
  "takeProfitType": "points"
}
```

This risks exactly $100 regardless of your account balance. With a 50-point SL and the current tick value, MetaCopier calculates the appropriate lot size automatically.

#### Pine Script Example with Risk Per Trade

```pine
//@version=5
strategy("Risk Managed Strategy", overlay=true)

slPoints = input.int(50, "SL Points")
tpPoints = input.int(100, "TP Points")
riskPct  = input.float(1.0, "Risk %", minval=0.1, maxval=100)

if buyCondition
    alertMsg = '{"secret": "your_secret_minimum_16_chars", "action": "open", "symbol": "' + syminfo.ticker + '", "orderType": "buy", "riskPercent": ' + str.tostring(riskPct) + ', "stopLoss": ' + str.tostring(slPoints) + ', "stopLossType": "points", "takeProfit": ' + str.tostring(tpPoints) + ', "takeProfitType": "points", "tradeKey": "risk_' + syminfo.ticker + '_' + str.tostring(timenow) + '"}'
    strategy.entry("Long", strategy.long, alert_message=alertMsg)
```

***

### Margin-Based Sizing

Instead of sizing from a stop-loss distance, you can size the position from your **free (available) margin** using `marginPercent`. This is useful when your strategy has no fixed stop loss, or when you want each trade to consume a predictable slice of your buying power.

#### How It Works

When you send `marginPercent` instead of `volume`, MetaCopier calculates the lot size using:

```
lots = (freeMargin × marginPercent / 100) / marginPerLot
```

`marginPerLot` is the margin required for 1.0 lot, taken directly from the broker (MT4 `MODE_MARGINREQUIRED` / MT5 `OrderCalcMargin`) when available, otherwise derived from the current price, contract size, and the symbol's effective leverage. The result is rounded to the symbol's lot step and clamped to its min/max volume.

{% hint style="info" %}
**Self-limiting.** Because sizing is based on *free* margin, each new open position reduces the margin available to the next one, so trades are automatically sized smaller as your exposure grows - reducing the chance of a margin call.
{% endhint %}

{% hint style="info" %}
**No stop loss and no Risk Per Trade feature required.** Unlike `riskPercent` / `riskAmount`, margin-based sizing does not use the stop-loss distance or the tick value, so the Risk Per Trade feature is not needed.
{% endhint %}

#### Rules

* `marginPercent` is mutually exclusive with `volume`, `riskPercent`, and `riskAmount` - provide exactly one
* `marginPercent` must be greater than `0` and at most `100`
* No `stopLoss` is required
* Works with all order types (market and pending)
* The `maxAllowedVolume` cap (if set) still applies after the calculation

{% hint style="warning" %}
**Not available where margin is unknown.** Some account types (e.g. certain crypto/CEX accounts) do not report free margin. On those accounts a `marginPercent` request is rejected with a `MARGIN_UNAVAILABLE` reason.
{% endhint %}

#### Example: Use 5% of Free Margin

```json
{
  "secret": "your_secret_minimum_16_chars",
  "action": "open",
  "symbol": "EURUSD",
  "orderType": "buy",
  "marginPercent": 5.0,
  "takeProfit": 1.0950,
  "tradeKey": "eur_margin_01"
}
```

If your free margin is $10,000 and 1.0 lot of EURUSD requires $500 of margin, this opens `(10000 × 5 / 100) / 500 = 1.0` lot.

***

### Multi Take Profit

Instead of sending several webhook calls when your strategy ladders out at multiple TP levels, you can declare every level in a single `open` request using the `takeProfits` array. MetaCopier expands the request server-side into **one position per TP level**, atomically and in order, so bursts cannot be partially dropped by the broker.

```json
{
  "secret": "your_secret_minimum_16_chars",
  "action": "open",
  "symbol": "XAUUSD",
  "orderType": "buy",
  "volume": 0.06,
  "stopLoss": 4455,
  "tradeKey": "xau_long_001",
  "takeProfits": [
    { "takeProfit": 4470 },
    { "takeProfit": 4480 },
    { "takeProfit": 4495 }
  ]
}
```

In this example MetaCopier opens **3 positions**, each sharing the same SL but with a different TP, splitting the parent `volume` equally (`0.02` each). Each leg receives its own unique `tradeKey` derived from the parent (`xau_long_001_t1`, `xau_long_001_t2`, …), so legs can later be modified or closed individually.

#### Level Fields

Each entry in `takeProfits` accepts the following fields:

| Field            | Required | Type   | Description                                                                                                                                                                     |
| ---------------- | -------- | ------ | ------------------------------------------------------------------------------------------------------------------------------------------------------------------------------- |
| `takeProfit`     | ✅        | number | TP value for this leg (price or points depending on `takeProfitType`)                                                                                                           |
| `takeProfitType` | ⬜        | string | `price` (default) or `points`. If omitted, inherits the parent request's `takeProfitType`                                                                                       |
| `volume`         | ⬜        | number | Absolute lot size for this leg. Mutually exclusive with `volumePercent`                                                                                                         |
| `volumePercent`  | ⬜        | number | Percentage (0-100) of the parent sizing to allocate to this leg. Mutually exclusive with `volume`. Works with parent `volume`, `riskPercent`, `riskAmount`, and `marginPercent` |

If a leg sets neither `volume` nor `volumePercent`, it receives an equal share of whatever sizing remains after the explicit allocations.

#### Per-Leg Sizing Example

```json
"takeProfits": [
  { "takeProfit": 4470, "volume": 0.03 },
  { "takeProfit": 4480, "volumePercent": 33.33 },
  { "takeProfit": 4495 }
]
```

The first leg takes a fixed `0.03` lots, the second takes 33.33% of the parent sizing, and the third receives the remainder.

#### Risk-Based / Margin-Based Parents

When the parent uses `riskPercent`, `riskAmount`, or `marginPercent` and the legs do not override sizing, the sizing is **divided equally** across legs so the total equals what you requested. Per-leg `volumePercent` can still be used to weight legs differently.

```json
{
  "secret": "your_secret_minimum_16_chars",
  "action": "open",
  "symbol": "EURUSD",
  "orderType": "buy",
  "riskPercent": 1.0,
  "stopLoss": 1.0800,
  "tradeKey": "eur_risk_01",
  "takeProfits": [
    { "takeProfit": 1.0850 },
    { "takeProfit": 1.0900 },
    { "takeProfit": 1.0950 }
  ]
}
```

#### Constraints

| Constraint                         | Limit                                                                                                                |
| ---------------------------------- | -------------------------------------------------------------------------------------------------------------------- |
| Maximum levels per request         | **20**                                                                                                               |
| Parent `tradeKey` length           | ≤ **16 chars** when `takeProfits` is used (server appends `_t<index>` to derive unique per-leg keys within 20 chars) |
| Sum of `volumePercent` across legs | ≤ **100**                                                                                                            |
| Per-leg `takeProfit`               | Required on every entry                                                                                              |
| `volume` vs `volumePercent`        | Mutually exclusive per leg                                                                                           |

#### Response Shape

The HTTP response stays backward compatible:

* The top-level `requestId` is the **first leg's** request id.
* `data.subRequestIds` lists every leg id in order.
* `data.legCount` is the total number of legs created.

Use the leg ids with `GET /requests/{requestId}/status` to track per-leg delivery and execution.

#### Managing Legs After Open

Each leg behaves like a normal position once opened. To modify or close a specific leg, use its derived `tradeKey`:

```json
{
  "secret": "your_secret_minimum_16_chars",
  "action": "modify",
  "tradeKey": "xau_long_001_t2",
  "stopLoss": 4460
}
```

To act on **all legs at once**, group them with a shared `magicNumber` on the parent request and use [`matchMode: GROUP`](#close-by-magic-number-group):

```json
{
  "secret": "your_secret_minimum_16_chars",
  "action": "open",
  "symbol": "XAUUSD",
  "orderType": "buy",
  "volume": 0.06,
  "stopLoss": 4455,
  "tradeKey": "xau_long_001",
  "magicNumber": "770001",
  "takeProfits": [
    { "takeProfit": 4470 },
    { "takeProfit": 4480 },
    { "takeProfit": 4495 }
  ]
}
```

```json
{
  "secret": "your_secret_minimum_16_chars",
  "action": "close",
  "matchMode": "GROUP",
  "magicNumber": "770001",
  "force": true
}
```

{% hint style="info" %}
**Why use this instead of sending multiple webhooks?** A single request avoids the race between concurrent webhook calls hitting the broker. Each leg is reserved with a unique `tradeKey` and submitted through the same queue, so partial drops under bursts no longer happen.
{% endhint %}

***

### Close Action

Closes position(s) based on matching criteria.

#### Match Modes

| Mode    | Matches By                 | Description                                    |
| ------- | -------------------------- | ---------------------------------------------- |
| `EXACT` | `tradeKey`                 | Close specific position(s) from stored mapping |
| `GROUP` | `magicNumber` or `orderId` | Close positions by strategy group              |
| `BULK`  | `symbol`                   | Close all positions for a symbol               |

{% hint style="info" %}
If `matchMode` is not provided, it's auto-detected based on which fields you include.
{% endhint %}

{% hint style="warning" %}
**An explicit `matchMode` overrides auto-detection and the other identifiers are ignored.** If you send `"matchMode": "GROUP"` together with a `tradeKey`, the `tradeKey` is not used at all and only `magicNumber` / `orderId` decide which positions match. If nothing matches you get `POSITION_NOT_FOUND`, even though the `tradeKey` exists.

To match a single position by its `tradeKey`, either omit `matchMode` entirely or set it to `"EXACT"`.
{% endhint %}

#### Close by TradeKey (EXACT)

```json
{
  "secret": "your_secret",
  "action": "close",
  "tradeKey": "my_trade_001"
}
```

#### Close by Magic Number (GROUP)

```json
{
  "secret": "your_secret",
  "action": "close",
  "matchMode": "GROUP",
  "magicNumber": "150001",
  "closeMode": "all"
}
```

#### Close by Symbol (BULK)

```json
{
  "secret": "your_secret",
  "action": "close",
  "matchMode": "BULK",
  "symbol": "EURUSD",
  "direction": "long",
  "closeMode": "first"
}
```

#### Close Fields

| Field         | Type    | Description                                                                                                                                   |
| ------------- | ------- | --------------------------------------------------------------------------------------------------------------------------------------------- |
| `matchMode`   | string  | `EXACT`, `GROUP`, or `BULK` (auto-detected if omitted). An explicit value overrides auto-detection                                            |
| `tradeKey`    | string  | Position identifier (EXACT mode). Ignored if `matchMode` is `GROUP` or `BULK`                                                                 |
| `magicNumber` | string  | Strategy identifier, digits only (GROUP mode). Reliable: never truncated                                                                      |
| `orderId`     | string  | Strategy order ID (GROUP mode). Matched inside the comment, so it can be lost to [comment truncation](#truncation-proof-grouping-magicnumber) |
| `symbol`      | string  | Trading pair (BULK mode)                                                                                                                      |
| `direction`   | string  | `long` or `short` filter (BULK mode)                                                                                                          |
| `closeMode`   | string  | `first`, `last`, or `all` (default: `all`)                                                                                                    |
| `force`       | boolean | Allow closing more than `maxMatchCount` positions                                                                                             |

#### Close Modes

| Value   | Description                  |
| ------- | ---------------------------- |
| `first` | Close oldest position (FIFO) |
| `last`  | Close newest position (LIFO) |
| `all`   | Close all matching positions |

#### Force Flag

If more than `maxMatchCount` positions match, you must either:

1. Add `force: true` with explicit `matchMode`
2. Add more specific filters

This prevents accidental bulk operations.

***

### Cancel Order Action

Cancels **pending order(s) only** (unfilled Limit/Stop orders). Live (already filled) positions are **never** affected. Uses the **exact same matching options as `close`** (`tradeKey` / `magicNumber` / `orderId` / `symbol` + `direction` / `closeMode` / `matchMode`).

{% hint style="info" %}
**Why this exists.** If you manage pending-order expiry with your own timer and send `close` when it fires, a `close` would also close the position if the order was **already filled** in the meantime. `cancelOrder` removes that risk: it only ever cancels pending orders. If the order already filled (or no longer exists), the request is a **safe no-op** (success, nothing cancelled) rather than an error.
{% endhint %}

**Cancel by TradeKey (EXACT):**

```json
{
  "secret": "your_secret",
  "action": "cancelOrder",
  "tradeKey": "my_trade_001"
}
```

**Cancel a pending order for a symbol (BULK):**

```json
{
  "secret": "your_secret",
  "action": "cancelOrder",
  "matchMode": "BULK",
  "symbol": "EURUSD",
  "direction": "long"
}
```

{% hint style="warning" %}
`cancelOrder` is a distinct action string. If you restrict `allowedActions`, add `"cancelOrder"` to the list (leaving `allowedActions` empty allows all actions).
{% endhint %}

{% hint style="success" %}
**Native alternative:** For MT4/MT5 you can skip the external timer entirely by setting `pendingExpirySeconds` on the `open` payload. See [Pending Order Expiry](#pending-order-expiry).
{% endhint %}

***

### Pending Order Expiry

Set `pendingExpirySeconds` on an `open` request to give a pending order (`buyLimit`, `sellLimit`, `buyStop`, `sellStop`) a **native broker-side expiry**. The broker cancels the order automatically if it has not been filled within that time. No follow-up webhook is needed.

```json
{
  "secret": "your_secret",
  "action": "open",
  "symbol": "EURUSD",
  "orderType": "buyLimit",
  "volume": 0.1,
  "openPrice": 1.0800,
  "pendingExpirySeconds": 3600
}
```

{% hint style="info" %}

* Only applies to **pending orders** on **MT4/MT5**. It is ignored for market orders (`buy`/`sell`) and for account types that do not support broker-native expiry.
* `0` or omitted means **good-till-cancelled** (no expiry).
* Enforcement is **broker-dependent**: some brokers require a minimum expiry (often at least a few minutes) or do not allow pending order expiry at all. If the broker rejects the expiry, the order is placed without one.
* Because the broker owns the timer, expiry works even if it fires long after the alert; there is no race with a fill (a filled order simply stays open).
* Prefer this over an external timer + `cancelOrder` when your account is MT4/MT5. Use `cancelOrder` for manual/early cancellation or on connectors without native expiry.
  {% endhint %}

***

### Modify Action

Modifies existing position(s). Supports `EXACT` (tradeKey), `GROUP` (magicNumber / orderId), and `BULK` (symbol) matching - same modes as the close action.

**Modify a single position by tradeKey (EXACT):**

```json
{
  "secret": "your_secret",
  "action": "modify",
  "tradeKey": "my_trade_001",
  "stopLoss": 1.0850,
  "takeProfit": 1.0980
}
```

**Modify all positions sharing a magicNumber (GROUP):**

```json
{
  "secret": "your_secret",
  "action": "modify",
  "matchMode": "GROUP",
  "magicNumber": "150001",
  "stopLoss": 1.0820,
  "takeProfit": 1.0960
}
```

**Modify all positions sharing a strategy orderId (GROUP):**

```json
{
  "secret": "your_secret",
  "action": "modify",
  "matchMode": "GROUP",
  "orderId": "Long Entry",
  "stopLoss": 1.0820
}
```

**Modify all open positions on a symbol (BULK):**

```json
{
  "secret": "your_secret",
  "action": "modify",
  "matchMode": "BULK",
  "symbol": "EURUSD",
  "stopLoss": 1.0820
}
```

{% hint style="info" %}
If a `modify` request matches more than `maxMatchCount` positions, the request is rejected with `AMBIGUOUS_MATCH`. Add `force: true` together with an explicit `matchMode` to proceed. This safety guard mirrors the `close` action.
{% endhint %}

#### Partial Close

```json
{
  "secret": "your_secret",
  "action": "modify",
  "tradeKey": "my_trade_001",
  "reduceVolumeBy": 0.05
}
```

{% hint style="info" %}
If `reduceVolumeBy` reduces the position to 0 or below, the position is fully closed.
{% endhint %}

{% hint style="warning" %}
`reduceVolumeBy` is only supported in `EXACT` mode (matching by `tradeKey`). It is rejected in `GROUP` and `BULK` modes because "reduce by X" is ambiguous across multiple positions (per-position vs. total group exposure). To reduce volume for several positions, send one `modify` per `tradeKey`.
{% endhint %}

#### Modify Fields

| Field            | Type    | Description                                                                                                                                   |
| ---------------- | ------- | --------------------------------------------------------------------------------------------------------------------------------------------- |
| `matchMode`      | string  | `EXACT`, `GROUP`, or `BULK` (auto-detected). An explicit value overrides auto-detection                                                       |
| `tradeKey`       | string  | Position identifier (EXACT mode). Ignored if `matchMode` is `GROUP` or `BULK`                                                                 |
| `magicNumber`    | string  | Strategy identifier, digits only (GROUP mode). Reliable: never truncated                                                                      |
| `orderId`        | string  | Strategy order ID (GROUP mode). Matched inside the comment, so it can be lost to [comment truncation](#truncation-proof-grouping-magicnumber) |
| `symbol`         | string  | Trading pair (BULK mode)                                                                                                                      |
| `force`          | boolean | Allow modifying more than `maxMatchCount` positions                                                                                           |
| `stopLoss`       | number  | New stop loss price (absolute price only, not points)                                                                                         |
| `takeProfit`     | number  | New take profit price (absolute price only, not points)                                                                                       |
| `openPrice`      | number  | New price for pending orders                                                                                                                  |
| `reduceVolumeBy` | number  | Volume to reduce (partial close)                                                                                                              |

***

### CloseAll Action

Closes ALL positions on the account.

```json
{
  "secret": "your_secret",
  "action": "closeAll",
  "force": true
}
```

**Requirements:**

* Feature must have `allowCloseAll: true`
* Request must have `force: true`

{% hint style="warning" %}
This closes every open position on the account!
{% endhint %}

***

### Store Action

Stores custom data from TradingView strategies/indicators.

```json
{
  "secret": "your_secret",
  "action": "store",
  "data": {
    "symbol": "EURUSD",
    "rsi": 72.5,
    "macd": 0.0012,
    "signal": "overbought"
  }
}
```

| Field  | Required | Type   | Description                               |
| ------ | -------- | ------ | ----------------------------------------- |
| `data` | ✅        | object | Any JSON object to store (max 100KB size) |

Data is stored in Database with TTL based on `dataRetentionDays`.

{% hint style="warning" %}
The `data` object has a maximum size limit of **100KB**. Requests exceeding this limit will be rejected.
{% endhint %}

#### Retrieve Stored Data

Use the REST API to fetch stored data:

**List all stored data (paginated):**

```
GET /rest/api/v1/webhooks/tradingview/accounts/{accountId}/data?limit=50&skip=0
```

Response:

```json
{
  "data": [
    {
      "id": "65abc123...",
      "accountId": "your-account-id",
      "data": { "symbol": "EURUSD", "rsi": 72.5 },
      "receivedAt": "2024-02-24T12:00:00Z"
    }
  ],
  "count": 1,
  "total": 15,
  "limit": 50,
  "skip": 0
}
```

**Get specific data by ID:**

```
GET /rest/api/v1/webhooks/tradingview/accounts/{accountId}/data/{dataId}
```

**Delete specific data:**

```
DELETE /rest/api/v1/webhooks/tradingview/accounts/{accountId}/data/{dataId}
```

{% hint style="info" %}
These endpoints require API authentication (not the webhook secret). See REST API documentation for details.
{% endhint %}

***

### Common Request Fields

Fields available on all actions:

| Field            | Type          | Description                         |
| ---------------- | ------------- | ----------------------------------- |
| `action`         | string        | Action type (required)              |
| `secret`         | string        | Webhook secret (for SECRET auth)    |
| `signature`      | string        | HMAC signature (for HMAC auth)      |
| `timestamp`      | number/string | Unix seconds or ISO-8601 string     |
| `idempotencyKey` | string        | Prevents duplicate execution        |
| `schemaVersion`  | integer       | Schema version (only `1` supported) |

#### Idempotency

Include an `idempotencyKey` to prevent duplicate executions:

```json
{
  "secret": "your_secret",
  "idempotencyKey": "open:EURUSD:1708771200000",
  "action": "open",
  ...
}
```

Same key within 5 minutes returns the cached response.

#### Timestamp Format

Timestamp accepts:

* **Number**: Unix seconds (e.g., `1708771200`)
* **String**: ISO-8601 (e.g., `"2024-02-24T12:00:00Z"`)

***

### Error Codes

#### Authentication Errors (401)

| Code                | Description                         |
| ------------------- | ----------------------------------- |
| `INVALID_SECRET`    | Webhook secret doesn't match        |
| `INVALID_SIGNATURE` | HMAC signature verification failed  |
| `TIMESTAMP_EXPIRED` | Timestamp outside valid window      |
| `TIMESTAMP_MISSING` | Timestamp required but not provided |

#### Authorization Errors (403)

| Code                               | Description                                               |
| ---------------------------------- | --------------------------------------------------------- |
| `WEBHOOK_NOT_ENABLED`              | Feature not enabled on account                            |
| `IP_NOT_ALLOWED`                   | Request IP not in allowlist                               |
| `ACTION_NOT_ALLOWED`               | Action not in allowed actions list                        |
| `CLOSE_ALL_NOT_ALLOWED`            | closeAll requires `allowCloseAll: true`                   |
| `SYMBOL_ONLY_NOT_ALLOWED`          | Symbol-only close requires additional filter              |
| `PROFIT_TARGET_HIT`                | Order skipped - a profit target is hit                    |
| `RISK_LIMIT_HIT`                   | Order skipped - a risk limit is hit                       |
| `PROFIT_TARGET_AND_RISK_LIMIT_HIT` | Order skipped - both profit target and risk limit are hit |

#### Validation Errors (400)

| Code                              | Description                                                                                                                                |
| --------------------------------- | ------------------------------------------------------------------------------------------------------------------------------------------ |
| `INVALID_ACTION`                  | Unknown or missing action                                                                                                                  |
| `INVALID_JSON`                    | JSON parsing failed                                                                                                                        |
| `INVALID_CONTENT_TYPE`            | Must be application/json                                                                                                                   |
| `INVALID_ORDER_TYPE`              | Unknown order type                                                                                                                         |
| `INVALID_MATCH_MODE`              | Unknown matchMode (must be EXACT/GROUP/BULK)                                                                                               |
| `MISSING_IDENTIFIER`              | No position identifier provided                                                                                                            |
| `FORCE_REQUIRES_EXPLICIT_MODE`    | force:true requires explicit matchMode                                                                                                     |
| `UNSUPPORTED_SCHEMA_VERSION`      | Only schemaVersion 1 supported                                                                                                             |
| `INVALID_TIMESTAMP_TYPE_FOR_HMAC` | HMAC requires numeric timestamp                                                                                                            |
| `INVALID_RISK_PERCENT`            | `riskPercent` must be > 0 and ≤ 100                                                                                                        |
| `INVALID_RISK_AMOUNT`             | `riskAmount` must be > 0                                                                                                                   |
| `INVALID_MARGIN_PERCENT`          | `marginPercent` must be > 0 and ≤ 100                                                                                                      |
| `RISK_SIZING_CONFLICT`            | Only one of `volume`, `riskPercent`, `riskAmount`, or `marginPercent` can be specified                                                     |
| `RISK_PERCENT_REQUIRES_STOP_LOSS` | `stopLoss` is mandatory when using `riskPercent`                                                                                           |
| `RISK_AMOUNT_REQUIRES_STOP_LOSS`  | `stopLoss` is mandatory when using `riskAmount`                                                                                            |
| `MISSING_SIZING`                  | None of `volume`, `riskPercent`, `riskAmount`, or `marginPercent` provided                                                                 |
| `RISK_PER_TRADE_FEATURE_REQUIRED` | Risk Per Trade feature must be added to the account                                                                                        |
| `RISK_TICK_VALUE_UNAVAILABLE`     | <p>No tick value data available yet for the symbol<br><br>see <a data-mention href="#risk-per-trade-sizing">#risk-per-trade-sizing</a></p> |

#### Not Found Errors (404)

| Code                 | Description                   |
| -------------------- | ----------------------------- |
| `TRADEKEY_NOT_FOUND` | TradeKey not found in mapping |
| `POSITION_NOT_FOUND` | No positions match criteria   |
| `ACCOUNT_NOT_FOUND`  | Account ID not found          |

#### Conflict Errors (409)

| Code              | Description                                               |
| ----------------- | --------------------------------------------------------- |
| `AMBIGUOUS_MATCH` | Too many matches - add force:true with explicit matchMode |

#### Service Errors (503)

| Code                    | Description                     |
| ----------------------- | ------------------------------- |
| `ACCOUNT_NOT_CONNECTED` | Trading account is disconnected |

#### Internal Errors (500)

| Code             | Description                                                                                                                                                                     |
| ---------------- | ------------------------------------------------------------------------------------------------------------------------------------------------------------------------------- |
| `REQUEST_FAILED` | An asynchronous request finished unsuccessfully. The `message` field carries the reason reported by the terminal, see [#execution-reasons-in-the-account-log](#troubleshooting) |
| `INTERNAL_ERROR` | Unexpected server-side error                                                                                                                                                    |

***

### IP Allowlist (Optional)

Restrict webhook access to specific IPs:

```json
{
  "ipAllowlist": ["52.89.214.238", "34.212.75.30"]
}
```

{% hint style="warning" %}
TradingView IPs may change without notice. Empty allowlist (default) allows all IPs.
{% endhint %}

***

### Troubleshooting

When troubleshooting any webhook issue, check the **Logs** and **Audit Logs** sections in MetaCopier. **Logs** show real-time information about trade execution, errors, and broker rejections. **Audit Logs** provide a detailed history of all actions and changes, helping you understand the sequence of events that led to an issue.

**Alert not working?**

1. Check your webhook URL is correct
2. Verify your JSON is valid (use a JSON validator)
3. Confirm your secret matches exactly
4. Make sure your account is connected

**Position not found?**

1. Check the `tradeKey` spelling exactly
2. The position may already be closed
3. Use the exact same `tradeKey` you used when opening

**AMBIGUOUS\_MATCH error?**

* Add `force: true` with explicit `matchMode`
* Or add more specific filters (symbol, direction)

**HMAC signature fails?**

* Ensure timestamp is numeric (Unix seconds)
* Ensure canonical payload excludes timestamp/signature
* Ensure keys are sorted alphabetically

**Alert accepted (202) but no trade appears?**

* The webhook was queued successfully, so the problem is on the broker side. Check the account **Logs** for the rejection reason.
* If the log shows that no confirmation was received from the terminal, the order is retried automatically as long as `openRetry` is enabled. Increase `openRetryTimeoutInMinutes` if your broker is regularly slow.
* If `openRetry` is disabled, the request is sent only once and a warning entry is written immediately.
* An entry such as `Attempt 2 failed, retrying: ... - buy EURUSD 0.10` means the trade is still being retried inside the configured window. No action is needed until the final warning appears.
* A message such as `Retry window elapsed after N attempt(s)` means every attempt inside the configured window failed. In that case the underlying broker error in the same log entry is the relevant one.

**Execution reasons in the account log**

These markers are not HTTP error codes. They come from the trading terminal and appear inside the account **Logs** entries (and in the `message` field when polling `GET /requests/{requestId}/status`).

| Marker                        | Meaning                                                                                                                   | Retried? |
| ----------------------------- | ------------------------------------------------------------------------------------------------------------------------- | -------- |
| `BROKER_REJECTION`            | No confirmation arrived from the terminal within 15 seconds. This is a timeout, not necessarily a rejection by the broker | Yes      |
| `ACCOUNT_IS_NOT_CONNTECTED`   | The account was offline when the request reached the terminal, nothing was sent                                           | Yes      |
| `SYMBOLS_NOT_LOADED`          | The account had just reconnected and the symbol list was still loading                                                    | Yes      |
| `REQUEST_IN_PROGRESS`         | A previous attempt for the same order is still running                                                                    | Yes      |
| `REQUEST_ALREADY_PROCESSED`   | The order of a previous attempt did reach the broker, so it is not sent again                                             | No       |
| `ACCOUNT_IS_READ_ONLY`        | The account is set to read only or has trading disabled                                                                   | No       |
| `MAX_OPEN_POSITIONS_EXCEEDED` | The account's maximum open positions limit was reached                                                                    | No       |
| `SYMBOL_NOT_FOUND`            | The symbol does not exist on the broker or is not mapped                                                                  | No       |

{% hint style="info" %}
Retried markers are only retried when `openRetry` is enabled and the retry window has not elapsed.
{% endhint %}

***

## Examples by Use Case

This section provides complete examples for common trading scenarios.

### Close All Positions on Account

Close every open position on the account. Useful for emergency exit or end-of-day cleanup.

**Step 1: Enable closeAll in Feature Settings**

```json
{
  "allowCloseAll": true
}
```

**Step 2: Send closeAll Request**

```json
{
  "secret": "your_secret_minimum_16_chars",
  "action": "closeAll",
  "force": true
}
```

{% hint style="warning" %}
This closes ALL positions immediately. Both `allowCloseAll: true` and `force: true` are required as safety guards.
{% endhint %}

***

### Close by Strategy Group (Magic Number)

Close all positions belonging to a specific strategy. Useful when running multiple strategies on the same account.

#### Open with Magic Number

```json
{
  "secret": "your_secret_minimum_16_chars",
  "action": "open",
  "symbol": "EURUSD",
  "orderType": "buy",
  "volume": 0.1,
  "magicNumber": "150001"
}
```

#### Close All Positions with Same Magic Number

```json
{
  "secret": "your_secret_minimum_16_chars",
  "action": "close",
  "matchMode": "GROUP",
  "magicNumber": "150001"
}
```

{% hint style="info" %}
This closes ALL positions with `magicNumber: "150001"`, regardless of symbol or direction.
{% endhint %}

#### Close Only Long Positions in Group

```json
{
  "secret": "your_secret_minimum_16_chars",
  "action": "close",
  "matchMode": "GROUP",
  "magicNumber": "150001",
  "direction": "long"
}
```

***

### Close by Order ID (Pine Script Strategies)

Close positions by strategy entry name. Useful for Pine Script strategies using `strategy.entry()`.

#### Pine Script Strategy Example

```pine
//@version=5
strategy("My Strategy", overlay=true)

if buyCondition
    strategy.entry("Long Entry", strategy.long)
    
if sellCondition
    strategy.entry("Short Entry", strategy.short)
```

#### Alert Message (Open)

```json
{
  "secret": "your_secret_minimum_16_chars",
  "action": "open",
  "symbol": "{{ticker}}",
  "orderType": "{{strategy.order.action}}",
  "volume": 0.1,
  "orderId": "{{strategy.order.id}}"
}
```

#### Alert Message (Close All "Long Entry" Positions)

```json
{
  "secret": "your_secret_minimum_16_chars",
  "action": "close",
  "matchMode": "GROUP",
  "orderId": "Long Entry"
}
```

{% hint style="info" %}
`orderId` is NOT unique - all positions with the same entry name are closed.
{% endhint %}

{% hint style="warning" %}
`orderId` is matched inside the position comment, which MT4/MT5 brokers truncate to 25–31 characters. Long entry names are cut off and then no longer match. If this recipe returns `POSITION_NOT_FOUND`, send a numeric `magicNumber` on open and group by that instead. See [Truncation-Proof Grouping](#truncation-proof-grouping-magicnumber).
{% endhint %}

***

### Close by Symbol (Bulk Matching)

Close positions for a specific symbol. Requires additional filters by default.

#### Close All EURUSD Long Positions

```json
{
  "secret": "your_secret_minimum_16_chars",
  "action": "close",
  "matchMode": "BULK",
  "symbol": "EURUSD",
  "direction": "long"
}
```

#### Close All EURUSD Short Positions

```json
{
  "secret": "your_secret_minimum_16_chars",
  "action": "close",
  "matchMode": "BULK",
  "symbol": "EURUSD",
  "direction": "short"
}
```

#### Close ALL EURUSD Positions (Both Directions)

```json
{
  "secret": "your_secret_minimum_16_chars",
  "action": "close",
  "matchMode": "BULK",
  "symbol": "EURUSD",
  "force": true
}
```

{% hint style="info" %}
Without `direction`, this matches all EURUSD positions. If more than `maxMatchCount` positions exist, `force: true` is required.
{% endhint %}

***

### Close First or Last Position (FIFO/LIFO)

Close only the oldest or newest position matching your criteria.

#### Close Oldest Position (FIFO)

```json
{
  "secret": "your_secret_minimum_16_chars",
  "action": "close",
  "matchMode": "BULK",
  "symbol": "EURUSD",
  "direction": "long",
  "closeMode": "first"
}
```

#### Close Newest Position (LIFO)

```json
{
  "secret": "your_secret_minimum_16_chars",
  "action": "close",
  "matchMode": "BULK",
  "symbol": "EURUSD",
  "direction": "long",
  "closeMode": "last"
}
```

#### Close Oldest Position in Strategy Group

```json
{
  "secret": "your_secret_minimum_16_chars",
  "action": "close",
  "matchMode": "GROUP",
  "magicNumber": "220001",
  "closeMode": "first"
}
```

***

### Partial Close (Reduce Position Size)

Reduce position size without fully closing it.

```json
{
  "secret": "your_secret_minimum_16_chars",
  "action": "modify",
  "tradeKey": "my_trade_001",
  "reduceVolumeBy": 0.05
}
```

{% hint style="info" %}
**Example**: Position is 0.1 lots → `reduceVolumeBy: 0.05` → Position becomes 0.05 lots
{% endhint %}

#### Partial Close by Magic Number

```json
{
  "secret": "your_secret_minimum_16_chars",
  "action": "modify",
  "matchMode": "GROUP",
  "magicNumber": "330001",
  "reduceVolumeBy": 0.01
}
```

{% hint style="info" %}
This reduces ALL positions in the group by 0.01 lots each.
{% endhint %}

***

### Using the Force Flag

The `force` flag allows closing more positions than `maxMatchCount` (default: 3).

#### When Force is Required

| Scenario                            | Force Required? |
| ----------------------------------- | --------------- |
| 2 positions match, maxMatchCount=3  | No              |
| 5 positions match, maxMatchCount=3  | Yes             |
| `closeAll` action                   | Always          |
| Symbol-only close without direction | Yes             |

#### Force with Explicit matchMode

```json
{
  "secret": "your_secret_minimum_16_chars",
  "action": "close",
  "matchMode": "GROUP",
  "magicNumber": "440001",
  "force": true
}
```

{% hint style="info" %}
**Important**: `force: true` requires an explicit `matchMode`. Auto-detected matchMode with force will be rejected with `FORCE_REQUIRES_EXPLICIT_MODE`.
{% endhint %}

***

### Real-World Strategy Examples

#### Grid Trading Strategy

Open multiple positions with the same magic number, close oldest first:

**Open (multiple grid levels)**

```json
{
  "secret": "your_secret_minimum_16_chars",
  "action": "open",
  "symbol": "EURUSD",
  "orderType": "buy",
  "volume": 0.01,
  "magicNumber": "220002",
  "tradeKey": "grid_EURUSD_{{timenow}}"
}
```

**Close Oldest Grid Position (Take Profit)**

```json
{
  "secret": "your_secret_minimum_16_chars",
  "action": "close",
  "matchMode": "GROUP",
  "magicNumber": "220002",
  "closeMode": "first"
}
```

**Close All Grid Positions (Emergency Exit)**

```json
{
  "secret": "your_secret_minimum_16_chars",
  "action": "close",
  "matchMode": "GROUP",
  "magicNumber": "220002",
  "force": true
}
```

***

#### Multi-Symbol Strategy

Trade multiple symbols with the same strategy:

**Open Position**

```json
{
  "secret": "your_secret_minimum_16_chars",
  "action": "open",
  "symbol": "{{ticker}}",
  "orderType": "{{strategy.order.action}}",
  "volume": 0.1,
  "magicNumber": "550001",
  "tradeKey": "trend_{{ticker}}_{{timenow}}"
}
```

**Close Specific Symbol**

```json
{
  "secret": "your_secret_minimum_16_chars",
  "action": "close",
  "matchMode": "BULK",
  "symbol": "{{ticker}}",
  "direction": "long"
}
```

**Close All Strategy Positions (All Symbols)**

```json
{
  "secret": "your_secret_minimum_16_chars",
  "action": "close",
  "matchMode": "GROUP",
  "magicNumber": "550001",
  "force": true
}
```

***

#### Scalping Strategy with Take Profit Levels

Open with tradeKey for precise control:

**Open Position**

```json
{
  "secret": "your_secret_minimum_16_chars",
  "action": "open",
  "symbol": "{{ticker}}",
  "orderType": "buy",
  "volume": 0.3,
  "stopLoss": 1.0850,
  "takeProfit": 1.0950,
  "tradeKey": "scalp_{{ticker}}_{{timenow}}"
}
```

{% hint style="info" %}
TradingView placeholders don't support math operations. Use fixed prices or calculate SL/TP in your Pine Script using `strategy.order.alert_message`.
{% endhint %}

**Partial Close at First Target (1/3)**

```json
{
  "secret": "your_secret_minimum_16_chars",
  "action": "modify",
  "tradeKey": "scalp_{{ticker}}_{{timenow}}",
  "reduceVolumeBy": 0.1
}
```

**Move Stop Loss to Break Even**

```json
{
  "secret": "your_secret_minimum_16_chars",
  "action": "modify",
  "tradeKey": "scalp_{{ticker}}_{{timenow}}",
  "stopLoss": 1.0880
}
```

{% hint style="info" %}
**Tip**: For dynamic SL/TP based on entry price, use `strategy.order.alert_message` in your Pine Script to pass calculated values.
{% endhint %}

**Close Remaining Position**

```json
{
  "secret": "your_secret_minimum_16_chars",
  "action": "close",
  "tradeKey": "scalp_{{ticker}}_{{timenow}}"
}
```

***

### Symbol-Only Close (Advanced)

Close all positions for a symbol without direction filter. Requires special permission.

**Step 1: Enable in Feature Settings**

```json
{
  "allowSymbolOnlyClose": true
}
```

**Step 2: Close All Symbol Positions**

```json
{
  "secret": "your_secret_minimum_16_chars",
  "action": "close",
  "matchMode": "BULK",
  "symbol": "EURUSD",
  "closeMode": "all"
}
```

{% hint style="info" %}
**Note**: Without `allowSymbolOnlyClose: true`, you must include `direction` or another filter.
{% endhint %}

***

### Using Dynamic Values (Advanced Pine Script)

TradingView placeholders don't support math operations. To use calculated values (like dynamic SL/TP), use the `alert_message` parameter in your Pine Script.

**Pine Script Example:**

```pine
//@version=5
strategy("Dynamic SL/TP Strategy", overlay=true)

// Calculate dynamic SL and TP
entryPrice = close
stopLoss = entryPrice * 0.998  // 0.2% below entry
takeProfit = entryPrice * 1.005  // 0.5% above entry

// Build the JSON message
alertMsg = '{"secret": "your_secret_minimum_16_chars", "action": "open", "symbol": "' + syminfo.ticker + '", "orderType": "buy", "volume": 0.1, "stopLoss": ' + str.tostring(stopLoss) + ', "takeProfit": ' + str.tostring(takeProfit) + ', "tradeKey": "trade_' + syminfo.ticker + '_' + str.tostring(timenow) + '"}'

if buyCondition
    strategy.entry("Long", strategy.long, alert_message=alertMsg)
```

**Alert Message (uses the dynamic values):**

```json
{{strategy.order.alert_message}}
```

When the alert triggers, TradingView replaces `{{strategy.order.alert_message}}` with the complete JSON containing the calculated SL/TP values.


# Telegram Signal Integration

{% hint style="warning" %}
The Telegram Signal Integration is currently in beta. It is recommended to validate its behavior using a demo account before deploying it in a live trading environment.
{% endhint %}

The Telegram Signal Integration enables the automated reception and execution of trading signals from Telegram channels and groups. By connecting your Telegram account to MetaCopier via the official Telegram API, incoming messages are analyzed by an AI engine to identify actionable trading signals (e.g., open, close, modify).

Once a valid signal is detected, it is automatically executed on the linked trading account without any manual intervention. In essence, MetaCopier acts as an intelligent assistant that transforms Telegram messages into executable trading actions.

## Requirements

To use the Telegram Signal Integration with MetaCopier, ensure the following:

* A **PRO plan**, the Telegram Signal Integration is a PRO feature
* One or more trading accounts connected to MetaCopier
* A Telegram account with access to the signal provider’s channel or group

## Quick Start

### Step 1: Get Telegram API Credentials

To communicate with your Telegram, you need to create API credentials. Please follow the steps below:

1. Go to [my.telegram.org](https://my.telegram.org) and log in with your phone number
2. Click on **"API development tools"**
3. If you already have an API configured, proceed to step 6.
4. Fill in the application form:
   * **App title**: MetaCopier (or any name you prefer)
   * **Short name**: metacopier (or any name you prefer)
   * **URL:** \<leave emtpy>
   * **Platform**: Desktop
   * **Description**: Trading signal integration
5. Click **"Create application"**
6. Copy and save your **API ID** and **API Hash**

<figure><img src="/files/iAvfijjbw4fdzpIqV6pv" alt=""><figcaption></figcaption></figure>

{% hint style="danger" %}
Keep your API credentials secure. Never share them with anyone.
{% endhint %}

### Step 2: Create a Telegram Account in MetaCopier

Navigate to the **Telegram** section in your project and find the **Telegram Signal Integration** section. Click the **"+"** button to add a new Telegram account.

<figure><img src="/files/CrYxNIVgKnxms422Q5QD" alt=""><figcaption></figcaption></figure>

A setup dialog will open. Follow the workflow:

1. Enter your **API ID** and **API Hash** from Step 1
2. Enter your **phone number** in international format (e.g., +1234567890)
3. Select the **region** that matches where your trading accounts are deployed
4. Click **Save**

{% hint style="info" %}
**Important:** Select a region that matches where your trading accounts are deployed. For example, if your trading account is in New York, select the New York region for your Telegram account.
{% endhint %}

### Step 3: Complete Verification

After saving, Telegram will send a **verification code** to your Telegram app. Enter the code in MetaCopier to authorize the connection.

If you have **Two-Factor Authentication (2FA)** enabled on your Telegram account, you'll also need to enter your 2FA password.

<figure><img src="/files/4UEg9Dq0w5wnmlLzH5Rp" alt=""><figcaption></figcaption></figure>

Once verified, a confirmation message will be displayed.

<figure><img src="/files/ocKI4zT2M04KaLeA1t1a" alt=""><figcaption></figcaption></figure>

In Telegram, you will receive a notification asking you to confirm the login from the selected region. Please confirm by selecting **“Yes, it’s me.”**

<figure><img src="/files/SzhgFQjFjxOe2ySFc4MU" alt=""><figcaption></figcaption></figure>

On the Telegram Signal Integration page, the status will change to **“Authorized”**, and your available chats will be loaded.

<figure><img src="/files/YC4YFWw05H0tdQ5ECSl3" alt=""><figcaption></figcaption></figure>

### Step 4: Add Telegram Connector to Your Trading Account

Now you need to link a Telegram chat to your trading account. To add the **Telegram Connector** feature:

1. Navigate to the **Accounts** page in your project.
2. Locate the trading account you want to receive signals on.
3. Click the **Features** button on that account.
4. In the Features dialog, click the **"+"** (add) button.
5. Select **Telegram Connector** from the list.

In the Telegram Connector dialog:

1. Select the **Telegram Account** you created in Step 2
2. Select the **Chat/Channel** you want to receive signals from. Groups that are organized in topics are listed once per topic, written as `Group -> Topic`
3. Select the **AI Model Tier** (Basic, Standard, or Pro)
4. Configure the connector settings (optional)
5. Click **Save**

That's it! Signals from the selected Telegram chat will now be executed on your trading account.

{% hint style="info" %}
**Multiple Connectors:** You can add multiple Telegram Connectors to the same trading account to receive signals from different channels. You can also connect the same channel to multiple trading accounts.
{% endhint %}

{% hint style="info" %}
**Groups with topics:** Many providers organize their group in topics and post the signals in only one of them. Select the entry for that topic and messages from all other topics are ignored. If you select the group itself, every topic is processed. You can also create one connector per topic, for example to send each topic to a different trading account.
{% endhint %}

### Step 5: Protect Your Account

Following signals from untrusted sources can expose your account to significant financial risk. It is essential to understand these risks and implement appropriate safeguards.

We strongly recommend using the following features:

* [**Risk Limiter**](/features/basic-features/risk-limits)**:** This is one of the most important protection tools. We recommend setting a strict limit on the account that is following the signals. The Risk Limiter allows you to automatically close all open positions if a predefined drawdown threshold is exceeded, helping to prevent excessive losses.
* [**Max Open Positions**](/features/basic-features/max-open-positions)**:** This feature is useful for controlling exposure by limiting the number of simultaneously open positions. It ensures that your account does not exceed a predefined level of activity or risk.
* **Maximum Lot Size:** In the Telegram Connector, you can define a *Maximum Allowed Volume* to limit the lot size of each individual position. This helps ensure that no trade exceeds your predefined risk limits.

***

## AI Signal Interpretation

{% hint style="info" %}
Please note that the AI is intended for signal extraction and not for building strategies. If you intend to use break-even, trailing stop, risk limits, and similar features, please use the dedicated functionality provided for those purposes.
{% endhint %}

MetaCopier uses AI to interpret trading signals from Telegram messages. The AI understands various signal formats commonly used by signal providers.

### Supported Signal Formats

The AI can detect signals in various formats:

**Simple format:**

```
BUY EURUSD
SL: 1.0800
TP: 1.0950
```

**With lot size:**

```
SELL GOLD 0.5 lot
SL 2650
TP1 2620
TP2 2600
```

**Natural language:**

```
Open a long position on GBPUSD at market price
Stop loss at 1.2550, take profit at 1.2700
Volume: 0.1
```

**Signal provider style:**

```
🟢 XAUUSD BUY NOW 2680
✅ TP1: 2695
✅ TP2: 2710
❌ SL: 2665
```

### AI Instructions

Use the **AI Instructions** field to provide specific instructions for better signal interpretation:

**Example AI instructions:**

* "The signal provider uses GOLD instead of XAUUSD"
* "SL/TP values are always in points, not price"
* "Ignore messages from admin that contain 'announcement'"
* "Volume is specified in mini lots (multiply by 0.1)"
* "Only process messages that contain the 🔔 emoji"
* "Use half of the lot size defined in the chat message."

***

## AI Model Tier

When creating a Telegram Connector, you can choose the AI model tier used for signal interpretation. The tier determines the quality and accuracy of the AI engine that analyzes your Telegram messages.

{% hint style="info" %}
**Two different things are called Pro.** The **PRO plan** unlocks the Telegram Signal Integration itself. The **Pro AI model tier** is a separate, optional charge per connector. With a PRO plan you can run every connector on the free Basic tier, a higher tier is only needed if you want a stronger model.
{% endhint %}

| Tier         | Description                                                     | Monthly Cost             |
| ------------ | --------------------------------------------------------------- | ------------------------ |
| **Basic**    | Default model. Suitable for most standard signal formats.       | Free                     |
| **Standard** | Enhanced model with better accuracy for complex signal formats. | $5/month (billed daily)  |
| **Pro**      | Premium model for maximum accuracy and advanced interpretation. | $10/month (billed daily) |

{% hint style="warning" %}
**The AI Model Tier cannot be changed after the connector is created.** To switch to a different tier, you must delete the connector and create a new one.
{% endhint %}

When selecting Standard or Pro, a confirmation dialog will appear showing the cost. The charge is calculated on a daily basis (monthly price ÷ 30 days).

{% hint style="info" %}
**Daily Message Limit:** Each connector has a daily AI call limit that depends on the AI model tier:

* **Basic** – up to **100 messages per day**
* **Standard / Pro** – up to **200 messages per day**

Messages beyond this limit are ignored until the counter resets at midnight (server time). Messages excluded by the [Message Filters](#message-filters-include--exclude) below do **not** count against this limit.
{% endhint %}

***

## Message Filters (Include / Exclude) <a href="#message-filters-include--exclude" id="message-filters-include--exclude"></a>

Use **Include** or **Exclude** patterns to control which messages are sent to the AI for interpretation. Filters run **before** the AI call, so filtered-out messages are free: they do not consume your daily AI call quota.

{% hint style="warning" %}
**Use either Include OR Exclude, not both.** In the connector dialog, typing in one field automatically clears the other list. Pick the approach that best fits your chat:

* **Exclude** – drop noisy messages (announcements, promos, off-topic chatter) and let everything else through. Good when most messages are signals.
* **Include** – whitelist only messages matching at least one pattern and drop the rest. Good when the chat is full of noise and signals follow a recognizable pattern.
  {% endhint %}

**Semantics:**

* Patterns are **case-insensitive regular expressions** and use **substring matching** (a pattern matches if it appears anywhere in the message).
* **Exclude list**: a message is skipped if **any** exclude pattern matches it.
* **Include list**: only messages matching **at least one** include pattern are sent to the AI. All other messages are dropped.
* Maximum **60 patterns** per list. Each pattern is a separate chip in the dialog.
* Invalid regex patterns are rejected at save time.

**Decision table** (✅ = sent to AI, ❌ = skipped):

| Filter mode | Matches a pattern? | Result                                   |
| ----------- | ------------------ | ---------------------------------------- |
| Exclude     | Yes                | ❌ skipped (does not consume daily quota) |
| Exclude     | No                 | ✅ sent to AI                             |
| Include     | Yes                | ✅ sent to AI                             |
| Include     | No                 | ❌ skipped (does not consume daily quota) |
| Neither     | n/a                | ✅ sent to AI (no filter active)          |

**Examples:**

| Mode    | Pattern                        | Matches                                                        |
| ------- | ------------------------------ | -------------------------------------------------------------- |
| Exclude | `announcement`                 | Skip any message containing the word "announcement"            |
| Exclude | `^promo:`                      | Skip messages that **start with** `promo:`                     |
| Exclude | `\bgiveaway\b`                 | Skip messages with the whole word "giveaway"                   |
| Exclude | `https?://`                    | Skip any message containing a URL                              |
| Include | `\b(buy\|sell)\b`              | Only forward messages with the whole word "buy" or "sell"      |
| Include | `signal`                       | Only forward messages containing the word "signal"             |
| Include | `🔔`                           | Only forward messages containing the bell emoji                |
| Include | `\b(EURUSD\|GBPUSD\|XAUUSD)\b` | Only forward messages mentioning one of these specific symbols |

{% hint style="info" %}
Need a refresher on regular expressions? See the [Regex cheat sheet](/tutorials/regex) for more examples.
{% endhint %}

***

## Best Practices

### Security

**Protect your Telegram credentials:**

* Never share your API ID, API Hash, or verification codes
* Use 2FA on your Telegram account for extra security

### Performance

1. **Choose the right region:** Select the region closest to your trading account's server for lower latency
2. **Start with a demo account:** Test the integration with a demo account first to verify signals are interpreted correctly
3. **Use AI instructions:** Provide clear AI instructions to help the AI understand your signal provider's format
4. **Monitor regularly:** Check the connector status and review executed trades periodically

### Multiple Signal Providers

You can subscribe to multiple signal providers by:

1. Creating separate Telegram Connectors for each channel
2. Using different **magicNumber** values to identify which provider triggered each trade

***

## Troubleshooting

### Telegram Account Issues

**"Code Required" status won't change?**

1. Check your Telegram app for the verification code
2. Enter the code exactly as received (no spaces)
3. The code expires after a few minutes - request a new one if needed

**"Session Expired" error?**

1. Telegram sessions can expire after inactivity
2. Edit the Telegram account and re-verify with a new code

**Chats not loading?**

1. Make sure the account status is "Authorized"
2. You must be a member of the channel/group to see it
3. Private channels require an invite link to join first
4. Topics of a group are cached, a newly created topic can take up to 15 minutes to appear

### Connector Issues

**Signals not being executed?**

1. Check that the connector is **enabled**
2. Verify the Telegram account status is "Authorized"
3. Check if the action is in the **allowedActions** list
4. Review the connector's error message if status is "ERROR"

**Wrong symbol being traded?**

1. Use **AI Instructions** to specify symbol name mappings
2. Example: "GOLD means XAUUSD, US30 means DJ30"

**Volume not correct?**

1. Set **volumeMode** to `FIXED` and configure **defaultVolume** if signals don't include lot size
2. Set **volumeMode** to `BALANCE_SCALED` and configure **lotsPerThousandBalance** to automatically scale volume based on account balance
3. Set **volumeMode** to `AI` to let AI determine volume based on the signal (customize via AI Instructions, e.g., "use 50% of signal volume")
4. Set **volumeMode** to `RISK_PERCENT` and configure **riskPercent** to automatically size positions based on a percentage of your account balance (requires a stop loss and the account-level [Risk Per Trade](https://docs.metacopier.io/features/pro-features/risk-per-trade) feature)

{% hint style="info" %}
**Before using `RISK_PERCENT`**, you must:

1. Add the [Risk Per Trade](https://docs.metacopier.io/features/pro-features/risk-per-trade) feature to your account. You do **not** need to set a risk percentage or absolute risk amount - both values can be left at `0`. This disables account-level risk limiting, but the **tick value service still runs** in the background, which is what the Telegram connector needs for lot size calculation.

2. Provide a **tick value** for each symbol you plan to trade. Two options:
   * **Automatic (recommended):** Leave **Tick value automatic adjustement** enabled on the account-level Risk Per Trade feature, then open and **close** a few trades on each symbol - the trades must have some pips of profit or loss (not zero). The system detects the tick value from live and history trades. Until the first sample is collected, the connector returns `RISK_TICK_VALUE_UNAVAILABLE`.
   * **Manual:** Disable **Tick value automatic adjustement** and enter the **Tick value** directly (globally or per symbol) on the account-level Risk Per Trade feature. Use this when you want to trade immediately without waiting for auto-detection, or when auto-detection is unreliable (very small or very few trades). See [risk-per-trade-tick-value.md](/features/pro-features/risk-per-trade/risk-per-trade-tick-value) for how to calculate the tick value.
     {% endhint %}

3. Set **volumeMode** to `MARGIN_PERCENT` and configure **marginPercent** to size positions from a percentage of your **free (available) margin** - no stop loss and no Risk Per Trade feature required; it self-limits as your open exposure grows

4. Use **forceVolumeMode** = `true` to always use the configured volumeMode and ignore any volume specified in the signal

5. Use **maxAllowedVolume** as a safety cap for any volume mode

6. Use **AI Instructions** to explain the volume format

**SL/TP not being set?**

1. Set **defaultStopLossPoints** and **defaultTakeProfitPoints**
2. Use **AI Instructions** to clarify if values are in points or price

***

## Frequently Asked Questions (FAQ)

**Can I use the same Telegram account for multiple trading accounts?**\
Yes. Create one Telegram account at the project level, then add multiple Telegram connectors to different trading accounts, all linked to the same Telegram account.

**Does this work with private channels?**\
Yes, as long as your Telegram account is a member of the private channel.

**The provider posts the signals in one topic of a group. Can I follow only that topic?**\
Yes. Groups with topics are listed once per topic as `Group -> Topic`. Pick the topic that carries the signals and everything posted in the other topics is ignored. Selecting the group itself processes all topics.

**What happens if the signal provider sends multiple signals quickly?**\
Each signal is processed independently. Consider using the *Max Open Positions* feature to limit exposure.

**Can I filter which signals to trade?**\
Yes. Use `allowedActions` to restrict specific actions, and apply AI instructions to filter by keywords, emojis, or message patterns.

**Is there a delay in signal execution?**\
Signals are processed in near real-time (typically under one second). The primary latency depends on Telegram’s message delivery.

**What if the AI misinterprets a signal?**\
Review the trade in your account logs and adjust the AI instructions to improve accuracy. You can also set `allowedActions` to an empty array (`[]`) to pause execution during testing.

***

## Settings details

### Telegram Account

| Option                | Type    | Default | Description                                                                       |
| --------------------- | ------- | ------- | --------------------------------------------------------------------------------- |
| `apiId`               | number  | -       | Your Telegram API ID from my.telegram.org                                         |
| `apiHash`             | string  | -       | Your Telegram API Hash from my.telegram.org                                       |
| `phoneNumber`         | string  | -       | Phone number in international format (+1234567890)                                |
| `regionId`            | number  | -       | Region where the Telegram client runs                                             |
| `includePrivateChats` | boolean | `false` | Include private chats in the available chats list (default: only groups/channels) |

### Telegram Connector

| Option                     | Type     | Default   | Description                                                                                                                                                                                                                                                                                                                                                                                                                                                                                                                                                                                                                                                                                                                                                                                                 |
| -------------------------- | -------- | --------- | ----------------------------------------------------------------------------------------------------------------------------------------------------------------------------------------------------------------------------------------------------------------------------------------------------------------------------------------------------------------------------------------------------------------------------------------------------------------------------------------------------------------------------------------------------------------------------------------------------------------------------------------------------------------------------------------------------------------------------------------------------------------------------------------------------------- |
| `telegramAccountFeatureId` | UUID     | -         | Reference to the Telegram Account feature ID (required)                                                                                                                                                                                                                                                                                                                                                                                                                                                                                                                                                                                                                                                                                                                                                     |
| `chatId`                   | number   | -         | Telegram chat ID to subscribe to (required)                                                                                                                                                                                                                                                                                                                                                                                                                                                                                                                                                                                                                                                                                                                                                                 |
| `forumTopicId`             | number   | -         | Topic inside a group with topics. Only messages of that topic are processed. Empty means the whole chat (optional)                                                                                                                                                                                                                                                                                                                                                                                                                                                                                                                                                                                                                                                                                          |
| `chatTitle`                | string   | -         | Chat title (read-only, populated automatically)                                                                                                                                                                                                                                                                                                                                                                                                                                                                                                                                                                                                                                                                                                                                                             |
| `enabled`                  | boolean  | `true`    | Enable/disable signal processing                                                                                                                                                                                                                                                                                                                                                                                                                                                                                                                                                                                                                                                                                                                                                                            |
| `allowedActions`           | array    | all       | Allowed actions: `open`, `close`, `modify`. Empty = all                                                                                                                                                                                                                                                                                                                                                                                                                                                                                                                                                                                                                                                                                                                                                     |
| `aiInstructions`           | string   | -         | AI instructions for signal interpretation (max 2000 characters). Use this to customize how the AI interprets signals. The default prompt is always included. Examples: symbol mappings, volume adjustments, filtering rules                                                                                                                                                                                                                                                                                                                                                                                                                                                                                                                                                                                 |
| `aiTier`                   | string   | `BASIC`   | AI model tier: `BASIC` (free), `STANDARD` ($5/month), or `PRO` ($10/month). Can only be set on creation - cannot be changed after the connector is created                                                                                                                                                                                                                                                                                                                                                                                                                                                                                                                                                                                                                                                  |
| `volumeMode`               | string   | `FIXED`   | Volume calculation mode: `FIXED` (use defaultVolume), `BALANCE_SCALED` (calculate from account balance), `AI` (let AI determine volume based on signal), `RISK_PERCENT` (calculate lot size from risk percentage of account balance - requires `riskPercent`, a stop loss, and the account-level [Risk Per Trade](https://docs.metacopier.io/features/pro-features/risk-per-trade) feature enabled), `RISK_AMOUNT` (calculate lot size from a fixed currency amount - requires `riskAmount`, a stop loss, and the account-level [Risk Per Trade](https://docs.metacopier.io/features/pro-features/risk-per-trade) feature enabled), or `MARGIN_PERCENT` (size the position to use a percentage of your free/available margin - requires `marginPercent`, no stop loss and no Risk Per Trade feature needed) |
| `forceVolumeMode`          | boolean  | `false`   | If `true`, always use `volumeMode` calculation and ignore any volume specified in the signal. If `false`, use signal volume when provided. Note: `forceVolumeMode=true` with `volumeMode=AI` falls back to `defaultVolume`                                                                                                                                                                                                                                                                                                                                                                                                                                                                                                                                                                                  |
| `maxAllowedVolume`         | number   | `1.0`     | Maximum allowed volume safety limit (min 0.001). Applies to ALL volume modes. Calculated volume is capped to this value                                                                                                                                                                                                                                                                                                                                                                                                                                                                                                                                                                                                                                                                                     |
| `defaultVolume`            | number   | -         | Default lot size if not specified in signal (min 0.001, used when volumeMode=`FIXED`)                                                                                                                                                                                                                                                                                                                                                                                                                                                                                                                                                                                                                                                                                                                       |
| `lotsPerThousandBalance`   | number   | `0.01`    | Lots per 1000 balance (min 0.001, used when volumeMode=`BALANCE_SCALED`). Example: balance 10000 with value 0.01 = 0.1 lots                                                                                                                                                                                                                                                                                                                                                                                                                                                                                                                                                                                                                                                                                 |
| `riskPercent`              | number   | -         | Risk per trade as percentage of account balance (0.01–100, used when volumeMode=`RISK_PERCENT`). Requires a stop loss (from signal or `defaultStopLossPoints`) and the account-level [Risk Per Trade](https://docs.metacopier.io/features/pro-features/risk-per-trade) feature enabled for tick value configuration                                                                                                                                                                                                                                                                                                                                                                                                                                                                                         |
| `riskAmount`               | number   | -         | Risk per trade as fixed currency amount (e.g., 100 = $100, used when volumeMode=`RISK_AMOUNT`). Requires a stop loss (from signal or `defaultStopLossPoints`) and the account-level [Risk Per Trade](https://docs.metacopier.io/features/pro-features/risk-per-trade) feature enabled for tick value configuration                                                                                                                                                                                                                                                                                                                                                                                                                                                                                          |
| `marginPercent`            | number   | -         | Percentage of free (available) margin the position should use (0.01–100, used when volumeMode=`MARGIN_PERCENT`). No stop loss required and the Risk Per Trade feature is not needed. Formula: `(freeMargin × marginPercent / 100) / marginPerLot`. Not available on accounts that do not report margin (e.g. some crypto/CEX accounts)                                                                                                                                                                                                                                                                                                                                                                                                                                                                      |
| `defaultStopLossPoints`    | number   | -         | Default SL in points if not in signal (min 0)                                                                                                                                                                                                                                                                                                                                                                                                                                                                                                                                                                                                                                                                                                                                                               |
| `defaultTakeProfitPoints`  | number   | -         | Default TP in points if not in signal (min 0)                                                                                                                                                                                                                                                                                                                                                                                                                                                                                                                                                                                                                                                                                                                                                               |
| `magicNumber`              | number   | -         | Magic number for positions from this connector                                                                                                                                                                                                                                                                                                                                                                                                                                                                                                                                                                                                                                                                                                                                                              |
| `comment`                  | string   | -         | Position comment (max 20 characters). See note below on comment behavior                                                                                                                                                                                                                                                                                                                                                                                                                                                                                                                                                                                                                                                                                                                                    |
| `messageExpiryMinutes`     | number   | `10`      | Maximum message age in minutes (1–10080). Messages older than this are skipped (e.g., due to network delays, Telegram outages, or server restarts). Default is 10                                                                                                                                                                                                                                                                                                                                                                                                                                                                                                                                                                                                                                           |
| `confidenceThreshold`      | number   | `70`      | AI confidence threshold (0–100). Only signals with confidence >= this threshold are executed. Lower = more signals (but more false positives), higher = fewer signals (but more reliable)                                                                                                                                                                                                                                                                                                                                                                                                                                                                                                                                                                                                                   |
| `contextMessageCount`      | number   | `5`       | Number of recent messages included as AI context (1–10). Higher values give the AI more context for multi-message signals but consume more tokens                                                                                                                                                                                                                                                                                                                                                                                                                                                                                                                                                                                                                                                           |
| `includePatterns`          | array    | -         | Optional list of case-insensitive regex patterns (max 60). If non-empty, only messages matching at least one pattern are sent to the AI. Substring match semantics. **Mutually exclusive with `excludePatterns`** (use one or the other, not both)                                                                                                                                                                                                                                                                                                                                                                                                                                                                                                                                                          |
| `excludePatterns`          | array    | -         | Optional list of case-insensitive regex patterns (max 60). Messages matching any pattern are skipped before the AI call and do not count against the daily AI call limit. **Mutually exclusive with `includePatterns`** (use one or the other, not both)                                                                                                                                                                                                                                                                                                                                                                                                                                                                                                                                                    |
| `status`                   | string   | `PENDING` | Connector status (read-only)                                                                                                                                                                                                                                                                                                                                                                                                                                                                                                                                                                                                                                                                                                                                                                                |
| `errorMessage`             | string   | -         | Error message if status is ERROR (read-only)                                                                                                                                                                                                                                                                                                                                                                                                                                                                                                                                                                                                                                                                                                                                                                |
| `lastMessageAt`            | datetime | -         | Last message processed timestamp (read-only)                                                                                                                                                                                                                                                                                                                                                                                                                                                                                                                                                                                                                                                                                                                                                                |

{% hint style="warning" %}
**Comment Truncation:** MetaCopier uses the trade comment field internally to track positions opened by the Telegram connector (format: `TG|messageId.tpIndex`). This is required for reliable close/modify operations. Since MT4/MT5 brokers typically limit the comment field to **25–31 characters**, the `comment` value you configure may be truncated or partially visible on the broker side. The Telegram channel name or original signal text is not included in the MT5 comment field due to these broker-imposed length constraints. Use `magicNumber` if you need to identify trades from a specific connector. If truncated comments are a problem for you, write to <support@metacopier.io>; we can enable server-side comment restoration for your account so the REST API returns the full text.
{% endhint %}

### Authorization Status

| Status              | Description                              |
| ------------------- | ---------------------------------------- |
| `PENDING`           | Waiting for initial setup                |
| `CODE_REQUIRED`     | Verification code sent to Telegram app   |
| `PASSWORD_REQUIRED` | 2FA password required                    |
| `AUTHORIZED`        | Connected and ready                      |
| `FAILED`            | Authorization failed                     |
| `SESSION_EXPIRED`   | Session expired, re-authorization needed |
| `DISCONNECTED`      | Disconnected from Telegram               |

### Connector Status

| Status         | Description                               |
| -------------- | ----------------------------------------- |
| `PENDING`      | Connector created, waiting for activation |
| `ACTIVE`       | Receiving and processing messages         |
| `PAUSED`       | Temporarily paused (enabled = false)      |
| `ERROR`        | Error occurred (check error message)      |
| `DISCONNECTED` | Parent Telegram account disconnected      |


# Prop firms guide

Proprietary trading firms (short prop firms) are expanding rapidly, and interest in trading with them is growing just as fast. To support your success and help you remain compliant, we've created this guide with key recommendations.

Before anything else, make sure you thoroughly read and understand the specific rules of your chosen prop firm. The guidelines provided here are meant to assist you in staying compliant. They **must not be used to bypass or circumvent** the firm’s official rules in any way.

We recommend starting with smaller accounts to test and refine your settings. Ultimately, **you are fully responsible** for ensuring your trading activities remain within the firm’s guidelines.

## Settings reccomendations

1. **Use** [**Risk Limits**](/features/basic-features/risk-limits) **and** [**Profit Targets**](/features/basic-features/profit-targets)**:** Set clear limits to manage your exposure and ensure disciplined trading.
2. **IP Address Considerations:**
   * If the prop firm monitors IP addresses, use either a [**dedicated IP**](/features/pro-features#dedicated-ip) or your [**home IP/VPS**](/tutorials/my-home-ip).
   * When using your home IP, configure it at the [**project level**.](/tutorials/my-home-ip#limitations)
   * When using a dedicated IP, make sure to **disable the** [**fallback option**](/features/basic-features/fallback-setting).
   * When adding a new account to MetaCopier, select either the dedicated IP or your home IP to ensure that the first connection is also made using your own IP address.
3. [**Fallback**](/features/basic-features/fallback-setting)**:** Fallback is what happens when a technical problem occurs on the infrastructure hosting your account (network disruption, hardware or datacenter failure). To restore the service quickly, MetaCopier automatically moves the account to another infrastructure, which means the account reconnects from a **different IP address**. For prop firms that enforce strict IP checks, that IP change can be seen as a rule violation, so we recommend turning fallback off and combining it with a [dedicated IP](/features/pro-features#dedicated-ip) or [My Home IP](/tutorials/my-home-ip).
   * **Enable "No Fallback"** so the account stays disconnected until the original infrastructure is back online, instead of being moved elsewhere.
   * The setting is available at **two levels**:
     * **Project level:** enable it once in the project settings and every account of that project inherits the behaviour.
     * **Account level:** enable it on a single account when only that account needs the stricter behaviour.
   * "No Fallback" is only taken into account when the account uses a **dedicated IP** (or your home IP). It is disabled by default.
   * If you prefer to keep fallback enabled, you can still restrict where the account may be moved through the **Allowed Regions** list.
4. **Lot Size Limitations:** Some prop firms impose limits on lot sizes per trade. If necessary, define [**custom lot size limits per symbol**](/features/basic-features/copiers).
5. [**Margin Cap**](/features/pro-features/margin-cap)**:** Set a maximum margin usage percentage to ensure copied trades stay within your prop firm's margin limits. MetaCopier automatically adjusts the lot size or skips the trade if necessary, helping prevent excessive leverage.
6. [**Disable Trade Comments**](/features/basic-features/copiers)**:** Turn off the comment feature in the copier to avoid any potential flagging.
7. **Limit Open Positions:** Use the copier’s [**max open positions**](/features/basic-features/max-open-positions) feature to control the number of simultaneous trades.
8. **Avoid Identical Trades:** To prevent trades from being too similar, consider
   1. enabling the [**TP/SL (Take Profit / Stop Loss) management**](/features/pro-features#tp-sl-management) feature on the copier and setting a value for the "*Additional TP points*" and "*Additional SL points*" to introduce variation in the position parameters
   2. enabling also the "*Adjust with master distance*" option in the TP/SL Management feature to to further randomize TP/SL values based on the slippage and spread of the slave account
   3. enabling the [Delayed execution](/features/pro-features#delayed-execution) feature to apply a random delay for opening and closing positions
9. [**Minimum holding time**](/features/basic-features/minimum-holding-time) **a position must stay open:** Sometimes, closing trades too quickly may violate certain rules or restrictions.
10. [**Block Hedge Positions**](/features/basic-features/block-hedging): Prevents opening a trade if an opposite position (BUY vs SELL) on the same symbol already exists, helping you stay compliant with prop firm no-hedging rules.
11. [**Trade cooldown**](/features/basic-features/trade-cooldown): Blocks copying a new open on a symbol for a set time after a previous trade on the same (or a correlated) symbol closes or opens. Use it to respect prop-firm "trade idea" rules, for example FTMO's rule that a new position within 1 hour of a previous trade on the same or a correlated symbol counts as the same trade idea.


# For developers

{% hint style="info" %}
If you are a developer, take a look at our REST API & SDKs
{% endhint %}

{% content-ref url="/pages/6caiwOfbqFACH3UarxFX" %}
[API](/rest-api/api)
{% endcontent-ref %}

{% content-ref url="/pages/Lmy4bPOkyEzKNd1vDj17" %}
[SDK](/rest-api/sdk)
{% endcontent-ref %}


# Regex

A regex, or regular expression, is a sequence of characters that defines a search pattern. It is used for pattern matching within strings, allowing you to find specific text based on defined rules.

To learn how regex works take a look at this site [regexone.com ](https://regexone.com/)or if you are already familiar you can also check this online utility: [regex101.com](https://regex101.com/) (make sure to select Java on the left side)

## Copier filter

The copier filter can be used to allow only specific trades based on the **comment** or **magic number**. Here are some examples:

<table><thead><tr><th width="174">Type</th><th width="122">Regex</th><th>Description</th></tr></thead><tbody><tr><td>Comment</td><td>my EA</td><td>It copies only the trades that have "my EA" in the comment field</td></tr><tr><td>Comment</td><td>^my EA</td><td>It copies only the trades that have "my EA" in the <strong>beggining</strong> of the comment field</td></tr><tr><td>Comment</td><td>^my EA$</td><td>It copies only the trades that have <strong>exactly</strong> "my EA" in the comment field</td></tr><tr><td>Magic number</td><td>5</td><td>It copies only the trades that have "5" as magic number. Pay attention that "15" will also be copied.</td></tr><tr><td>Magic number</td><td>^5$</td><td>It copies only the trades that have "5" as magic number.</td></tr></tbody></table>

### Remarks

* Regex is **case sensitive**
* If you have multiple filters, they will be handled with the **OR operator**
* **cTrader**: the magic number filter is matched against the position **label**, but only **numeric** labels are supported. Labels containing letters or other non-numeric characters are ignored and the filter will never match. Use a numeric-only label on cTrader, or filter by the **comment** field instead.

## Symbol mapping

Here are some examples regarding the [symbol mapping](https://docs.metacopier.io/features/basic-features/symbol-mapping) and broker selection:

<table><thead><tr><th width="242">Regex</th><th>Description</th></tr></thead><tbody><tr><td>ICMarketsSC</td><td>The mapping is valid for all brokers that have ICMarketsSC in the broker name. This includes all live and demo brokers.</td></tr><tr><td>^ICMarketsSC-Demo02$</td><td>The mapping is valid for all brokers that matches <strong>exactly</strong> ICMarketsSC-Demo02</td></tr></tbody></table>

### Remarks

* Regex is **case sensitive**

## Permitted symbols

Here are some examples regarding the permitted symbols feature:

<table><thead><tr><th width="187">Type</th><th>Regex</th><th>Description</th></tr></thead><tbody><tr><td>Whitelist</td><td>eurusd</td><td>Only orders that includes "eurusd" and "EURUSD" (case insenstive) will be copied</td></tr><tr><td>Whitelist</td><td>eur</td><td>All order that includes "eur" or "EUR" (case insensitive) will be copied</td></tr><tr><td>Whitelist</td><td>^eurusd$</td><td>Only orders that matches <strong>exactly</strong> "eurusd" and "EURUSD" (case insenstive) will be copied</td></tr><tr><td>Blacklist</td><td>xau</td><td>All orders except orders that includes "xau" or "XAU" (case insenstive) will be copied</td></tr></tbody></table>

### Remarks

* Regex is **case insensitive**

## Telegram message filters

The [Telegram connector](/tutorials/telegram-signal-integration) lets you define **Include** and **Exclude** regex patterns to control which messages reach the AI. Filters are applied **before** the AI is called, so dropped messages do **not** count against your daily AI call limit (100/day on Basic, 200/day on Standard & Pro).

Use **either Include OR Exclude**, not both. Typing in one field clears the other list automatically.

* **Exclude** → drop noisy messages (announcements, promos, off-topic chatter) and let everything else through.
* **Include** → whitelist only messages matching at least one pattern and drop the rest.

Up to **60 patterns** per list. Each pattern is a separate chip, evaluated independently with substring match. If **any** pattern in the list matches the message, the list is considered a match.

### Examples

<table><thead><tr><th width="120">Type</th><th width="240">Regex</th><th>Description</th></tr></thead><tbody><tr><td>Exclude</td><td>announcement</td><td>Skip any message containing the word "announcement" (anywhere in the text).</td></tr><tr><td>Exclude</td><td>^promo:</td><td>Skip messages that <strong>start with</strong> <code>promo:</code> (e.g. <code>promo: 50% off</code>).</td></tr><tr><td>Exclude</td><td>\bgiveaway\b</td><td>Skip messages containing the <strong>whole word</strong> "giveaway" (won't match "giveaways" or "giveawayed").</td></tr><tr><td>Exclude</td><td>https?://</td><td>Skip any message containing a URL (http or https link).</td></tr><tr><td>Exclude</td><td>@\w+</td><td>Skip messages mentioning a Telegram username (e.g. <code>@admin</code>, <code>@support</code>).</td></tr><tr><td>Include</td><td>\b(buy|sell)\b</td><td>Only forward messages containing the whole word "buy" or "sell" (typical trading signal keywords).</td></tr><tr><td>Include</td><td>signal</td><td>Only forward messages containing the word "signal" anywhere in the text.</td></tr><tr><td>Include</td><td>🔔</td><td>Only forward messages containing the bell emoji (useful when the provider tags every signal with an emoji).</td></tr><tr><td>Include</td><td>\b(EURUSD|GBPUSD|XAUUSD)\b</td><td>Only forward messages mentioning one of these specific symbols.</td></tr><tr><td>Include</td><td>\b(tp|sl)\s*[:=]</td><td>Only forward messages that look like a real signal (contain <code>TP:</code>, <code>TP =</code>, <code>SL:</code> or <code>SL =</code>).</td></tr></tbody></table>

### Remarks

* Regex is **case insensitive** (you don't need to write both `buy` and `BUY`).
* Patterns use **substring match**: the regex doesn't need to match the whole message, just a portion of it.
* Invalid regex patterns are rejected when you press **Enter** or click **Add**.
* On the **Include** list, a message must match at least one pattern to be forwarded. Empty list = the include filter is off.
* On the **Exclude** list, a message matching any pattern is dropped. Empty list = the exclude filter is off.


# Cron expressions

**Cron Expressions** are a powerful way to define schedules for automated tasks. They are used to specify the precise timing for the execution of commands or scripts. Cron expressions consist of six fields that represent different units of time, allowing for highly customizable and flexible scheduling.

A typical cron expression follows this format:

```
* * * * * *
- - - - - -
| | | | | |
| | | | | +---- Day of the week (1 - 7) (Sunday = 1, Saturday = 7)
| | | | +------ Month (1 - 12)
| | | +-------- Day of the month (1 - 31)
| | +---------- Hour (0 - 23)
| +------------ Minute (0 - 59)
+-------------- Second (0 - 59)
```

## Description

1. **Second**: The second of the minute when the command will run (0-59).
2. **Minute**: The minute of the hour when the command will run (0-59).
3. **Hour**: The hour of the day when the command will run (0-23).
4. **Day of the Month**: The day of the month when the command will run (1-31).
5. **Month**: The month when the command will run (1-12).
6. **Day of the Week**: The day of the week when the command will run (1-7, where 1 = Sunday and 7 = Saturday). You may also use the three-letter names `SUN`, `MON`, `TUE`, `WED`, `THU`, `FRI`, `SAT`.

{% hint style="info" %}
Day of the Month and Day of the Week cannot both be set to a specific value at the same time (this is a Quartz cron requirement). Use `?` in whichever field you do not want to constrain.
{% endhint %}

## Examples

* `0 0 0 * * ?`: Runs at midnight every day.
* `0 30 8 ? * MON-FRI`: Runs at 8:30:00 AM every weekday (Monday to Friday).
* `0 0 3 1 * ?`: Runs at 3 AM on the first day of every month.
* `0 30 8 ? * 4`: Runs every week on Wednesday at 8:30 AM (Quartz day-of-week: 1=SUN, 2=MON, 3=TUE, 4=WED, 5=THU, 6=FRI, 7=SAT).

{% hint style="info" %}
All times are based on UTC.
{% endhint %}

## Special characters

* `*` (asterisk): Represents all possible values for a field.
* `/` (slash): Specifies increments. For example, `0/5` in the minute field means "every 5 minutes starting at minute 0."
* `,` (comma): Separates multiple values. For example, `1,15` in the minute field means "at minute 1 and 15."
* `-` (dash): Specifies a range. For example, `2-6` in the day of the week field means "Monday to Friday" (or use the literal names: `MON-FRI`).
* `?` (question mark): Used in the day-of-the-month and day-of-the-week fields to indicate no specific value, preventing conflicts when both fields are specified.
* `L` (last): Specifies the last day of the month or the last day of the week.
* `W` (weekday): Specifies the nearest weekday to a given day of the month.
* `#` (hash): Specifies the nth day of the month. For example, `2#1` means "the first Monday of the month."


# My home IP

{% hint style="warning" %}
This feature requires some technical knowledge. If you're not familiar with IPs, Docker, routers, or port forwarding, it’s better to skip this and use the [Dedicated IP](/features/pro-features#dedicated-ip) feature instead.
{% endhint %}

## Introduction

The "My Home IP" feature lets you trade using your home internet connection.

Instead of keeping a computer running at home, you can also use a VPS (Virtual Private Server). [The setup process](#vps) is the same for both options.

With this feature, all trading connections will go through your home IP address. This means your broker will always see your home IP when you trade.

<figure><img src="/files/kVFZvZfJoKMyDAFLqYTw" alt=""><figcaption><p>My home IP</p></figcaption></figure>

You can apply the "My Home IP" setting to the whole project, so all accounts use your home IP, or you can turn it on only for specific accounts if needed.

{% hint style="info" %}
In case of conflicts with the dedicated IP, the My Home IP will take precedence.
{% endhint %}

## Pricing

The **My Home IP** feature costs **6 USD per month**, whether you apply it to the entire project or just to individual accounts. The price does not change.

However, if you use **different IP addresses or ports**, you will be charged for **each unique combination**.

The feature is billed **monthly, not daily**, and the amount is never prorated. The cycle is a **rolling 30 days**, counted from the day you added the feature, not from the 1st of the month. If you add it on the 20th, it renews on the 20th of the following months. Removing it again on the same day still costs the full 6 USD.

## **Limitations**

* This feature disables Fallback and Redundancy. If your home IP becomes unreachable, all connected accounts will be disconnected.
* Depending on the platform and the number of accounts using a single IP, brokers may impose limitations that lead to slower trading or disconnections. If this happens, try reducing the number of accounts per IP or add additional IP addresses / projects.

## Requirements

Before you start setting up this feature, please read the following carefully:

1. **Always-On PC Required**: You need a PC or VPS that is always up and running. The hardware requirements are very low, so even an old computer or a Raspberry Pi will work.
2. **Technical Knowledge Needed**: This feature requires some technical skills. If you’re not familiar with IPs, Docker, routers, or port forwarding, it’s better to skip this and use the [Dedicated IP](/features/pro-features#dedicated-ip) feature instead.

**Important**: Make sure you fully understand the points above before proceeding.

## Installation

Install Docker on your PC or VPS, then run the following commands. Make sure to replace `<password>` with your own secure password.

```bash
docker run -d --name socks5 -p 1080:1080 \
  -e PROXY_USER=metacopier \
  -e PROXY_PASSWORD=<password> \
  --restart always \
  public.ecr.aws/w2w6q4q0/metacopier/socks5-proxy:master
```

```bash
docker run -d --name http-proxy -p 1081:3128 \
  -e SQUID_USERNAME=metacopier \
  -e SQUID_PASSWORD=<password> \
  --restart always \
  public.ecr.aws/w2w6q4q0/metacopier/http-proxy:master
```

After starting the Docker containers, update your router's firewall to forward the required ports to the PC running the containers.

If your home IP changes often, you can use a dynamic DNS service like EntryDNS or one that works with your router.

Finally, open MetaCopier select a project and enter all the settings in the corresponding fields.

<figure><img src="/files/dcroft83DLUs4Q7U2uef" alt=""><figcaption><p>My home IP settings</p></figcaption></figure>

Once activated, this feature will automatically apply to all your accounts. This might take a few minutes, so please be patient.

If everything is working correctly, you should see a "PROXY" label on your accounts. For example:

<figure><img src="/files/DXgpU1t9Kq8HPPbKy4OF" alt=""><figcaption><p>PROXY label</p></figcaption></figure>

{% hint style="info" %}
Please also note that the "PROXY" label is not updated in real-time. When adding new accounts to a project with *My Home IP* enabled, it may take a few minutes for the "PROXY" label to appear. However, all connections are still made over the *My Home IP* during this time.
{% endhint %}

If you prefer to assign the "My home IP" feature only to specific accounts, you can do so from the Accounts page by navigating to: **Account → Features → My home IP**.

## VPS

You can also use a **VPS (Virtual Private Server)** hosted in the cloud instead of running a PC at home. The installation process is the same (or even easier) since it usually requires fewer configuration steps.

To use a VPS as your **Home IP**, follow these steps:

1. **Choose a cloud provider** that offers VPS hosting in your region (e.g. DigitalOcean, Linode, etc.).
2. **Create a new VPS** with minimal system requirements:
   * 1 CPU and 1 GB RAM are usually sufficient
   * This setup typically costs just a few dollars per month
3. **Select Ubuntu 24.04** as the operating system (other systems may also work).
4. **Ensure the VPS has a public IPv4 address** so it can be accessed externally.
5. Once the VPS is created, you’ll receive the **access details** needed to connect. Proceed with the following steps:

<pre class="language-bash"><code class="lang-bash"># Connect to the VPS with SSH
ssh root@&#x3C;your VPS IP>

# Update the system
apt update &#x26;&#x26; apt upgrade -y

# Install Docker
apt install docker.io -y

# Install MetaCopier Home IP containers
# Replace &#x3C;password> with a strong, secure password of your choice

<strong>docker run -d --name socks5 -p 1080:1080 \
</strong>  -e PROXY_USER=metacopier \
  -e PROXY_PASSWORD=&#x3C;password> \
  --restart always \
  public.ecr.aws/w2w6q4q0/metacopier/socks5-proxy:master

docker run -d --name http-proxy -p 1081:3128 \
  -e SQUID_USERNAME=metacopier \
  -e SQUID_PASSWORD=&#x3C;password> \
  --restart always \
  public.ecr.aws/w2w6q4q0/metacopier/http-proxy:master

# Verify that both containers are running
# You should see "STATUS = Up" for both
docker ps

# Secure your VPS by setting up a firewall
apt install ufw -y

# Allow necessary ports and enable the firewall
ufw allow 22
ufw allow 1080
ufw allow 1081
ufw enable

# Reboot the VPS and continue setting up the my home ip in Metacopier
reboot
</code></pre>

{% hint style="info" %}
If you are running the containers on an ARM64 processor, such as a Raspberry Pi, simply add **“-arm64”** to the image tag, like this:

```
socks5-proxy:master-arm64
http-proxy:master-arm64
```

{% endhint %}

## Updates

To keep the containers up to date, you can choose between a **manual** or **automated** update process. Automation is **recommended** for convenience and consistency.

### Automated Updates (Recommended)

To automate updates, run a Watchtower container. Watchtower monitors running containers and automatically updates them when a new image is available. By default, it checks every 24 hours.

Use the following command to start Watchtower:

```bash
docker run -d --name watchtower \
    --volume /var/run/docker.sock:/var/run/docker.sock \
    --restart always \
    containrrr/watchtower
```

### Manual Updates

If you prefer to update manually (e.g., during scheduled maintenance on weekends), follow these steps:

```bash
# Download new images (if any)
docker pull public.ecr.aws/w2w6q4q0/metacopier/socks5-proxy:master
docker pull public.ecr.aws/w2w6q4q0/metacopier/http-proxy:master

# Stop and remove the actual containers
docker stop socks5
docker rm socks5
docker stop http-proxy
docker rm http-proxy

# Start the new containers with the command in the previous chapter

# Optional: verify that all containers are running
docker ps
```

## Monitoring

If for any reason your connection goes offline, you will receive an email notification shortly after we detect the disconnection or when it reconnects.

## Known issues

* Complex passwords for the HTTP/SOCKS5 containers defined via `PROXY_PASSWORD` and `SQUID_PASSWORD` are not supported. If your password contains special characters and the connection does not work, please remove the special characters and try again.


# Webhook

The Webhook feature allows you to receive real-time HTTP POST notifications whenever trading events occur on your MetaCopier accounts. This enables you to build custom integrations, dashboards, alerting systems, or automated workflows.

## Overview

When enabled, MetaCopier sends a JSON payload to your HTTPS endpoint whenever one of the subscribed events fires. You can configure authentication, delivery behavior, and payload content.

### Supported Events

| Event             | Event type string | Description                              |
| ----------------- | ----------------- | ---------------------------------------- |
| `POSITION_OPENED` | `position.opened` | A new position was opened on the account |
| `POSITION_CLOSED` | `position.closed` | A position was closed on the account     |
| `HISTORY_UPDATED` | `history.updated` | The trade history was updated            |

## Setup

### Account Level

1. Navigate to your **Account → Features**
2. Click the **+** button and select **Webhook**
3. Configure the webhook settings and save

### Project Level

1. Navigate to your **Project → Webhooks** panel in the sidebar
2. Fill in the configuration form and save

{% hint style="info" %}
At the project level, the webhook applies to **all accounts** in that project. Only one webhook can be configured per project.
{% endhint %}

## Configuration

### General

| Setting            | Description                                             |
| ------------------ | ------------------------------------------------------- |
| **Enable webhook** | Toggle delivery on/off without losing the configuration |
| **Endpoint URL**   | Your HTTPS endpoint (must start with `https://`)        |
| **Description**    | Optional label for your reference                       |

### Authentication

| Method           | Description                                                                           |
| ---------------- | ------------------------------------------------------------------------------------- |
| **None**         | No authentication header is sent                                                      |
| **HMAC-SHA256**  | A signature is computed over the payload and sent in the `X-Webhook-Signature` header |
| **Bearer Token** | Your token is sent as `Authorization: Bearer <token>`                                 |

#### HMAC-SHA256 Details

When HMAC-SHA256 is selected:

* The signature is computed as `HMAC-SHA256(secret, payload_body)` and sent hex-encoded in the `X-MetaCopier-Signature` header.
* If **Include timestamp in signature** is enabled, a `X-MetaCopier-Timestamp` header is sent (value in milliseconds) and the signature is computed over `timestamp.payload_body` for replay protection.
* The secret must be at least 32 characters. You can use the **Generate** button to create a cryptographically secure key.

### Delivery Configuration

| Setting              | Description                                                            | Range     | Default |
| -------------------- | ---------------------------------------------------------------------- | --------- | ------- |
| **Max retries**      | Number of retry attempts on failure                                    | 0–5       | 3       |
| **Retry delay (ms)** | Initial delay between retries (exponential backoff: delay × 2^attempt) | 500–30000 | 2000    |
| **Timeout (sec)**    | HTTP request timeout                                                   | 5–60      | 30      |
| **Rate limit/min**   | Maximum deliveries per minute (0 = unlimited)                          | 0–1000    | 60      |

### Payload Options

| Option                       | Description                                           | Default |
| ---------------------------- | ----------------------------------------------------- | ------- |
| **Include position details** | Include symbol, volume, prices, profit in the payload | true    |
| **Include account metadata** | Include broker name and login number                  | false   |

### Custom Headers

You can add up to 10 custom HTTP headers that will be included with every webhook request. This is useful for routing, API keys in downstream systems, or correlation IDs.

{% hint style="warning" %}
Reserved header names are blocked: `Content-Type`, `Authorization`, and any header starting with `X-MetaCopier-`.
{% endhint %}

## Payload Format

All webhook payloads are sent as `Content-Type: application/json` with a POST request. Fields with `null` values are excluded from the JSON.

### Example: Position Opened

```json
{
  "eventType": "position.opened",
  "timestamp": "2026-05-01T12:00:00.000Z",
  "accountId": "550e8400-e29b-41d4-a716-446655440000",
  "position": {
    "id": "100001",
    "symbol": "EURUSD",
    "orderType": "Buy",
    "volume": 0.10,
    "openPrice": 1.08542,
    "stopLoss": 1.08200,
    "takeProfit": 1.09000,
    "openTime": "2026-05-01T11:59:58.000Z",
    "comment": "metacopier",
    "magicNumber": "123456"
  },
  "accountMetadata": {
    "broker": "ICMarkets-MT5",
    "login": "12345678"
  }
}
```

### Example: Position Closed

```json
{
  "eventType": "position.closed",
  "timestamp": "2026-05-01T14:30:00.000Z",
  "accountId": "550e8400-e29b-41d4-a716-446655440000",
  "position": {
    "id": "100001",
    "symbol": "EURUSD",
    "orderType": "Buy",
    "volume": 0.10,
    "openPrice": 1.08542,
    "closePrice": 1.08890,
    "stopLoss": 1.08200,
    "takeProfit": 1.09000,
    "openTime": "2026-05-01T11:59:58.000Z",
    "closeTime": "2026-05-01T14:29:55.000Z",
    "profit": 34.80,
    "netProfit": 33.50,
    "swap": -0.30,
    "commission": -1.00,
    "comment": "metacopier",
    "magicNumber": "123456"
  },
  "accountMetadata": {
    "broker": "ICMarkets-MT5",
    "login": "12345678"
  }
}
```

### Example: History Updated

```json
{
  "eventType": "history.updated",
  "timestamp": "2026-05-01T14:35:20.789Z",
  "accountId": "550e8400-e29b-41d4-a716-446655440000",
  "accountMetadata": {
    "broker": "ICMarkets-MT5",
    "login": "12345678"
  }
}
```

{% hint style="info" %}
When **Include position details** is disabled, the `position` field is omitted entirely.

When **Include account metadata** is disabled, the `accountMetadata` field is omitted.
{% endhint %}

### Position Fields Reference

| Field         | Type   | Description                                     |
| ------------- | ------ | ----------------------------------------------- |
| `id`          | string | Position ticket ID                              |
| `symbol`      | string | Trading symbol (e.g. `EURUSD`)                  |
| `orderType`   | string | `Buy`, `Sell`, `BuyLimit`, `SellLimit`, etc.    |
| `volume`      | number | Lot size                                        |
| `openPrice`   | number | Entry price                                     |
| `closePrice`  | number | Exit price (only on close events)               |
| `stopLoss`    | number | Stop loss price                                 |
| `takeProfit`  | number | Take profit price                               |
| `openTime`    | string | ISO 8601 open timestamp                         |
| `closeTime`   | string | ISO 8601 close timestamp (only on close events) |
| `profit`      | number | Gross profit                                    |
| `netProfit`   | number | Profit after swap and commission                |
| `swap`        | number | Swap/rollover charges                           |
| `commission`  | number | Trading commission                              |
| `comment`     | string | Position comment                                |
| `magicNumber` | string | Magic number identifier                         |

## Headers Sent

Every webhook request includes these headers:

| Header                          | Description                                                              |
| ------------------------------- | ------------------------------------------------------------------------ |
| `Content-Type`                  | Always `application/json`                                                |
| `X-MetaCopier-Delivery-Attempt` | The delivery attempt number (starts at 1)                                |
| `X-MetaCopier-Timestamp`        | Unix timestamp in **milliseconds** (when HMAC with timestamp is enabled) |
| `X-MetaCopier-Signature`        | HMAC-SHA256 hex signature (when HMAC auth is configured)                 |
| `Authorization`                 | `Bearer <token>` (when Bearer Token auth is configured)                  |
| Custom headers                  | Any custom headers you configured                                        |

## Client-Side Implementation

Below are examples showing how to receive and verify webhook requests on your server.

***

### C\#

```csharp
using System.Security.Cryptography;
using System.Text;
using Microsoft.AspNetCore.Mvc;

[ApiController]
[Route("api/webhooks/metacopier")]
public class MetaCopierWebhookController : ControllerBase
{
    private const string HmacSecret = "your-hmac-secret-here-min-32-chars!!";
    private const int MaxTimestampAgeSeconds = 300; // 5 minutes

    [HttpPost]
    public IActionResult HandleWebhook()
    {
        using var reader = new StreamReader(Request.Body);
        var payload = reader.ReadToEndAsync().Result;

        // Verify HMAC signature
        if (!VerifySignature(payload))
            return Unauthorized("Invalid signature");

        // Parse the event
        var json = System.Text.Json.JsonDocument.Parse(payload);
        var eventType = json.RootElement.GetProperty("eventType").GetString();

        switch (eventType)
        {
            case "position.opened":
                HandlePositionOpened(json.RootElement);
                break;
            case "position.closed":
                HandlePositionClosed(json.RootElement);
                break;
            case "history.updated":
                HandleHistoryUpdated(json.RootElement);
                break;
        }

        return Ok();
    }

    private bool VerifySignature(string payload)
    {
        var signatureHeader = Request.Headers["X-MetaCopier-Signature"].FirstOrDefault();
        if (string.IsNullOrEmpty(signatureHeader))
            return false;

        var timestampHeader = Request.Headers["X-MetaCopier-Timestamp"].FirstOrDefault();
        var signedPayload = string.IsNullOrEmpty(timestampHeader)
            ? payload
            : $"{timestampHeader}.{payload}";

        // Check timestamp freshness (replay protection) - timestamp is in milliseconds
        if (!string.IsNullOrEmpty(timestampHeader))
        {
            if (long.TryParse(timestampHeader, out var timestampMs))
            {
                var ageMs = DateTimeOffset.UtcNow.ToUnixTimeMilliseconds() - timestampMs;
                if (Math.Abs(ageMs) > MaxTimestampAgeSeconds * 1000L)
                    return false;
            }
        }

        using var hmac = new HMACSHA256(Encoding.UTF8.GetBytes(HmacSecret));
        var computedHash = hmac.ComputeHash(Encoding.UTF8.GetBytes(signedPayload));
        var computedSignature = BitConverter.ToString(computedHash).Replace("-", "").ToLowerInvariant();

        return CryptographicOperations.FixedTimeEquals(
            Encoding.UTF8.GetBytes(computedSignature),
            Encoding.UTF8.GetBytes(signatureHeader));
    }

    private void HandlePositionOpened(System.Text.Json.JsonElement root)
    {
        var position = root.GetProperty("position");
        var id = position.GetProperty("id").GetString();
        var symbol = position.GetProperty("symbol").GetString();
        Console.WriteLine($"Position opened: {symbol} id={id}");
    }

    private void HandlePositionClosed(System.Text.Json.JsonElement root)
    {
        var position = root.GetProperty("position");
        var id = position.GetProperty("id").GetString();
        var profit = position.GetProperty("profit").GetDouble();
        Console.WriteLine($"Position closed: id={id} profit={profit}");
    }

    private void HandleHistoryUpdated(System.Text.Json.JsonElement root)
    {
        var accountId = root.GetProperty("accountId").GetString();
        Console.WriteLine($"History updated for account {accountId}");
    }
}
```

***

### Java

```java
import javax.crypto.Mac;
import javax.crypto.spec.SecretKeySpec;
import java.nio.charset.StandardCharsets;
import java.security.MessageDigest;
import java.time.Instant;

import org.springframework.http.ResponseEntity;
import org.springframework.web.bind.annotation.*;

import com.fasterxml.jackson.databind.JsonNode;
import com.fasterxml.jackson.databind.ObjectMapper;

@RestController
@RequestMapping("/api/webhooks/metacopier")
public class MetaCopierWebhookController {

    private static final String HMAC_SECRET = "your-hmac-secret-here-min-32-chars!!";
    private static final long MAX_TIMESTAMP_AGE_SECONDS = 300; // 5 minutes
    private final ObjectMapper objectMapper = new ObjectMapper();

    @PostMapping
    public ResponseEntity<String> handleWebhook(
            @RequestBody String payload,
            @RequestHeader(value = "X-MetaCopier-Signature", required = false) String signature,
            @RequestHeader(value = "X-MetaCopier-Timestamp", required = false) String timestamp) {

        // Verify HMAC signature
        if (!verifySignature(payload, signature, timestamp)) {
            return ResponseEntity.status(401).body("Invalid signature");
        }

        try {
            JsonNode json = objectMapper.readTree(payload);
            String eventType = json.get("eventType").asText();

            switch (eventType) {
                case "position.opened":
                    handlePositionOpened(json);
                    break;
                case "position.closed":
                    handlePositionClosed(json);
                    break;
                case "history.updated":
                    handleHistoryUpdated(json);
                    break;
            }
        } catch (Exception e) {
            return ResponseEntity.badRequest().body("Invalid payload");
        }

        return ResponseEntity.ok("OK");
    }

    private boolean verifySignature(String payload, String signature, String timestamp) {
        if (signature == null || signature.isEmpty()) {
            return false;
        }

        // Check timestamp freshness - timestamp is in milliseconds
        if (timestamp != null && !timestamp.isEmpty()) {
            long tsMs = Long.parseLong(timestamp);
            long ageMs = Math.abs(System.currentTimeMillis() - tsMs);
            if (ageMs > MAX_TIMESTAMP_AGE_SECONDS * 1000L) {
                return false;
            }
        }

        String signedPayload = (timestamp != null && !timestamp.isEmpty())
                ? timestamp + "." + payload
                : payload;

        try {
            Mac mac = Mac.getInstance("HmacSHA256");
            SecretKeySpec secretKey = new SecretKeySpec(
                    HMAC_SECRET.getBytes(StandardCharsets.UTF_8), "HmacSHA256");
            mac.init(secretKey);
            byte[] hash = mac.doFinal(signedPayload.getBytes(StandardCharsets.UTF_8));
            String computedSignature = bytesToHex(hash);
            return MessageDigest.isEqual(
                    computedSignature.getBytes(StandardCharsets.UTF_8),
                    signature.getBytes(StandardCharsets.UTF_8));
        } catch (Exception e) {
            return false;
        }
    }

    private static String bytesToHex(byte[] bytes) {
        StringBuilder sb = new StringBuilder();
        for (byte b : bytes) {
            sb.append(String.format("%02x", b));
        }
        return sb.toString();
    }

    private void handlePositionOpened(JsonNode json) {
        JsonNode position = json.get("position");
        String id = position.get("id").asText();
        String symbol = position.get("symbol").asText();
        System.out.println("Position opened: " + symbol + " id=" + id);
    }

    private void handlePositionClosed(JsonNode json) {
        JsonNode position = json.get("position");
        String id = position.get("id").asText();
        double profit = position.get("profit").asDouble();
        System.out.println("Position closed: id=" + id + " profit=" + profit);
    }

    private void handleHistoryUpdated(JsonNode json) {
        String accountId = json.get("accountId").asText();
        System.out.println("History updated for account " + accountId);
    }
}
```

***

### TypeScript

```typescript
import express from "express";
import crypto from "crypto";

const app = express();
const HMAC_SECRET = "your-hmac-secret-here-min-32-chars!!";
const MAX_TIMESTAMP_AGE_SECONDS = 300; // 5 minutes

app.post(
  "/api/webhooks/metacopier",
  express.raw({ type: "application/json" }),
  (req, res) => {
    const payload = req.body.toString("utf-8");
    const signature = req.headers["x-metacopier-signature"] as string;
    const timestamp = req.headers["x-metacopier-timestamp"] as string;

    // Verify HMAC signature
    if (!verifySignature(payload, signature, timestamp)) {
      return res.status(401).send("Invalid signature");
    }

    const event = JSON.parse(payload);

    switch (event.eventType) {
      case "position.opened":
        console.log(
          `Position opened: ${event.position.symbol} id=${event.position.id}`
        );
        break;
      case "position.closed":
        console.log(
          `Position closed: id=${event.position.id} profit=${event.position.profit}`
        );
        break;
      case "history.updated":
        console.log(`History updated for account ${event.accountId}`);
        break;
    }

    res.status(200).send("OK");
  }
);

function verifySignature(
  payload: string,
  signature: string | undefined,
  timestamp: string | undefined
): boolean {
  if (!signature) return false;

  // Check timestamp freshness - timestamp is in milliseconds
  if (timestamp) {
    const ageMs = Math.abs(Date.now() - parseInt(timestamp));
    if (ageMs > MAX_TIMESTAMP_AGE_SECONDS * 1000) return false;
  }

  const signedPayload = timestamp ? `${timestamp}.${payload}` : payload;
  const computedSignature = crypto
    .createHmac("sha256", HMAC_SECRET)
    .update(signedPayload)
    .digest("hex");

  return crypto.timingSafeEqual(
    Buffer.from(computedSignature),
    Buffer.from(signature)
  );
}

app.listen(3000, () => console.log("Webhook server listening on port 3000"));
```

***

### Python

```python
import hmac
import hashlib
import time
import json
from flask import Flask, request

app = Flask(__name__)

HMAC_SECRET = "your-hmac-secret-here-min-32-chars!!"
MAX_TIMESTAMP_AGE_SECONDS = 300  # 5 minutes


@app.route("/api/webhooks/metacopier", methods=["POST"])
def handle_webhook():
    payload = request.get_data(as_text=True)
    signature = request.headers.get("X-MetaCopier-Signature")
    timestamp = request.headers.get("X-MetaCopier-Timestamp")

    # Verify HMAC signature
    if not verify_signature(payload, signature, timestamp):
        return "Invalid signature", 401

    event = json.loads(payload)
    event_type = event.get("eventType")

    if event_type == "position.opened":
        position = event["position"]
        print(f"Position opened: {position['symbol']} id={position['id']}")
    elif event_type == "position.closed":
        position = event["position"]
        print(f"Position closed: id={position['id']} profit={position['profit']}")
    elif event_type == "history.updated":
        print(f"History updated for account {event['accountId']}")

    return "OK", 200


def verify_signature(payload: str, signature: str, timestamp: str) -> bool:
    if not signature:
        return False

    # Check timestamp freshness - timestamp is in milliseconds
    if timestamp:
        age_ms = abs(int(time.time() * 1000) - int(timestamp))
        if age_ms > MAX_TIMESTAMP_AGE_SECONDS * 1000:
            return False

    signed_payload = f"{timestamp}.{payload}" if timestamp else payload
    computed = hmac.new(
        HMAC_SECRET.encode("utf-8"),
        signed_payload.encode("utf-8"),
        hashlib.sha256,
    ).hexdigest()

    return hmac.compare_digest(computed, signature)


if __name__ == "__main__":
    app.run(port=3000)
```

***

### Go

```go
package main

import (
	"crypto/hmac"
	"crypto/sha256"
	"encoding/hex"
	"encoding/json"
	"fmt"
	"io"
	"math"
	"net/http"
	"strconv"
	"time"
)

const (
	hmacSecret             = "your-hmac-secret-here-min-32-chars!!"
	maxTimestampAgeSeconds = 300 // 5 minutes
)

type WebhookPayload struct {
	EventType       string          `json:"eventType"`
	Timestamp       string          `json:"timestamp"`
	AccountID       string          `json:"accountId"`
	Position        *Position       `json:"position,omitempty"`
	AccountMetadata *AccountMetadata `json:"accountMetadata,omitempty"`
}

type Position struct {
	ID         string  `json:"id"`
	Symbol     string  `json:"symbol"`
	OrderType  string  `json:"orderType"`
	Volume     float64 `json:"volume"`
	OpenPrice  float64 `json:"openPrice"`
	ClosePrice float64 `json:"closePrice"`
	StopLoss   float64 `json:"stopLoss"`
	TakeProfit float64 `json:"takeProfit"`
	Profit     float64 `json:"profit"`
	NetProfit  float64 `json:"netProfit"`
	Swap       float64 `json:"swap"`
	Commission float64 `json:"commission"`
}

type AccountMetadata struct {
	Broker string `json:"broker"`
	Login  string `json:"login"`
}

func main() {
	http.HandleFunc("/api/webhooks/metacopier", handleWebhook)
	fmt.Println("Webhook server listening on port 3000")
	http.ListenAndServe(":3000", nil)
}

func handleWebhook(w http.ResponseWriter, r *http.Request) {
	if r.Method != http.MethodPost {
		http.Error(w, "Method not allowed", http.StatusMethodNotAllowed)
		return
	}

	body, err := io.ReadAll(r.Body)
	if err != nil {
		http.Error(w, "Failed to read body", http.StatusBadRequest)
		return
	}
	defer r.Body.Close()

	signature := r.Header.Get("X-MetaCopier-Signature")
	timestamp := r.Header.Get("X-MetaCopier-Timestamp")

	// Verify HMAC signature
	if !verifySignature(string(body), signature, timestamp) {
		http.Error(w, "Invalid signature", http.StatusUnauthorized)
		return
	}

	var payload WebhookPayload
	if err := json.Unmarshal(body, &payload); err != nil {
		http.Error(w, "Invalid payload", http.StatusBadRequest)
		return
	}

	switch payload.EventType {
	case "position.opened":
		fmt.Printf("Position opened: %s id=%s\n", payload.Position.Symbol, payload.Position.ID)
	case "position.closed":
		fmt.Printf("Position closed: id=%s profit=%.2f\n", payload.Position.ID, payload.Position.Profit)
	case "history.updated":
		fmt.Printf("History updated for account %s\n", payload.AccountID)
	}

	w.WriteHeader(http.StatusOK)
	w.Write([]byte("OK"))
}

func verifySignature(payload, signature, timestamp string) bool {
	if signature == "" {
		return false
	}

	// Check timestamp freshness - timestamp is in milliseconds
	if timestamp != "" {
		ts, err := strconv.ParseInt(timestamp, 10, 64)
		if err != nil {
			return false
		}
		ageMs := math.Abs(float64(time.Now().UnixMilli() - ts))
		if ageMs > maxTimestampAgeSeconds*1000 {
			return false
		}
	}

	signedPayload := payload
	if timestamp != "" {
		signedPayload = timestamp + "." + payload
	}

	mac := hmac.New(sha256.New, []byte(hmacSecret))
	mac.Write([]byte(signedPayload))
	computed := hex.EncodeToString(mac.Sum(nil))

	return hmac.Equal([]byte(computed), []byte(signature))
}
```

***

## Best Practices

1. **Always verify signatures** - Never trust incoming webhooks without validating the HMAC signature.
2. **Check timestamp freshness** - Reject requests with timestamps older than 5 minutes to prevent replay attacks.
3. **Respond quickly** - Return a `200 OK` as soon as possible. Process the event asynchronously if your logic is slow.
4. **Handle retries idempotently** - The same event may be delivered multiple times. Use the position `id` and `timestamp` to deduplicate.
5. **Use HTTPS** - MetaCopier only delivers webhooks to `https://` endpoints.
6. **Monitor failures** - If your endpoint returns errors consistently, check your server logs and ensure the endpoint is accessible.

## Troubleshooting

| Issue                        | Solution                                                                |
| ---------------------------- | ----------------------------------------------------------------------- |
| Not receiving webhooks       | Ensure the webhook is **enabled** and your endpoint returns `200`       |
| Signature verification fails | Check that your secret matches exactly and you're using UTF-8 encoding  |
| Stale timestamp errors       | Ensure your server clock is synchronized (NTP)                          |
| Rate limited                 | Increase the **Rate limit/min** setting or optimize your endpoint speed |


# Business-to-Business

At MetaCopier, we understand that businesses often require tailor-made solutions to meet their unique needs. Whether you're running a trading platform, managing a financial institution, or developing a trading project, our copier technology is adaptable to your specific requirements.

## Why Choose MetaCopier for Your Business?

* **Flexible Integration**: We can seamlessly integrate our copier technology into your existing trading project, whether you use MetaTrader or another platform.
* **Scalability**: Our solutions are designed to scale, ensuring they grow with your business and support increasing demands.
* **Customization**: From trade management to reporting, we offer customizable features that align with your business goals.
* **Security & Reliability**: We prioritize the highest standards in data security, encryption, and system stability to ensure that your trading operations are safe and consistent.

Our custom solutions can help you automate trade copying across multiple accounts, enhance execution efficiency. Our copier can adapt to various trading platforms and strategies to meet the demands of your business.

We offer two solutions:

{% content-ref url="/pages/mXgb8A5RGSTyHht5A8iN" %}
[White-Label](/b2b/white-label)
{% endcontent-ref %}

{% content-ref url="/pages/6OvQAlRQ83fqJ15hCExh" %}
[Signal sharing](/features/signal-sharing)
{% endcontent-ref %}

## Build Your Own Frontend & Backend via API

As an alternative to the White Label option, you can build your own frontend and backend and use our [REST API](/rest-api/api) and [Socket API](/socket-api/api) to add, configure, and manage trading accounts programmatically.

### How it works

1. **You create a project in MetaCopier**.
2. **You generate a project-level API key** (optionally restricted via an [Access Policy](/rest-api/access-policy)).
3. **Your backend uses our REST / Socket API** to automate account creation, configuration, copying rules, monitoring, etc.
4. **Your users interact with your own frontend** and never touch MetaCopier directly.

This setup is ideal if you already have a product, a user base, and a billing system, and you only want to use MetaCopier as the trade-copying engine behind the scenes.

### What is **not** possible

Our REST / Socket API **cannot** be used to let *your end customers* sign up to MetaCopier, create their own MetaCopier projects, or add their own credit cards through your application. The API is designed to operate **within a single project that you own and pay for**.

In other words:

* ✅ You own one (or more) MetaCopier projects and drive them via the API on behalf of your customers.
* ❌ You cannot use the API to provision a separate MetaCopier project, subscription, or payment method per end customer.

If you want to expose copier functionality to your own users, you must implement **user registration, authentication, billing, and payment** on your own backend / frontend. All trading accounts created via the API will live inside your MetaCopier project and be billed to you under your subscription.

## Taxes, VAT & Reverse Charge

All prices displayed on MetaCopier are **fixed final service prices**. The price you see is the total amount you pay for the selected product or service. We do **not** add VAT, sales tax, or any other indirect tax on top of the displayed price. Where MetaCopier is legally required to collect VAT, that tax is **already included** within the displayed price.

### Reverse charge for business customers

Where the reverse-charge mechanism (or another customer-accounted-tax treatment) applies, MetaCopier does **not** charge, include, or separately state VAT on your invoice. As the business customer, **you** are responsible for declaring and paying any VAT or similar tax due in your own jurisdiction.

{% hint style="warning" %}
Reverse charge does **not** reduce the displayed price. The fixed final service price you accepted remains payable in full, even when VAT is not collected by MetaCopier. VAT that would be included for a consumer is not a separate discount, so a business customer is not automatically entitled to deduct a consumer-VAT amount from the price.
{% endhint %}

### Business Customer Benefits

MetaCopier offers the same pricing for both individual and business customers. The difference lies in the level of service provided.

Once your business has been successfully verified, your project becomes eligible for enhanced operational support designed for professional and commercial environments.

Business customers receive:

* **Priority Support:** Support requests are prioritized to ensure faster response and resolution times for business-critical issues.
* **Proactive Project Monitoring:** Your project is monitored more closely to help identify operational issues early and maintain a reliable trading environment.
* **Direct Engineering Access:** When required, business customers can communicate directly with our engineering team for technical discussions, integration guidance, and product-related feedback.
* **Business-Focused Assistance:** We provide a higher level of technical guidance and operational assistance to help you deploy, integrate, and scale MetaCopier efficiently.

The subscription price remains unchanged. Business verification simply grants access to an enhanced service level tailored to customers who rely on MetaCopier for professional or commercial operations.

### How to request reverse-charge / B2B tax treatment

{% hint style="info" %}
Simply entering a company name, company registration number, tax number, or VAT number in your profile or invoice details does **not** automatically activate the reverse-charge mechanism or grant business-to-business tax treatment.
{% endhint %}

To request reverse-charge or other business-to-business tax treatment, please **contact us** and provide the required information, which may include:

* Legal business name
* Registered address and country of establishment
* A valid VAT or tax identification number
* Supporting documents if requested (e.g., VAT registration certificate, company extract, proof of authority)

By requesting business-to-business tax treatment, you confirm that you are authorised to act for the stated business, that the VAT/tax identification number belongs to that business, and that the product or service is acquired for business purposes.

### Verification

MetaCopier may verify business and tax information (for example via VIES, official company registers, or third-party verification providers) before applying reverse-charge treatment. Until the required information has been provided and successfully verified:

* MetaCopier applies its standard tax treatment.
* The displayed fixed final service price remains payable.
* Reverse-charge or other B2B tax treatment is **not** granted.

Verified business tax treatment applies only to invoices issued **after** successful verification. Changes to your tax status or billing information apply **going forward only**. MetaCopier may periodically revalidate VAT numbers and business information, and may refuse, suspend, or withdraw B2B tax treatment where information is invalid, incomplete, inconsistent, or gives rise to a reasonable suspicion of misuse.

{% hint style="warning" %}
Invoices that have already been issued are **final**. As a general rule, MetaCopier does not re-issue, adjust, or reclassify them retroactively; any change to your tax status, VAT number, or billing information applies only to future invoices. This does not limit any invoice correction that is expressly required by mandatory applicable law. The [GTC](https://metacopier.io/gtc) prevail.
{% endhint %}

{% hint style="info" %}
For the full legal terms, see our [General Terms and Conditions (GTC)](https://metacopier.io/gtc).
{% endhint %}

## Get in Touch

Interested in a custom solution for your business? Contact us to discuss your specific needs, and let us provide a tailored solution that delivers results.

**Contact us at**: <support@metacopier.io>


# Monetize your trading signals

If you already run a trading community, the hard part is done. You have the audience, the strategy and the trust. What is usually missing is the layer that turns attention into recurring income without you chasing anyone for payment or explaining how to place a trade.

This page explains how trading communities use MetaCopier to sell their signals. For the step-by-step setup of the feature itself, see [Signal sharing](/features/signal-sharing).

## Who this is for

| Community type                | What changes                                                                                                                                         |
| ----------------------------- | ---------------------------------------------------------------------------------------------------------------------------------------------------- |
| **Telegram signal groups**    | Your entries land in every follower account automatically, at the same second you take them. A Telegram channel can also be used as a signal source. |
| **Discord trading servers**   | A free chat server becomes a paid product. Followers connect their own broker once and mirror every trade you place.                                 |
| **TradingView authors**       | Route your Pine Script alerts through a webhook and let subscribers copy the signal into MetaTrader, cTrader, Binance, Bybit or Hyperliquid.         |
| **Educators and mentors**     | A recurring revenue stream next to your course. Students learn from your reasoning while copying the execution.                                      |
| **EA and algo developers**    | Sell access to the live output of your strategy instead of shipping the source code. Your logic never leaves your machine.                           |
| **Prop and fund communities** | One master strategy distributed to hundreds of funded accounts with per-account risk rules and broker restrictions.                                  |

## What it costs you

The signal provider feature itself is **free**. There is no setup fee, no listing fee, no revenue minimum and no minimum follower count. Publishing your signal, distributing it and managing your followers costs nothing extra.

What you do pay is the normal MetaCopier price for the trading account you connect as the signal source, exactly like any other account on the platform. That is the standard usage-based rate, billed daily, with no separate charge for being a provider. See [Billing](/metacopier/billing) for the current rates.

You keep 100% of what you charge your followers, unless you choose MetaCopier as your payment provider. In that case a 30% service fee applies, and only when money actually moves.

{% hint style="success" %}
In practice one connected account is enough to serve an unlimited number of followers, so the cost of running a signal is a fixed daily amount that does not grow with your audience.
{% endhint %}

## Three ways to charge

### 1. Monthly subscription

A fixed monthly fee for access to your signal. The simplest model and the easiest to forecast.

* You set the price, there is no cap
* Billed automatically every month
* Works with private access lists

### 2. Profit sharing (monthly)

A percentage of the profit your followers generate each month, calculated regardless of previous losses. Nothing to pay upfront, so the barrier to join is low.

### 3. High watermark

A performance fee charged **only** when a follower reaches a new peak in their cumulative profit. After a losing month the account must first recover before you earn again.

* Followers never pay twice for the same gains
* Deposits and withdrawals do not distort the calculation
* This is the hedge-fund fairness standard and it is the strongest objection-killer when selling a signal

{% hint style="warning" %}
The billing model for profit sharing can only be set **during creation** and cannot be changed afterwards. Decide before you publish.

The fees themselves stay editable, but on MetaCopier they can only be lowered. To raise a fee, contact MetaCopier support. On a white label platform the brand owner can raise the monthly subscription fee freely, and the profit-sharing fee as long as it is not currently 0.
{% endhint %}

You can combine a monthly subscription with a performance fee if you want both a base income and upside.

## Sell without your own payment processor

Enable **Use MetaCopier as Payment Provider** and you never have to open a merchant account, register for VAT in a dozen countries or argue with a chargeback.

MetaCopier charges your followers, applies the correct tax for their country and pays you out in the currency defined in your project. The 30% service fee covers:

* Payment provider processing fees
* Credit card fees and crypto fees
* Applicable taxes based on the follower's country
* Administrative and compliance costs, including transaction handling and payouts
* Currency conversion fees where applicable
* Chargeback and dispute handling

{% hint style="info" %}
KYC/KYB verification is required for this payment option.
{% endhint %}

**Prefer to keep your own checkout?** Set your signal to free inside MetaCopier and bill your community exactly as you do today. Many communities keep their existing Stripe, PayPal or crypto checkout and use MetaCopier purely as the copy-trading engine behind it.

## Let your community use MetaCopier for free

Every extra bill is a reason for somebody not to join. With **Cover follower costs**, the base MetaCopier subscription of your follower accounts is charged to your project instead of theirs. Your followers pay you and nothing else.

* Joining your signal becomes a single, clean price
* **Max covered accounts per follower project** caps how many accounts you sponsor per follower, so one person cannot connect ten accounts on your budget
* Use `0` to cover all follower accounts without a cap
* The cap can be changed at any time and takes effect immediately for the current billing period
* The **Follower cost report** shows what the cover costs you per month and per individual follower, so you can see exactly who you are sponsoring and for how much

{% hint style="warning" %}
`Cover follower costs` is available only during creation, and only if the signal provider has **more than 100 planned followers**. It covers the base subscription only, not your own performance fees.
{% endhint %}

## One signal, every market

Most signal platforms only reach MetaTrader users, which means a large part of your audience is unreachable. MetaCopier distributes the same signal to all of the following at the same time:

* **Traditional brokers**: MetaTrader 4, MetaTrader 5, cTrader, TradeLocker, DXtrade, MatchTrader
* **Crypto exchanges**: Binance, Bybit, Bitget, BloFin, OKX, Gate.io, Bitunix
* **On-chain / DEX**: Hyperliquid
* **US brokers**: TradeStation, Tradovate, Alpaca
* **Signal sources**: your own trading account, a [TradingView webhook](/features/pro-features/tradingview-webhook) or a [Telegram channel](/features/pro-features/telegram-signal-integration)

## Stay in control of who copies you

| Setting                            | What it does                                                                                                      |
| ---------------------------------- | ----------------------------------------------------------------------------------------------------------------- |
| **Allowed broker patterns**        | Restrict subscriptions to specific brokers using full names, wildcards or [regular expressions](/tutorials/regex) |
| **Minimum account balance**        | Require followers to be capitalised enough to mirror your strategy safely                                         |
| **Is public**                      | Publish to the marketplace so anyone can find and follow you                                                      |
| **Make visible in marketplace**    | Stay private but remain discoverable, so prospects can find you while you approve access                          |
| **Allow customers**                | For private signals, grant access only to the email addresses you list                                            |
| **Allow override copier settings** | Decide whether followers may adjust risk parameters and trade sizes                                               |
| **Make history public**            | Let prospects review real trades before subscribing                                                               |
| **Trading profile link**           | Link your MyFxbook or FX Blue profile for third-party verification                                                |

{% hint style="info" %}
It can take **up to 12 hours** for your signal to appear in the marketplace, and the account needs at least **10 trades** in its history. That threshold exists so followers always see a real track record.
{% endhint %}

## Grow through resellers

Enable **Allow reselling** and your subscribers may offer your signal to their own customers, adding their own markup. This turns individual subscribers into a distribution network.

{% hint style="warning" %}
Resellers cannot resell further. If a reseller enables `Allow reselling`, the system disables it automatically. The option can only be set during creation.
{% endhint %}

## Why followers trust it

MetaCopier is **non-custodial**. Funds stay in each follower's own brokerage or exchange account and they can stop copying at any moment. You never touch their capital, which removes the single biggest hesitation people have about paying a stranger for trades.

## Setup in five steps

1. **Connect your trading account** on the Accounts page. It can be a broker account, an exchange account, a TradingView webhook or a Telegram channel.
2. **Create your signal provider profile** with a name, a description of your strategy and optionally a link to your verified performance.
3. **Set your price and billing model**, and decide whether MetaCopier collects the money or you keep your own checkout.
4. **Set your requirements**: minimum balance, allowed brokers, public or private access, override permissions and cost coverage.
5. **Share the link and trade.** Every trade you take from that point on is mirrored into every follower account automatically.

{% content-ref url="/pages/6OvQAlRQ83fqJ15hCExh" %}
[Signal sharing](/features/signal-sharing)
{% endcontent-ref %}

## When you outgrow a signal page

{% content-ref url="/pages/mXgb8A5RGSTyHht5A8iN" %}
[White-Label](/b2b/white-label)
{% endcontent-ref %}

{% content-ref url="/pages/bzmuJs7ospnMG6CLGLVz" %}
[Business-to-Business](/b2b/business-to-business)
{% endcontent-ref %}

{% content-ref url="/pages/nXerrMptY8ETxScvtJdR" %}
[Investor program](/features/investor-program)
{% endcontent-ref %}

## Frequently asked questions

<details>

<summary>What does it cost to start selling my signals?</summary>

The signal provider feature is free. There is no setup fee, no listing fee and no minimum follower count. You only pay the standard MetaCopier price for the trading account you connect as your signal source, the same rate that applies to any account on the platform. You keep 100% of what you charge unless you choose MetaCopier as your payment provider.

</details>

<details>

<summary>Do I have to use MetaCopier for billing?</summary>

No. Set your signal to free inside MetaCopier and invoice your community however you already do. The copy engine works either way.

</details>

<details>

<summary>What is a high watermark and why does it matter?</summary>

You only earn a performance fee when a follower reaches a new peak in their cumulative profit. After a losing month they pay nothing until the account has recovered and surpassed its previous all-time high. Deposits and withdrawals do not distort the watermark.

</details>

<details>

<summary>Can my followers use MetaCopier for free?</summary>

Yes, with `Cover follower costs`. The base subscription of your follower accounts is billed to your project instead of theirs. Available at creation time for providers with more than 100 planned followers.

</details>

<details>

<summary>Can I restrict which brokers my followers use?</summary>

Yes. `Allowed broker patterns` accept full broker names or wildcards and regular expressions. You can also set a minimum account balance.

</details>

<details>

<summary>Do I need a VPS?</summary>

No. MetaCopier runs in the cloud across multiple regions and providers with automatic failover, so your signal keeps distributing even when your own machine is off.

</details>

<details>

<summary>Can I run this under my own brand?</summary>

Yes. With the [white-label](/b2b/white-label) option your community sees your domain, logo and colours. If you already have a product, you can also drive everything through our [REST API](/rest-api/api) and keep your own frontend.

</details>

{% hint style="danger" %}
**Risk and legal notice.** Trading involves substantial risk and may result in partial or total loss of capital. Past performance does not guarantee future results. MetaCopier provides a technological trade-copying tool only and does not offer brokerage, custody, investment advisory or portfolio management services. As a signal provider you are responsible for ensuring that offering your signals complies with the laws and licensing requirements of your jurisdiction and those of your followers. This is not financial advice.
{% endhint %}

## Get in touch

Planning a large rollout, or want to discuss customized pricing for high transaction volume? **Contact us at**: <support@metacopier.io>


# White-Label

## Overview

MetaCopier’s White Label setup lets you create your own branded version of the platform using your name, logo, and website address. It is a great option if you want to offer copy trading to your clients without building your own system. This guide will help you through every step of the setup process. You will learn how to add your logo, connect your domain, customize settings, and get your platform ready to launch. Everything is explained in simple terms so you can feel confident as you go.

{% hint style="success" %}
If you don’t have a Stripe account or a custom domain, there are other ways you can connect MetaCopier to your customers. For example, you can use our [Signal Sharing](/features/signal-sharing) feature or build your own app and [connect it to our APIs](/rest-api/sdk).
{% endhint %}

## Requirements & Prerequisites

Before you start setting up your white label platform, please review the [limitations](#limitations) and ensure that you have the following prepared:

### Credit Card

To enable the white-label feature, a valid credit card is required. Once added, you still have full flexibility: you can choose to **manually fund your project at any time**, or allow **automatic monthly billing**, which will be processed at the beginning of each month.

### Stripe Key

To process payments and issue invoices through your white-label platform, you’ll need a **live API key** from Stripe. Stripe is used as the billing and CRM system and is therefore mandatory.

If you don’t yet have a Stripe account, you can create one at **stripe.com**. Please note that Stripe requires business verification as part of the setup process. This includes providing a website that clearly describes your product or service, so make sure your homepage is ready before applying.

If you prefer to handle invoicing yourself, you may alternatively use a **test API key**. In that case, automatic Stripe charges are disabled and you take care of billing, either fully outside MetaCopier, or via the built-in **Manual collection** mode that still generates real-amount invoices and tracks paid/unpaid status for you. See [Manual billing](#manual-billing-real-amount-no-auto-charge) for the full workflow.

{% hint style="info" %}
If you are interested in additional integrations, please let us know.
{% endhint %}

### Domain Name with DNS Access

To use your own web address (like [www.yourbrand.com](http://www.yourbrand.com)), you need to have a domain name and access to its DNS settings. This is where you will connect your domain to the MetaCopier white label platform. If you are not sure how to do this, your domain provider (like GoDaddy or Namecheap) usually has a control panel where you can manage DNS settings.

***

## Initial Configuration

First, you need to create an account on MetaCopier and add a project. If you need help with this step, please check our [Quick Start Guide](/tutorials/quick-start-guide). Once your project is set up, select it from your dashboard and go to the **White Label** section in the left-hand menu.

<figure><img src="/files/ORK12rQLaeaHV5eh6cFH" alt=""><figcaption><p>White Label Section</p></figcaption></figure>

Now it's time to fill in the configuration settings for your white label platform. Here’s what you’ll need to do:

### Stripe Setup

Enter your **Stripe live key** in this section. This key allows the platform to generate and send invoices on your behalf. Once you save it, the system will automatically check if the key is valid.

### Domain Verification

* **Brand or Business Name**: Enter the name you want to display throughout your platform. This could be your company name or your personal brand.
* **Subdomain**: Choose the URL where your white label platform will be hosted, for example `trade.example.com`.\
  **Important:** You must use a subdomain. Top-level or apex domains (like `example.com`) are not supported. Also, make sure the domain matches the one configured in your Stripe account.

Once you enter your subdomain, the system will show you the DNS records you need to add. Follow the instructions provided to update your DNS settings.\
Please note that it might take a few minutes (in some cases up to 24 hours) for the changes to take effect, depending on your DNS provider.

If the check fails, a **DNS verification** window opens and lists every required record separately, so you can see exactly which one is missing or points to the wrong target. Each entry shows the record type, the name to create, the expected value and the value your nameservers actually returned. You can copy any value with one click and press **Check again** after you have corrected your DNS settings, without leaving the page. The same window is available at any time through the **DNS details** button.

### Branding

Customize how your platform looks and feels to match your brand identity.

* **Logo URL:** Provide a publicly accessible URL (PNG) or a CDN path to your logo. The logo will be used in system emails and throughout the white-label user interface.
* **Theme (Pro):** Select a visual theme for the white-label solution, including colors and general styling. This option is available with the PRO plan.
* **Layout (Pro):** Choose the layout structure of the white-label interface, defining how navigation and content are arranged. This option is available with the PRO plan.

### Additional settings

Configure pricing, feature availability, and usage limits for your white-label platform. Default values follow MetaCopier standards.

#### Pricing configuration

* **Account Price (Shared):** Daily price (USD) for shared projects.
* **Feature Price (Pro):** Daily price (USD) for PRO features.
* **Account Price (Dedicated):** Daily price (USD) for dedicated projects.
* **Account Price (Dedicated – Minimum):** Minimum daily price (USD) for dedicated projects after volume discounts.

#### Allowed account types

* **Allowed account types:** Select which account types are available for the white-label solution. If not specified, all account types are allowed.

#### Allowed regions

* **Allowed regions:** Select which regions are available for account deployment on the white-label platform. If not specified, all regions are allowed. When configured, users will only be able to select from the allowed regions when adding a new account.

#### Broker OAuth credentials (cTrader & Tradovate)

cTrader and Tradovate use OAuth-based authentication, where users connect their broker account by logging in through the broker's own login page. On a white-label, that login page must be tied to **your own OAuth application** rather than MetaCopier's. Otherwise the broker would display "MetaCopier" to your customers and the connection would be tied to our app instead of yours.

For this reason, if you want to offer cTrader and/or Tradovate on your white-label, you must register your own OAuth application with each broker and enter the resulting credentials below.

How the credentials interact with the **Allowed account types** field:

* If you **explicitly include** cTrader or Tradovate in the allowed account types list, the matching client ID and secret are **required**. Saving the white-label settings without them will be rejected with a validation error.
* If the allowed account types list is **left empty** (which means "all account types are allowed"), saving is not blocked even when the OAuth credentials are missing. In that case, cTrader and/or Tradovate will simply **not appear** in the account-type dropdown on your white-label until you add the corresponding credentials. This lets you launch the white-label first and add broker-specific OAuth apps later, without being forced to fill them in up front.
* **cTrader Client ID:** Your cTrader OAuth Client ID, used to enable support for cTrader accounts on your white-label platform. Generate it from the cTrader Open API portal.
  * Permission: Access any available account and trade
* **cTrader Client Secret:** Your cTrader OAuth Client Secret, used together with the Client ID to authenticate cTrader account connections.
* **Tradovate Client ID:** Your Tradovate OAuth Client ID, used to enable support for Tradovate accounts on your white-label platform. Generate it from the Tradovate API/OAuth portal.

  <figure><img src="/files/7C4TELpfJIIkVQnhbir0" alt=""><figcaption></figcaption></figure>
* **Tradovate Client Secret:** Your Tradovate OAuth Client Secret, used together with the Client ID to authenticate Tradovate account connections.

{% hint style="info" %}
When you save the white-label settings, the client secrets are stored encrypted and are never returned to the dashboard in plain text. If you need to rotate a secret later, simply enter the new value and save again.
{% endhint %}

**Redirect URLs to register at each broker**

When you create the OAuth application at cTrader and Tradovate, both portals will ask you for a **redirect URL** (sometimes called "callback URL" or "redirect URI"). This is the page the broker sends users back to after they have logged in and approved the connection. It must point to your white-label subdomain, **not** to MetaCopier's domain.

Replace `trade.example.com` in the examples below with the exact subdomain you configured in the [Domain Verification](#domain-verification) step. The URL is case-sensitive, must use `https://`, and must match what the broker portal has on file character-for-character, including the trailing path and **no trailing slash**.

| Broker        | Redirect URL to register              |
| ------------- | ------------------------------------- |
| **cTrader**   | `https://trade.example.com/ctrader`   |
| **Tradovate** | `https://trade.example.com/tradovate` |

Specifically:

* **cTrader**: In the [cTrader Open API portal](https://openapi.ctrader.com/), open your application, scroll down to the **Redirect URIs** section, and add `https://<your-subdomain>/ctrader`. You can register multiple redirect URIs on the same application if needed. Note that Spotware manually reviews and approves new Open API applications, so submit the application early and provide a clear description of how it will be used (a copy-trading white-label built on top of MetaCopier).
* **Tradovate**: When you register your OAuth application with Tradovate, set the `redirect_uri` to `https://<your-subdomain>/tradovate`. Tradovate does not currently expose a self-service OAuth-app portal the way cTrader does. To obtain a `client_id` / `client_secret` for OAuth, you generally need an active Tradovate account with API access and have to contact Tradovate (or your introducing broker) to register the application and whitelist your redirect URI. See the [Tradovate OAuth example](https://github.com/tradovate/example-api-oauth) and the [Tradovate API documentation](https://api.tradovate.com/#tag/Authentication/operation/oAuthToken) for details. The same OAuth credentials are used against both `live.tradovateapi.com` (real accounts) and `demo.tradovateapi.com` (simulation), so a single registered redirect URI covers both.

{% hint style="warning" %}
If the redirect URL configured at the broker does not exactly match your white-label subdomain, the OAuth popup will close with an error (typically "invalid redirect\_uri") and users will not be able to connect. Double-check protocol (`https`), host, path (`/ctrader` or `/tradovate`), and the absence of a trailing slash.
{% endhint %}

#### Feature controls

* **Disable invoicing:** Disable automatic invoice generation. When enabled, no Stripe charge is attempted and your customers are not billed by MetaCopier. By default, invoices are still produced for audit purposes but with a zero amount. Combine this with **Manual collection** below if you want real-amount invoices that you collect yourself.
* **Manual collection (real amount, no auto-charge):** Available only when **Disable invoicing** is on. When enabled, MetaCopier still generates invoices using the prices configured in your white-label settings, with the real amount, but **never charges them through Stripe**. The invoices stay in `OPEN` status and you collect payment from each customer externally (bank transfer, crypto, cash, etc.). Once paid, mark the invoice as paid from the admin dashboard. See [Manual billing](#manual-billing-real-amount-no-auto-charge) for the full workflow.
* **Send statement email to customers:** Available only when **Manual collection** is on. When enabled, each customer receives a branded "Your monthly statement" email at the start of the billing cycle, containing the invoice details and the payment instructions you configured. When disabled, customers are not emailed and you handle communication yourself.
* **Payment instructions:** A free-text block (up to 2,000 characters) included in the customer statement email. Use it to specify your IBAN, crypto wallet, PayPal link, expected reference, payment deadline, etc. Required when **Send statement email to customers** is on.
* **Accept crypto payments (self-custody):** Let your customers top up their project balance by paying in crypto directly to **your own wallet**. You provide an extended public key (xpub) per chain and the platform derives a permanent receive address per project and chain, and it never holds your keys or your funds. See [Accepting crypto payments](#accepting-crypto-payments-self-custody) for the full setup.
* **Disable adding copiers:** Disable the ability to add new copiers. When enabled, users cannot add new copiers.
* **Disable dedicated projects:** Disable the creation of dedicated projects. When enabled, users can only create shared projects.
* **Disable dedicated IP purchase:** Disable the purchase of dedicated IPs. When enabled, users cannot buy dedicated IPs.
* **Hide broker in signal provider:** Broker information is hidden in signal provider listings.
* **Hide current balance in signal provider:** When enabled, balance and equity values are hidden in signal provider listings, detail pages, and analytics dialogs. The growth chart remains visible. This is useful for privacy when you don't want to expose your account balance to followers.
* **Disable marketplace subscription:** Disable the Subscribe button on the marketplace. When enabled, the Subscribe button is hidden on all signal provider listings, preventing users from subscribing to signals directly from the marketplace.
* **Show score on marketplace:** Show signal scores on the marketplace. When enabled, signal scores are visible to users on the white-label marketplace.
* **Enable TradingView Webhook:** Enable the TradingView Webhook feature for your white-label platform. When enabled, users can create TradingView webhook accounts to receive and execute alerts from TradingView. This feature requires a DNS alias and ingress configuration on our side, so please contact support after enabling this option to complete the activation.
* **Enable Telegram Signals:** Enable the Telegram Signal Integration feature for your white-label platform. When enabled, users can create Telegram connector accounts to receive and execute trading signals from Telegram channels and groups.
* **Signal Provider alias:** Replace the "Signal Provider" / "Signal" terminology throughout your white-label UI with a custom term (max 30 characters). This is useful for regulatory reasons or to better match your brand language. For example, setting the alias to "EA Expert" will replace all occurrences of "Signal Provider" with "EA Expert" and "Signal" with "EA Expert" in the marketplace and related pages. Leave empty to use the default terminology.

#### Navigation links

* **Home link:** An optional URL that adds a "Home" menu item to the left-hand navigation of your white-label dashboard. When set, clicking the logo will also navigate to this URL instead of the internal dashboard. Useful for linking back to your main website. Leave empty to hide the menu item.
* **Support link:** An optional URL that adds a "Support" menu item to the navigation. This allows your customers to quickly reach your help desk or support page. Leave empty to hide the menu item.

#### Registration restriction (Pro)

{% hint style="info" %}
This feature is only available on the **PRO plan**.
{% endhint %}

Restrict access to your white-label platform to specific email addresses or email domains. When enabled, only users whose email matches the allowed list can access the platform. Users with unauthorized emails will be shown an error message and logged out automatically.

* **Restrict registration:** Toggle to enable or disable registration restriction. When disabled, any user can register.
* **Registration page link:** A URL to redirect unauthorized users to when they are denied access (e.g., your signup or contact page). This field is **required** when registration restriction is enabled. Users who fail the restriction check will be logged out and redirected to this URL.
* **Allowed email addresses:** A list of specific email addresses that are authorized to access your platform (e.g., `john@company.com`, `jane@company.com`).
* **Allowed email domains:** A list of email domains (without `@`) that are authorized (e.g., `company.com`, `partner.org`). All emails from these domains will be allowed.

You can manage both lists using either an interactive list view (add/remove individual entries) or a bulk textarea view (one entry per line). Switch between views using the toggle buttons.

{% hint style="warning" %}
Make sure to include your own email address or domain in the allowed list. Otherwise, you may lock yourself out of your own platform.
{% endhint %}

#### Resource limits

* **Maximum accounts per project:** Maximum number of accounts allowed per project. Set to `0` to use the platform default.
* **Maximum projects per user:** Maximum number of projects a user can create. Set to `0` to use the platform default.

#### Custom CSS & JavaScript (Pro)

{% hint style="info" %}
This feature is only available on the **PRO plan**.
{% endhint %}

{% hint style="warning" %}
Custom JavaScript runs with full access to the page. Only use trusted scripts from verified providers. Malicious or broken scripts may affect the user experience on your platform.
{% endhint %}

Inject custom CSS or JavaScript into your white-label frontend to further customize the user experience. This is useful for integrating third-party tools (e.g., chatbots, analytics, or tracking scripts) or applying custom styling beyond the built-in theme options.

* **Custom CSS:** Add custom CSS rules that will be injected into the `<head>` of your white-label platform. Use this to override styles, adjust colors, hide elements, or add custom fonts. Maximum 50,000 characters.
* **Custom JavaScript:** Add custom JavaScript or HTML script tags that will be injected into the `<body>` of your white-label platform. Use this to embed third-party widgets like chatbots (e.g., Intercom, Crisp, Tidio), analytics tools (e.g., Google Analytics, Hotjar), or any other script-based integration. Maximum 50,000 characters.

**Example – Embedding a chatbot:**

```html
<script src="https://cdn.example.com/chatbot-widget.js"></script>
<script>
  ChatbotWidget.init({ apiKey: 'your-api-key', position: 'bottom-right' });
</script>
```

**Example – Custom CSS:**

{% hint style="info" %}
To avoid collisions with MetaCopier's internal styles, always scope your custom CSS using the `[data-wl="your-brand-name"]` attribute selector that is automatically added to the `<body>` element of your white-label platform.
{% endhint %}

```css
[data-wl="yourbrand"] .sidebar { background-color: #1a1a2e; }
[data-wl="yourbrand"] .logo-text { font-family: 'Inter', sans-serif; }
```

**Example – Custom chat widget (full working example):**

The following example creates a floating chat button with a contact dialog. Paste the CSS into the **Custom CSS** field and the JavaScript into the **Custom JavaScript** field.

Custom CSS:

```css
[data-wl] .wl-chat-btn {
  position: fixed;
  bottom: 24px;
  right: 24px;
  width: 56px;
  height: 56px;
  border-radius: 50%;
  background: #4f46e5;
  color: white;
  border: none;
  cursor: pointer;
  box-shadow: 0 4px 12px rgba(0,0,0,0.25);
  z-index: 9999;
  display: flex;
  align-items: center;
  justify-content: center;
  transition: transform 0.2s, background 0.2s;
}
[data-wl] .wl-chat-btn:hover {
  transform: scale(1.1);
  background: #4338ca;
}
[data-wl] .wl-chat-btn svg {
  width: 28px;
  height: 28px;
}
[data-wl] .wl-chat-dialog {
  position: fixed;
  bottom: 96px;
  right: 24px;
  width: 360px;
  max-height: 500px;
  background: white;
  border-radius: 12px;
  box-shadow: 0 8px 32px rgba(0,0,0,0.2);
  z-index: 9999;
  display: none;
  flex-direction: column;
  overflow: hidden;
}
[data-wl] .wl-chat-dialog.open {
  display: flex;
}
[data-wl] .wl-chat-header {
  background: #4f46e5;
  color: white;
  padding: 16px;
  font-weight: 600;
  font-size: 16px;
  display: flex;
  justify-content: space-between;
  align-items: center;
}
[data-wl] .wl-chat-close {
  background: none;
  border: none;
  color: white;
  font-size: 20px;
  cursor: pointer;
  line-height: 1;
}
[data-wl] .wl-chat-body {
  padding: 20px;
  flex: 1;
  overflow-y: auto;
}
[data-wl] .wl-chat-body p {
  margin: 0 0 12px;
  color: #374151;
  font-size: 14px;
  line-height: 1.5;
}
[data-wl] .wl-chat-body a {
  color: #4f46e5;
  text-decoration: underline;
}

@media (max-width: 480px) {
  [data-wl] .wl-chat-dialog {
    width: calc(100vw - 32px);
    right: 16px;
    bottom: 88px;
  }
}
```

Custom JavaScript:

```html
<script>
(function() {
  var btn = document.createElement('button');
  btn.className = 'wl-chat-btn';
  btn.setAttribute('aria-label', 'Open chat');
  btn.innerHTML = '<svg xmlns="http://www.w3.org/2000/svg" fill="none" viewBox="0 0 24 24" stroke="currentColor"><path stroke-linecap="round" stroke-linejoin="round" stroke-width="2" d="M8 12h.01M12 12h.01M16 12h.01M21 12c0 4.418-4.03 8-9 8a9.863 9.863 0 01-4.255-.949L3 20l1.395-3.72C3.512 15.042 3 13.574 3 12c0-4.418 4.03-8 9-8s9 3.582 9 8z"/></svg>';

  var dialog = document.createElement('div');
  dialog.className = 'wl-chat-dialog';
  dialog.innerHTML = ''
    + '<div class="wl-chat-header">'
    + '  <span>Chat with us</span>'
    + '  <button class="wl-chat-close">&times;</button>'
    + '</div>'
    + '<div class="wl-chat-body">'
    + '  <p>👋 Hi! How can we help you today?</p>'
    + '  <p>Send us a message at <a href="mailto:support@yourbrand.com">support@yourbrand.com</a></p>'
    + '  <p><a href="https://wa.me/1234567890" target="_blank">💬 WhatsApp</a></p>'
    + '  <p><a href="https://t.me/yourbrand" target="_blank">✈️ Telegram</a></p>'
    + '</div>';

  document.body.appendChild(btn);
  document.body.appendChild(dialog);

  btn.addEventListener('click', function() {
    dialog.classList.toggle('open');
  });
  dialog.querySelector('.wl-chat-close').addEventListener('click', function() {
    dialog.classList.remove('open');
  });
})();
</script>
```

After completing the initial configuration, you should be able to view your portal by visiting your URL in a browser. If needed, you can revisit the configuration settings at any time to make adjustments.

## Functional configuration

### Signal sharing

If you want to provide your customers with a signal to follow, you can do so using the **Signal sharing** feature. You can set up a signal provider as explained in the [Signal Sharing](/features/signal-sharing) section, and your customers will be able to follow that signal within your white label platform.

In a white label setup, the signal provider works just like it does on MetaCopier, with a couple of key differences:

* **Your public signals are only visible to your white label customers.** MetaCopier users outside of your platform will not see them.
* **Your white label customers cannot create their own signals.** Only you, as the provider, can share a signal with them.

This makes it a great option if you want to broadcast a strategy or share your trades with your user base in a simple and controlled way.

{% hint style="warning" %}
Signal providers must be created after the white label configuration is complete
{% endhint %}

***

## Billing

The white-label billing system involves **two separate invoices** each month: one for your customers and one for you as the platform owner.

{% hint style="info" %}
**At a glance**

* **2nd of each month**: invoices are sent to your customers for their usage of the previous month.
* **15th of each month**: MetaCopier invoices you for MetaCopier's platform cost, aggregated across all customer projects linked to your white-label.
  {% endhint %}

### How it works

#### 1. Your customers receive an invoice (2nd of each month)

On the **2nd of each month**, MetaCopier generates an invoice for each of your customer's projects. The invoice is charged through **your connected Stripe account**, so all customer payments go directly to you without any middleman.

The pricing on these invoices is based on the prices you configured in your white-label settings:

| Charge type                   | Default price            | Configurable |
| ----------------------------- | ------------------------ | ------------ |
| Account (Shared)              | 0.27 USD / account / day | Yes          |
| Account (Dedicated)           | 0.32 USD / account / day | Yes          |
| Account (Dedicated – Minimum) | 0.22 USD / account / day | Yes          |
| Feature PRO                   | 0.10 USD / account / day | Yes          |

You can set your own prices for each of these in the white-label configuration. For example, you could charge your customers 0.50 USD per account per day on a shared project while MetaCopier charges you the platform rate.

Billing is calculated per **account-day**: each account is billed for the exact number of days it was active during the month. If an account was created on the 10th and the month has 30 days, it is billed for 21 days.

#### 2. You receive an invoice from MetaCopier (15th of each month)

On the **15th of each month**, MetaCopier generates an invoice for you as the white-label owner. This invoice covers MetaCopier's platform cost for **all accounts across all customer projects** linked to your white-label.

This invoice is charged at MetaCopier's base platform rates (not your custom prices):

| Charge type         | MetaCopier platform rate            |
| ------------------- | ----------------------------------- |
| Account (Shared)    | 0.27 USD / account / day            |
| Account (Dedicated) | Volume-based (starting at 0.32 USD) |
| Feature PRO         | 0.10 USD / account / day            |
| Dedicated IP        | 6.00 USD / IP / month               |

The white-label owner invoice aggregates all paid customer invoices from the previous period and sums up the whitelabel amount stored in each customer invoice. This ensures you are only billed for usage that has actually been invoiced and processed on the customer side.

{% hint style="info" %}
The 15-day delay between customer billing (1st) and your billing (15th) ensures that all customer payments have enough time to be processed before you are charged.
{% endhint %}

### Billing examples

#### Example 1: Shared project – 25 accounts, full month

You run a white-label platform and set the shared account price to **0.50 USD/day** for your customers. One of your customers has a project with **25 accounts** that were active for the entire month (30 days).

**Your customer's invoice (charged via your Stripe):**

| Item                             | Calculation    | Amount         |
| -------------------------------- | -------------- | -------------- |
| 25 accounts × 30 days × 0.50 USD | 25 × 30 × 0.50 | **375.00 USD** |

**Your invoice from MetaCopier (charged on the 15th):**

| Item                             | Calculation    | Amount         |
| -------------------------------- | -------------- | -------------- |
| 25 accounts × 30 days × 0.27 USD | 25 × 30 × 0.27 | **202.50 USD** |

**Your margin:** 375.00 − 202.50 = **172.50 USD**

#### Example 2: Multiple customers, mixed activity

You have 3 customers on your white-label (shared price set to **0.40 USD/day**):

| Customer   | Accounts | Days active          | Customer invoice                | MetaCopier cost                |
| ---------- | -------- | -------------------- | ------------------------------- | ------------------------------ |
| Customer A | 10       | 30 (full month)      | 10 × 30 × 0.40 = **120.00 USD** | 10 × 30 × 0.27 = **81.00 USD** |
| Customer B | 8        | 30 (full month)      | 8 × 30 × 0.40 = **96.00 USD**   | 8 × 30 × 0.27 = **64.80 USD**  |
| Customer C | 5        | 15 (added mid-month) | 5 × 15 × 0.40 = **30.00 USD**   | 5 × 15 × 0.27 = **20.25 USD**  |

**Total you collect from customers:** 120.00 + 96.00 + 30.00 = **246.00 USD**\
**Your invoice from MetaCopier:** 81.00 + 64.80 + 20.25 = **166.05 USD**\
**Your margin:** 246.00 − 166.05 = **79.95 USD**

#### Example 3: With PRO features

A customer has **10 accounts**, of which **4 have PRO features** enabled for the full month (30 days). Your prices: shared = 0.40 USD/day, PRO = 0.15 USD/day.

**Your customer's invoice:**

| Item                                | Calculation | Amount         |
| ----------------------------------- | ----------- | -------------- |
| 10 accounts × 30 days × 0.40 USD    |             | 120.00 USD     |
| 4 PRO features × 30 days × 0.15 USD |             | 18.00 USD      |
| **Total**                           |             | **138.00 USD** |

**Your invoice from MetaCopier:**

| Item                                | Calculation | Amount        |
| ----------------------------------- | ----------- | ------------- |
| 10 accounts × 30 days × 0.27 USD    |             | 81.00 USD     |
| 4 PRO features × 30 days × 0.10 USD |             | 12.00 USD     |
| **Total**                           |             | **93.00 USD** |

**Your margin:** 138.00 − 93.00 = **45.00 USD**

### White-Label PRO fee

If you have enabled the **PRO plan** for your white-label and the total number of active or stopped accounts across all your white-label customer projects is **50 or fewer**, a flat fee of **99.00 USD/month** is added to your MetaCopier invoice. Once you exceed 50 accounts, this fee is waived.

### Currency handling

All prices are calculated in USD. If a customer's project uses a different currency, the amount is converted using the current exchange rate. The same conversion is applied to your MetaCopier invoice if your project currency is not USD.

### Manual billing (real amount, no auto-charge)

If you do not want MetaCopier to auto-charge your customers (e.g. you collect payment by bank transfer, crypto, cash, or your own external invoicing tool), you can use the built-in **Manual collection** mode. MetaCopier still generates the monthly invoices with the real amount and keeps a per-customer billing dashboard for you, but it never attempts a Stripe charge.

**How to enable it:**

1. Open your white-label configuration and enable **Disable invoicing** in the Feature controls section.
2. Enable **Manual collection (real amount, no auto-charge)** directly below it.
3. Optional: enable **Send statement email to customers** and fill in the **Payment instructions** field (IBAN, crypto wallet, PayPal link, payment reference, due date, etc.) if you want each customer to receive a branded statement email at the start of the cycle. If you turn this off, no email is sent and you handle communication yourself.
4. Save. Existing white-labels are not affected by this change, so you have to explicitly opt in.

**What happens each month:**

* On the 2nd of the month, MetaCopier generates an invoice per customer project with the real amount, using the prices you configured. The invoice is created in `OPEN` status and **no Stripe charge is attempted**.
* If you enabled the customer statement email, each customer receives a branded email with their invoice details and your payment instructions.
* On the 3rd of the month, you (the white-label owner) receive a digest email summarising every customer with an outstanding balance, with a link back to your white-label admin dashboard.
* Customers pay you directly through whatever channel you specified.
* You record each payment in the admin dashboard (see below). Once an invoice is marked as paid, it transitions from `OPEN` to `PAID` and is removed from the outstanding list.

**Marking invoices as paid:**

The white-label admin dashboard shows a per-customer view of outstanding amounts, current-month charges, and lifetime paid totals (only when manual collection is on). For each customer you can:

* Open the **Customer details** drilldown to see all open invoices and mark them paid one at a time.
* Use **Mark all paid** on the customer row to settle every open invoice for that customer in one click (useful when a customer pays a single bank transfer covering multiple months).

When you mark an invoice as paid, you can optionally record:

* **External reference** (max 100 characters), for example `WIRE-2026-04-15-001`, the transaction ID from your payment provider, the crypto tx hash, etc.
* **Note** (max 120 characters), for example `Paid in cash on 2026-04-15`.

Both fields are stored on the invoice and on the resulting internal transaction for your records. Once marked paid, an invoice cannot be marked paid again, and auto-charged invoices (from white-labels not in manual collection mode) cannot be marked paid with this action: only the dedicated manual flow can.

**Automating via REST API:**

Everything you can do from the admin dashboard is also exposed through the [MetaCopier REST API](/rest-api/api), so you can wire it up to your own bookkeeping, accounting tool, or payment-reconciliation workflow. The relevant endpoints (scoped to your white-label project and feature) are:

* `GET /projects/{projectId}/features/{featureId}/whitelabel/customers/{customerId}/invoices?status=OPEN`: list invoices for a single customer, optionally filtered by status.
* `PUT /projects/{projectId}/features/{featureId}/whitelabel/invoices/{invoiceNumber}/paid`: mark a single invoice as paid. Body: `{ "externalReference": "...", "note": "..." }` (both optional).
* `PUT /projects/{projectId}/features/{featureId}/whitelabel/customers/{customerId}/invoices/paid`: mark every open invoice of a single customer as paid in one call (same optional body).

Typical automation patterns:

* **Bank-feed reconciliation:** poll your bank statement for incoming wire transfers, match by reference, and call the per-invoice endpoint with the transaction ID as `externalReference`.
* **Crypto payment provider:** listen for the provider's "invoice paid" webhook and trigger the corresponding `PUT` call with the on-chain tx hash as `externalReference`.
* **Bulk settlement:** when a customer pays multiple months in a single transfer, call the per-customer endpoint to close all open invoices at once.

Authentication uses your existing project API key (see [Access Policy](/rest-api/access-policy)). The same validation rules as the dashboard apply: only the white-label owner can mark invoices as paid, the invoice must be in `OPEN` status, and only invoices generated in manual-collection mode are eligible.

**Validation rules:**

* **Manual collection** can only be enabled together with **Disable invoicing**.
* **Send statement email to customers** requires **Manual collection** to be enabled.
* **Payment instructions** are required when the customer statement email is enabled.

Switching back to Stripe-driven billing at any time is just a matter of turning the toggles off and re-enabling a live Stripe key. Already-generated manual invoices stay where they are; future months go back to auto-charge.

{% hint style="info" %}
If you only want to suppress all invoicing (neither charge customers via Stripe nor generate real-amount invoices for them), keep **Disable invoicing** on and leave **Manual collection** off. This is the behaviour MetaCopier has always had for white-labels with invoicing disabled, and it is still the default.
{% endhint %}

#### Alternative: invoice fully outside MetaCopier

If you prefer to invoice fully outside MetaCopier (no per-customer dashboard, no statement emails, no `OPEN`/`PAID` state), keep **Disable invoicing** on and leave **Manual collection** off. In that case MetaCopier will not produce real-amount invoices for your customers at all, so you are entirely responsible for tracking who pays you and for revoking access to non-payers. The signal-provider followers list (see [Signal sharing](/features/signal-sharing)) is a convenient place to find each customer's email address.

Because there are no invoices in this mode, MetaCopier cannot auto-block non-payers for you (auto-block is only triggered by unpaid invoices, whether Stripe-charged or manually collected). To help you revoke access without going project by project, the admin dashboard exposes a **Block customer** action that stops and deletes every project of a given customer email under your white-label. See [Blocking non-paying customers](#blocking-non-paying-customers).

## Accepting crypto payments (self-custody)

In addition to Stripe, you can let your customers **top up their project balance by paying in crypto**. The funds land **directly in your own wallet**. MetaCopier is fully **non-custodial**: it only ever holds your *public* keys, derives receive addresses from them, and never has access to your private keys or your money.

Once a payment is confirmed on-chain, the customer's project balance is credited. From there, your monthly service fees are deducted from that balance exactly the same way they are for a Stripe or card top-up. In other words, crypto is just another way for your customers to add balance, and everything downstream (invoicing, fees, blocking) is unchanged.

{% hint style="success" %}
Because you provide only an extended **public** key (xpub), the platform can generate unlimited receive addresses but can **never move your funds**. Your coins go straight from your customer's wallet to yours.
{% endhint %}

### How it works

1. You enable the feature and paste one extended public key (xpub) per chain you want to accept.
2. A customer opens **Fund project ▸ Crypto** on your white-label, picks a coin/network, and enters an amount in their project currency.
3. The platform derives a **permanent receive address** for that project and chain from your xpub, and shows it to the customer with a QR code and a live price quote. The same customer gets the same address on every later top-up.
4. The customer pays from their own wallet. The platform's chain watcher tracks confirmations.
5. Once enough confirmations are reached, the customer's project balance is credited and the funds are already in your wallet.
6. Anything that arrives on that address later, with or without an open payment window, is credited automatically at the exchange rate of the moment it arrives.

### Enabling it

Open your white-label configuration, scroll to the **Feature controls** section, and turn on **Accept crypto payments (self-custody)**. A sub-panel appears where you configure your wallet:

* **Chain xpubs**: paste your extended public key for each chain you want to offer:
  * **TRON xpub**: for USDT on TRC-20 (derivation path `m/44'/195'/0'`).
  * **Ethereum xpub**: for ETH and USDT / USDC on ERC-20 (`m/44'/60'/0'`).
  * **Bitcoin zpub**: for native BTC, native segwit (`m/84'/0'/0'`).
* **Validate**: next to each field, the **Validate** button checks the key server-side and shows the **first derived receive address**, so you can confirm in your own wallet that it belongs to you before saving.
* **Coins offered to users**: tick which coin/network pairs appear at checkout. A coin only works if its chain's xpub is set, so untick anything you have not configured.

{% hint style="info" %}
The xpub fields behave exactly like the Stripe key: they are stored **encrypted at rest** and are never returned to the dashboard in clear text. To rotate a key later, just paste the new value and save again.
{% endhint %}

{% hint style="danger" %}
**Never paste a private key or seed phrase.** Only extended *public* keys are accepted: `xpub…` for TRON/Ethereum and `zpub…` for Bitcoin. If you paste an `xprv`/`zprv` or a 12/24-word mnemonic, the form warns you instantly and the server rejects it. Anyone with your private key can steal your funds.
{% endhint %}

### Supported coins & networks

The **platform** offers USD stablecoins on TRON and Ethereum. As a white-label owner you can additionally offer **native ETH and BTC** simply by providing the corresponding xpub, with no extra approval needed.

| Coin | Network                 | Key you provide | Confirmations before credit |
| ---- | ----------------------- | --------------- | --------------------------- |
| USDT | TRON (TRC-20)           | TRON xpub       | 19                          |
| USDT | Ethereum (ERC-20)       | Ethereum xpub   | 12                          |
| USDC | Ethereum (ERC-20)       | Ethereum xpub   | 12                          |
| ETH  | Ethereum                | Ethereum xpub   | 12                          |
| BTC  | Bitcoin (native segwit) | Bitcoin zpub    | 2                           |

Each payment must be between the platform's configured minimum and maximum amount (by default 20–5,000 USD per top-up).

### Getting your xpub (step by step)

You provide **one account-level extended public key per chain**. It is always a **public** key on **mainnet (live)**: MetaCopier does not accept testnet keys. Never export or paste your seed phrase or a private key (`xprv`/`zprv`).

Recap of what each chain needs:

| Chain    | Key prefix              | Derivation path (account level) |
| -------- | ----------------------- | ------------------------------- |
| TRON     | `xpub…`                 | `m/44'/195'/0'`                 |
| Ethereum | `xpub…`                 | `m/44'/60'/0'`                  |
| Bitcoin  | `zpub…` (native segwit) | `m/84'/0'/0'`                   |

Pick the option that matches the wallet you already use. Bitcoin exports a `zpub` out of the box; TRON and Ethereum wallets often hide the account key, so for those the offline tool in Option C is usually the cleanest route.

{% hint style="warning" %}
The extended public key lets anyone see **all** past and future addresses and balances of that account. Treat it as sensitive (privacy), even though it can never move funds. Consider using a **dedicated account** (a fresh derivation index or a separate wallet) just for MetaCopier deposits.
{% endhint %}

#### Which tool should I use?

You do not need to be technical. Install one of these free, well-known apps and copy the key it shows. For most owners the friendliest combination is:

| What you need             | Easiest tool                                                                                                                                            | What you copy                              |
| ------------------------- | ------------------------------------------------------------------------------------------------------------------------------------------------------- | ------------------------------------------ |
| Bitcoin `zpub`            | **Sparrow Wallet** ([sparrowwallet.com](https://sparrowwallet.com)) or **Electrum** ([electrum.org](https://electrum.org))                              | the `zpub` shown in wallet info            |
| TRON / Ethereum `xpub`    | **BIP39 tool** (download the offline `bip39-standalone.html` from [github.com/iancoleman/bip39/releases](https://github.com/iancoleman/bip39/releases)) | the "Account Extended Public Key" (`xpub`) |
| You use a hardware wallet | **Trezor Suite** ([trezor.io](https://trezor.io/trezor-suite)) or **Ledger Live** ([ledger.com](https://www.ledger.com/ledger-live)) + Sparrow          | the `xpub`/`zpub` shown per account        |

{% hint style="success" %}
**Beginner-friendly path (recommended if you are unsure):** create a **dedicated deposit wallet** just for MetaCopier. Download the offline BIP39 tool, open it on a computer **disconnected from the internet**, click **Generate** to create a brand-new seed phrase, write that phrase down and store it safely, then copy the `xpub` for TRON and Ethereum (and the `zpub` for Bitcoin) from the same screen. This keeps your existing wallets untouched, and because you own the fresh seed you can always sweep the collected funds later. Nothing about your main wallet is ever exposed.
{% endhint %}

The detailed, click-by-click steps for each tool follow below.

#### Option A: Hardware wallet (recommended)

The most secure route, because the seed never leaves the device.

**Trezor (Bitcoin `zpub`, easiest):**

1. Open **Trezor Suite** and select (or create) a **Bitcoin** account of type **Native SegWit (bc1...)**. This is exactly the `m/84'/0'/0'` path.
2. Go to the account, open the menu (three dots) and choose **Show public key (XPUB)**.
3. Confirm on the device and copy the shown key. For a native-segwit account it is your `zpub`. Paste it into the **Bitcoin zpub** field in MetaCopier.

**Ledger (Bitcoin `zpub`, via a watch-only companion):**

1. Install the **Bitcoin** app on the Ledger via Ledger Live.
2. Open **Sparrow Wallet** (free, desktop), choose **New Wallet**, then **Connect Hardware Wallet** and select your Ledger.
3. Set the **Script Type** to **Native SegWit (P2WPKH)**, which uses `m/84'/0'/0'`.
4. After import, open **Settings** of that wallet and copy the extended public key shown as `zpub`. Paste it into the **Bitcoin zpub** field.

For **Ethereum** and **TRON** with a hardware wallet, the companion apps rarely expose the account xpub directly. Use Option C below (offline, still safe: the account xpub is public).

#### Option B: Watch-only desktop wallet (Bitcoin `zpub`)

If you do not use a hardware wallet, a watch-only Bitcoin wallet still lets you export the `zpub` cleanly.

**Electrum:**

1. Create a **Standard wallet**, choose **Native segwit (p2wpkh)** when asked for the seed type (this is `m/84'/0'/0'`).
2. Open **Wallet -> Information**.
3. Copy the **Master Public Key** (starts with `zpub`) and paste it into the **Bitcoin zpub** field.

**Sparrow:** same steps as in Option A, but create a software wallet instead of connecting a hardware device.

#### Option C: Offline derivation for TRON and Ethereum `xpub` (advanced)

TRON (TronLink) and Ethereum (MetaMask) wallets usually do not show the account xpub. Derive it yourself from your seed on an **air-gapped** machine. Only the resulting **public** key ever leaves the offline machine.

1. On a computer with **no internet** (ideally a live USB session that forgets everything on shutdown), open the offline **Ian Coleman BIP39** tool (the `bip39-standalone.html` file, downloaded and verified beforehand).
2. Enter your **BIP39 mnemonic** (your seed). Because the machine is offline and wiped afterwards, the seed never touches the network.
3. Set **Coin** to the chain and read the **Account Extended Public Key** at the account path:
   * **TRON:** derivation path `m/44'/195'/0'`
   * **Ethereum:** derivation path `m/44'/60'/0'`
4. Copy **only** the value labelled **Account Extended Public Key** (it starts with `xpub`). **Do not** copy the "Account Extended Private Key" (`xprv`) or the seed.
5. Transfer just that `xpub` (e.g. via a QR code or a USB text file) and paste it into the matching **TRON xpub** / **Ethereum xpub** field. Then wipe the offline session.

{% hint style="danger" %}
On the BIP39 tool you will see both an `xpub` (public) and an `xprv` (private) per account. MetaCopier needs **only the `xpub`**. If you ever paste an `xprv` or the mnemonic, the form blocks it and the server rejects it, but you should never get that far. Keep the seed offline, always.
{% endhint %}

#### Verify before you go live

After pasting each key, click **Validate** next to the field. MetaCopier derives the **first receive address** from your `xpub`/`zpub` and shows it. Open your own wallet, look up that same first address on the external chain, and confirm it matches. Only then save. This one check catches a wrong key, a wrong chain, or a wrong script type before a single customer pays.

### What your customer sees

When crypto is enabled, your customers get a **Crypto** option in the **Fund project** dialog. They pick a coin and network, enter an amount in their project currency, and receive a payment screen with the receive address, a QR code, the exact amount in coin, and a countdown for the locked quote. The dialog polls for confirmations and shows the credit as soon as it lands. Because the address is permanent, a customer who returns for a second top-up sees the address they already know.

### Things to keep in mind

* **Works for USD, EUR and CHF projects.** The customer enters the amount in their project currency and the platform converts it to the stablecoin amount at the current rate. The balance is credited in the project currency.
* **Network fees are on the customer.** The customer's wallet pays the blockchain fee on top of the transfer, so the full requested amount reaches your wallet. MetaCopier credits the customer's balance based on what actually arrives on-chain. If a customer sends too little (for example an exchange deducted its withdrawal fee from the amount), the shortfall can be topped up to the same address at any time, so you still receive the full amount.
* **The quote expires, the address does not.** Only the locked price has a deadline. Funds that arrive afterwards, or without any payment window at all, are still credited, using the exchange rate at the time of arrival.
* **Payments are irreversible.** Crypto transactions cannot be reversed or charged back. Since the funds arrive directly in your wallet, any refund to a customer is handled by you, outside MetaCopier.
* **You are the custodian.** MetaCopier never holds the funds or the keys. Securing your wallet and its seed is entirely your responsibility.
* **One address per project and chain.** A customer keeps the same address across top-ups, which makes it reusable and hard to get wrong. Addresses are never shared between projects, so your per-project accounting stays clean.

## Admin dashboard

The admin dashboard gives you a quick overview of your white label platform, including the number of created projects and active accounts. It’s an easy way to track usage and growth.

<figure><img src="/files/9TF2hVYQnpUmS4AbqwtG" alt=""><figcaption><p>Example dashboard metrics</p></figcaption></figure>

### Manual-collection billing overview

When **Manual collection** is enabled (see [Manual billing](#manual-billing-real-amount-no-auto-charge)), the dashboard switches to a per-customer billing view designed for owners who collect payment externally:

* **Total outstanding banner** at the top of the dashboard, summing all unpaid invoices across every customer in the current cycle.
* **Customer drilldown** with three monetary columns visible only in manual-collection mode:
  * **Outstanding**: sum of all `OPEN` invoices for this customer.
  * **This month**: outstanding amount limited to the current billing cycle.
  * **Paid lifetime**: total amount this customer has paid you so far.
* **Per-row actions** to mark a single invoice as paid (with optional external reference and note) or to mark every open invoice of a customer as paid in one click.
* **Manual / Auto badge** on the All-invoices view so you can tell at a glance which invoices were generated under manual collection.

These views appear automatically when manual collection is on and disappear when you turn it off, so your existing Stripe-driven dashboards are unchanged.

{% hint style="info" %}
You do not need to manually block non-payers in manual-collection mode. Once an invoice stays `OPEN` past its grace period, MetaCopier automatically blocks the affected project just as it does for Stripe auto-charge invoices, see [What happens when a customer does not pay](#what-happens-when-a-customer-does-not-pay). The **Block customer** action described below is meant for owners who invoice fully outside MetaCopier (**Disable invoicing** on, **Manual collection** off), where no invoices exist and auto-block cannot trigger.
{% endhint %}

### What happens when a customer does not pay

Whenever a customer invoice stays in `OPEN` status, MetaCopier escalates automatically. This applies to Stripe auto-charge invoices and to manual-collection invoices in exactly the same way, and the thresholds are the same for your white-label customers as for direct MetaCopier customers. All days are counted from the invoice date (invoices are generated on the 2nd of each month).

| Days after the invoice date | What happens                                                                                                                                                                                                                                                                                                                                                          |
| --------------------------- | --------------------------------------------------------------------------------------------------------------------------------------------------------------------------------------------------------------------------------------------------------------------------------------------------------------------------------------------------------------------- |
| 7                           | A reminder email is sent to the customer. Depending on the situation it says that no payment method is set or that the payment attempt failed. Nothing is blocked yet.                                                                                                                                                                                                |
| 12                          | The **customer is blocked**. They can still sign in, but they land on a blocking dialog and cannot use the platform until the outstanding amount is settled. They receive one email, branded with your white-label name and sent from your domain, explaining that the account is suspended because of an outstanding invoice. Trading continues, nothing is deleted. |
| 22                          | The **copiers are paused**. Every active copier of the project is switched to monitor-only, so open positions are left untouched but no new trades are copied.                                                                                                                                                                                                        |
| 30                          | The **project is removed**. All copiers are deleted, all accounts are stopped and deleted, and the project itself is deleted and flagged as blocked.                                                                                                                                                                                                                  |

**The customer can unblock themselves.** A blocked customer who signs in sees a dialog listing the outstanding amount per project, with a payment button that opens a checkout in your Stripe account. Once the payment goes through, the block is lifted automatically and the platform reloads.

**Payment resets the escalation.** As soon as an invoice moves from `OPEN` to `PAID`, the customer is unblocked automatically. This works for a successful Stripe charge as well as for an invoice you mark as paid or void yourself from the admin dashboard, so settling a bank transfer or a crypto payment on your side restores access immediately.

{% hint style="warning" %}
**In manual-collection mode you have to keep the invoice list clean.** Manually collected invoices are never auto-charged, so they stay in `OPEN` status until you mark them as paid. The escalation above looks only at the invoice status, not at how the invoice is collected. If a customer pays you by bank transfer and you forget to record it, MetaCopier will still block that customer on day 12 and delete the project on day 30. Since your customers settle with you outside the platform in this mode, they cannot clear the block themselves through the payment dialog, so marking invoices as paid (or voiding them) as soon as the money arrives is your responsibility, ideally automated through the REST API.
{% endhint %}

{% hint style="warning" %}
Unblocking restores access, it does not restore trading state. Copiers that were switched to monitor-only at day 22 stay in monitor-only and have to be re-enabled manually by the customer or by you. Accounts and projects removed at day 30 cannot be restored.
{% endhint %}

**Safeguards built into the process:**

* **Open positions are protected.** A copier is only paused when its account currently has no open positions and no pending orders. Accounts that are in the market keep copying until they are flat.
* **Large projects are never touched automatically.** If a project has more than 10 active accounts, the pause and the deletion steps are skipped and MetaCopier support is notified instead, so a big customer is reviewed by a human before anything happens.
* **Your own white-label project is exempt.** The owner project that hosts the white-label feature is never auto-deleted, because that would take down all of your customers at once. If your own invoices to MetaCopier stay unpaid, support contacts you directly.
* **No repeated block emails.** A customer who has been blocked is not blocked and emailed again for 14 days, so a customer who is unable to pay does not receive a suspension email on every run.

**You keep full control at any time.** Independently of the automatic escalation, you can settle, void or refund an invoice, or block a customer and remove all their projects immediately, without waiting for day 30. See [Marking invoices as paid](#manual-billing-real-amount-no-auto-charge) and [Blocking non-paying customers](#blocking-non-paying-customers) below.

{% hint style="info" %}
The escalation is driven exclusively by invoices in `OPEN` status. If you run your white-label with **Disable invoicing** on and **Manual collection** off, MetaCopier never creates customer invoices, so none of the steps above ever trigger and revoking access to a non-payer is entirely up to you.
{% endhint %}

### Blocking non-paying customers

This action is intended for the "invoice fully outside MetaCopier" mode (**Disable invoicing** on, **Manual collection** off). In that mode there are no MetaCopier invoices, so auto-block never triggers and you (the white-label owner) have to revoke access yourself when a customer stops paying. In Stripe auto-charge mode and in manual-collection mode you normally do not need this: unpaid invoices already trigger the standard auto-block flow.

**How it works:**

1. Open the **Customers** dialog from the white-label admin dashboard.
2. Click the red **Block** icon on the row of the non-paying customer, or open the customer drilldown and use the **Block customer** button at the top.
3. In the confirmation dialog, retype the customer email to confirm the destructive action. Optionally add a reason (max 255 characters) that will be included in the summary email.
4. The request is accepted immediately (the UI does not wait for the block to finish) and MetaCopier schedules the block on an internal worker.

**What gets blocked:**

* Every project of that customer that is linked to your white-label. Projects the same customer owns under other white-labels or standalone are never touched.
* All accounts inside each blocked project are stopped and deleted.
* Each project is flagged as blocked and hidden from the customer.
* Your own white-label owner project is never blocked, even if you accidentally enter your own email.

**What is not sent:**

The blocked customer does not receive any notification from MetaCopier. Communicating the block (and its reason) to the customer is your responsibility as the white-label owner.

**Summary email to you:**

When the background job finishes, you receive an internal MetaCopier notification email at your account address containing:

* The customer email that was blocked and the optional reason you provided.
* The list of blocked project IDs with per-project status.
* The number of successful and failed blocks and the total duration.
* If no matching projects were found under your white-label, the email still arrives so you know the request was processed.

This email is deliberately sent from metacopier.io (not from your white-label domain) because it is an internal admin notification to you, not a customer-facing message.

**Automating via REST API:**

The same action is exposed through the [MetaCopier REST API](/rest-api/api):

* `PUT /projects/{projectId}/features/{featureId}/whitelabel/customers/block`: schedule a block for the given customer email. Body: `{ "email": "customer@example.com", "reason": "Non-payment of 3 months" }` (`reason` is optional). Response: `{ "accepted": true, "email": "customer@example.com", "queuedProjectCount": 4, "queuedProjectIds": ["..."], "notificationEmail": "owner@example.com" }`.

The endpoint returns 202-style right away and the actual block runs in the background. Only the white-label owner can call this endpoint. It works in every mode, but as noted above, in modes with real invoices you rarely need it because auto-block already handles non-payers.

{% hint style="danger" %}
Blocking is destructive and permanent. Blocked projects are hidden and their accounts are stopped and deleted. There is no unblock in MetaCopier: neither from the UI, the API, nor through support. Use the retype-email confirmation as your last chance to abort.
{% endhint %}

## Pricing

White Label is available in a Basic plan, with a Pro plan. Enjoy our **Basic plan** at no cost. Upgrade to the **Pro plan** for just 99 USD/month, or get it for free if your average number of connected accounts is over 50. Here's a quick overview:

<table><thead><tr><th width="426">Feature</th><th data-type="checkbox">Basic</th><th data-type="checkbox">Pro</th></tr></thead><tbody><tr><td>Admin dashboard</td><td>true</td><td>true</td></tr><tr><td>Custom domain</td><td>true</td><td>true</td></tr><tr><td>Custom logo</td><td>true</td><td>true</td></tr><tr><td>Custom domain address sender</td><td>true</td><td>true</td></tr><tr><td>Stripe integration</td><td>true</td><td>true</td></tr><tr><td>SSL certificate</td><td>true</td><td>true</td></tr><tr><td>Web Application Firewall</td><td>true</td><td>true</td></tr><tr><td>DDoS protection</td><td>true</td><td>true</td></tr><tr><td>Navigation links (Home / Support)</td><td>true</td><td>true</td></tr><tr><td>Registration restriction</td><td>false</td><td>true</td></tr><tr><td>No "Powered by MetaCopier"</td><td>false</td><td>true</td></tr><tr><td>Priority support</td><td>false</td><td>true</td></tr><tr><td>Advanced customization</td><td>false</td><td>true</td></tr></tbody></table>

## Security Specifications

Our platform includes several built-in protections to help keep your white label instance fast, secure, and reliable, even under challenging conditions. While no system can offer perfect protection, these measures are designed to significantly reduce risk and improve stability.

* **Defend against common attacks with WAF**\
  The Web Application Firewall (WAF) helps protect your platform from many of the most common online threats, including vulnerabilities highlighted by OWASP. This covers risks such as SQL injection, cross-site scripting, and other well-known attack patterns.
* **Protect against zero-day threats**\
  The WAF also includes mechanisms to help detect and block some types of zero-day vulnerabilities before they can be exploited.
* **DDoS protection**\
  The platform is equipped with strong protection against Distributed Denial of Service attacks. Although no solution can offer absolute prevention, this system ensures your platform remains stable and accessible, even during heavy or malicious traffic. It delivers reliability that is as close as possible to full uptime.

## Maintenance & Updates

Your white label platform runs on top of the MetaCopier system, which means you automatically get all the latest improvements, security updates, and new features. There is no need to manage any technical updates yourself. We take care of everything in the background so you can focus on your users and your business. If an update includes something that may affect the look or feel of your platform, we make sure your branding stays in place. You can always go back to your settings and adjust them if needed. For larger changes, we will let you know in advance so you have time to prepare.

## Troubleshooting & FAQ

### Do you have a demo site where I can check how it looks?

We don't have a separate demo site at the moment. However, the white label platform looks very similar to MetaCopier itself, just with your own branding, domain, and pricing. If you're familiar with MetaCopier, you'll have a good idea of what your white label version will look and feel like.

### Can I customize the branding?

Absolutely. You can fully customize the platform to match your brand. This includes uploading your logo, setting brand colors, using your own domain, and even customizing pricing. All branding options are available in the White Label section of your project dashboard.

### Will my customers receive the MetaCopier newsletter?

No, your customers will not receive any emails or newsletters from MetaCopier. Since your platform is fully white labeled, all communication with your users is under your brand.

### Can I disable the free trial balance for white label customers?

At the moment, this is not possible. The trial balance is enabled by default to help new users explore the platform and understand how copy trading works before connecting a real account. It lowers the entry barrier, builds trust, and often leads to higher conversion rates. We may consider adding an option to disable it in future updates based on demand.

### How can I delete a white label setup?

At the moment, there is no direct "delete" button for a white label configuration. However, you can contact our support team, and we will assist you in removing or resetting the setup for your project. We’re also working on adding this functionality to the dashboard in a future update.

## Limitations

While the white label platform offers a wide range of features and flexibility, there are still a few things to keep in mind. Below are some current limitations you should be aware of when setting up and using your branded version.

* **No Social Login:** At the moment, users cannot log in using social accounts like Google or Facebook. All users must register and sign in with an email and password.
* **cTrader and Tradovate Require Your Own OAuth Credentials:** If you plan to offer cTrader or Tradovate accounts through your white-label platform, you must generate your own OAuth client ID and secret directly from each broker (cTrader Open API portal / Tradovate API portal) and enter them in the white-label settings. This step cannot be handled automatically from the MetaCopier side and must be done manually. If you explicitly add cTrader or Tradovate to the allowed account types but the matching credentials are missing, saving the white-label settings will be rejected. If the allowed account types list is left empty (all types allowed) and the credentials are missing, saving still works, but cTrader and Tradovate will simply be hidden from the account-type dropdown on your white-label until you add the credentials.
* **Telegram notifications:** Telegram notifications are not available yet, but they’re on our roadmap and coming soon. Once released, you’ll be able to send important updates, like trade alerts or system messages, directly to your users via Telegram. We’ll let you know as soon as this feature is ready so you can start using it right away.
* **No Affiliations:** The affiliate system is not available for white label platforms because you operate under your own brand and pricing. Our affiliate program is tied to the main MetaCopier platform and designed for direct referrals.
* **Single Signal Provider:** Only the owner of the white label platform can share trading signals with their users. Customers within your white label environment cannot create, share, or sell their own signals. This ensures that all signals and strategies remain exclusive to the platform owner’s management.
* **E-mail Notifications:** Email notifications (such as registration emails) are sent via Mailgun. If you are already using Mailgun with your top-level domain, you will not be able to authenticate Mailgun again for the MetaCopier white label. In this case, there is currently no workaround, and we recommend using a separate domain for the white label application.
* **No Documentation Link in UI:** The white label interface does not include a direct link to documentation, as documentation is not embedded within the white label environment.


# Affiliate Program

Join the **MetaCopier Affiliate Program** - a simple and rewarding way to earn by sharing MetaCopier with your network. Once you register at [affiliates.metacopier.io](https://affiliates.metacopier.io), you’ll receive a personal referral link that you can share on any platform.

For every user who signs up through your link and becomes a customer, you’ll earn **20% commission on every successful transaction - not just once, but for life**. There's no time limit: as long as your referrals keep using MetaCopier, you keep earning.

<figure><img src="/files/8mr8SdhLw6pZI1fIzFo0" alt=""><figcaption><p>Affiliate Program Login Page</p></figcaption></figure>

## How It Works

1. Register at [affiliates.metacopier.io](https://affiliates.metacopier.io)
2. Generate your unique affiliate link
3. Share it via social media, email, blog, or messaging platforms
4. Earn **20% commission** on every transaction made by your referrals - **for life**

## Commission Details

* Earn **20% commission** on MetaCopier platform subscriptions from referred users. Note: Commission applies only to platform subscription fees and does not include signal provider revenues (such as signal subscriptions, marketplace transactions, or profit-sharing payments).
* Commissions are **lifetime-based,** you earn as long as the user remains active
* Payouts are processed monthly, with details available in your dashboard

## Affiliate Dashboard

Your dashboard gives you full control:

* Track clicks, sign-ups, and earnings
* Monitor your lifetime commission stats
* Update payment information and view payout history

### Customer Statuses

Every user you refer through your affiliate link will appear in your dashboard with a **status** that reflects their progress. This helps you understand where they are in the conversion funnel and how your referrals are performing.

Below are the possible **customer statuses**:

<table><thead><tr><th width="156">Status</th><th>Description</th></tr></thead><tbody><tr><td>Lead</td><td>The user has <strong>signed up</strong> through your affiliate link but <strong>has not yet started using the service</strong>. They are registered, but not active.</td></tr><tr><td>Trialing</td><td>The user is currently in a <strong>trial period</strong>, testing MetaCopier before committing to full use. This is a crucial stage where they are actively exploring the platform.</td></tr><tr><td>Active</td><td>The user has completed their trial and is now a <strong>paying customer</strong>. You will earn <strong>20% lifetime commission</strong> on all transactions they make from this point onward.</td></tr><tr><td>Canceled</td><td>The user was previously active but has <strong>canceled their subscription or stopped using the service</strong>. You will no longer receive commissions from them unless they reactivate.</td></tr></tbody></table>

### New Leads

When you share your affiliate link, MetaCopier uses **cookies** to track referrals and ensure you get proper credit - even if the user doesn’t register right away.

Here’s how it works:

#### **30-Day Cookie Window**

* When someone clicks your affiliate link, a **cookie is stored in their browser for 30 days**.
* If the user **registers anytime within that 30-day period**, the lead will be **automatically attributed to your account** - even if they sign up weeks later.
* This ensures that you still receive credit for delayed decisions or hesitant users.

#### **Post-Registration Attribution (7-Day Window)**

Sometimes, users may register on MetaCopier **before clicking your affiliate link** - for example, they might sign up on their own after hearing about the platform, and only later receive your referral.

To ensure you’re still rewarded for influencing that user, we apply a **7-day retroactive attribution window**.

Here’s how it works:

* If the user **registered up to 7 days before clicking your affiliate link**, the system will **automatically credit the lead to your account**.
* This applies even if the user didn’t use your link during registration.
* Once they click your link within that 7-day period after signing up, the system detects the match and assigns the referral to you.

### No Retroactive Attribution

Affiliations cannot be added retroactively. Once the attribution window expires, a user can no longer be linked to your affiliate account - regardless of cookies, manual requests, or any other circumstance. This rule applies in all cases, with no exceptions.

## Tips for Promoting MetaCopier

Boost your affiliate earnings with these effective strategies:

* **Know your audience**: Focus on **traders**, **crypto enthusiasts**, and people interested in **automated income**.
* **Use social media**: Share your link on **Twitter**, **Telegram**, **Discord**, and **LinkedIn** with engaging captions and real results.
* **Create valuable content**: Write **blog posts**, record **YouTube reviews**, or share quick **how-to videos** that explain the benefits of MetaCopier.
* **Share personal experience**: Use **screenshots**, **testimonials**, or your **performance results** to build trust.
* **Avoid spam**: Promote ethically - no **misleading claims** or posting in **unrelated channels**.

Smart promotion = higher conversions + long-term passive income.

## Rules & Code of Conduct

To ensure fairness and integrity in the MetaCopier Affiliate Program, all affiliates must follow these rules:

* **No self-referrals**: Creating multiple accounts to refer yourself is strictly prohibited.
* **No fraudulent or deceptive practices**: This includes using fake identities, bots, or any method to simulate traffic or transactions.
* **No misleading claims**: Do not make false promises or exaggerated claims about MetaCopier’s performance or features.
* **No impersonation**: You may not present yourself as an official representative of MetaCopier.
* **No brand abuse in paid ads**: Using the term "MetaCopier" in paid ads (e.g., Google Ads) without written permission is not allowed.
* **No spamming**: Avoid unsolicited mass messaging or email campaigns that violate local regulations (e.g., GDPR, CAN-SPAM).
* **Exclusion**: Users with special agreements cannot be linked to affiliate accounts. If a referred user later receives a special agreement, the affiliate relationship ends.

**Violation of these rules may result in immediate termination** from the affiliate program and forfeiture of earned commissions.

## Payout Terms

* **Minimum payout threshold**: $50 USD
* **Accepted payment methods**: **Wise** or **Bank transfer**
* **Fees and Commissions:** Any bank, transfer, or processing fees associated with the payout will be deducted from the payment amount.
* **Payouts are made monthly**, **after a 30-day holding period** to account for potential refunds or chargebacks. This means that commissions from referred transactions become eligible for payout **30 days after the billing date**. For example, for the billing period of August (billed on September 2), your rewards become eligible on October 1, or 30 days after the payment to Metacopier.
* **Commissions are calculated based on net amounts**, meaning **MetaCopier deducts transaction fees** before calculating your 20% commission.
* You can track **eligible and pending commissions** in your affiliate dashboard.
* **Commission data is updated daily**, not in real time - expect a short delay between transactions and visibility in your dashboard.
* **Affiliates are responsible** for handling any local tax or reporting obligations.


# Frequently Asked Questions (FAQ)

This FAQ section gathers common questions and answers that don’t naturally fit into other parts of our documentation. Whether you're seeking clarification on edge cases, uncommon scenarios, or general guidance, this is the place to look. If you encounter a question not addressed here or elsewhere in the docs, feel free to suggest it for inclusion. We’re always working to improve the support experience.

## Is MetaCopier suitable for beginners?

Absolutely! MetaCopier is designed to be user-friendly, making it suitable for both beginners and experienced traders. Our intuitive interface and documentation ensure a smooth experience for all users.

## What sets MetaCopier apart from other copy trading platforms?

MetaCopier stands out due to its unbeatable pricing, fast execution speed, and user-friendly design. We prioritize transparency, reliability, and innovation, making us the preferred choice for copy trading enthusiasts.

## How secure is MetaCopier?

Security is our top priority. MetaCopier employs state-of-the-art encryption and security measures to safeguard your account information and transactions. We take every precaution to ensure a secure and trustworthy trading environment.

## If I add an account but there is no copier active, will it be billed?

Yes. Billing starts as soon as the account is added and continues until it is removed. To avoid being billed, you need to remove the account.

## How long does it take to replicate a trade?

The time required to replicate a trade on MetaCopier depends on several factors, including the speed of the broker’s server, internet connection stability, and overall market conditions. Nevertheless, MetaCopier is designed to execute trades in real time, ensuring fast and efficient replication.

## Are there any limits on the number of accounts?

MetaCopier is cloud-based and built to scale, so there’s no hard limit on how many accounts you can add. That said, to prevent misuse, there’s a soft limit of 100 accounts per project, but if you need more, just let us know and we’ll be happy to increase it. For **trial users**, there’s a limit of 10 accounts, which can be lifted by funding the project with $50 or an equivalent amount. If you’ve already received and paid an invoice, this limit no longer applies.

## Do you offer a money-back guarantee?

We provide a $20 free trial credit so you can explore most of our features before making a purchase. Because of this, we do not offer a money-back guarantee or refunds. If you wish to stop billing, please **delete all accounts in every project** to ensure no further charges are incurred.

## Why is my account showing as read-only?

Your account may show as read-only if you connected it using the investor password instead of the master password, or because some prop firms temporarily switch funded accounts to read-only mode during weekends. If you are using a cTrader account, make sure to generate a token with both read and write permissions to enable full access.

## Do you restrict any countries?

No, we do not impose any country restrictions. Our platform is accessible worldwide, allowing users from any region to register and use our services. However, please note that it is your responsibility to ensure compliance with your local laws and regulations regarding online trading and financial services.

## Why does MetaCopier show a higher drawdown than MetaTrader?

MetaCopier calculates drawdown values in real time, updating every second, while MetaTrader and many other platforms calculate them less frequently or with simplified methods. Because of this higher measurement frequency, MetaCopier captures even the smallest fluctuations in account balance or equity, leading to a more precise (and sometimes higher) drawdown figure.

## Where can I see the details of the invoice?

You can find them in your project. Open your project and, on the left-hand side, select Invoices. There you will find a link to download a PDF with all the invoice details and a breakdown of how it was calculated.

## Can I trigger a payment manually?

Yes. If, for some reason, the invoice could not be paid automatically, you can trigger the payment manually. Please open your project and select Invoices from the menu on the left. There you will find a button labeled “Request payment”, which you can use to trigger the payment again.


# Troubleshooting

Here, we've listed common errors you might encounter and simple solutions to help you resolve them quickly. If you don’t find what you’re looking for, don’t hesitate to reach out to our support team.

## Broker rejection

Broker rejection occurs when a broker declines to execute a trade or transaction that you’ve requested. This can happen for several reasons, and understanding why can help you address the issue.

* **Insufficient Funds:** If your account doesn’t have enough available funds to cover the cost of a trade, your broker will reject the transaction, often displaying error messages like **"NO MONEY"** or **"NOT ENOUGH MARGIN."** To fix this, you can increase the leverage on your account (if allowed by your broker), reduce the lot size of your trade, or close existing positions to free up margin.
* **Wrong Symbol:** Different brokers may use different symbols for the same asset. Usually, the system matches these symbols automatically, but sometimes you might need to [manually map the correct symbol](/features/basic-features).
* **Market Conditions:** In highly volatile markets, the price of an asset might change rapidly, causing your order to be rejected if the price moves beyond acceptable limits.
* **Order Type:** Certain order types (e.g., limit orders) may be rejected if the market conditions don’t meet the specific criteria you've set.
* **Technical Issues:** Occasionally, technical problems on the broker’s platform can result in a rejected order.
* **Account Limitations:** If your account has certain restrictions or limits, such as a maximum trade size or restrictions on margin trading, your order might be rejected if it exceeds these limits.
* **Interval Too Short:** If positions are opened and closed within a very short time interval (e.g., less than 10 seconds), the broker may reject the close request with an error such as **"REQUEST\_REJECTED"**. In such cases, the copier will automatically retry the operation after 30 seconds.

### DXtrade unexpected error

In rare instances, you may encounter this message on the **DXtrade** platform "**Unexpected error. Please contact your account manager**". If this occurs, please contact your account manager. The account may need to be reset, so it's important to reach out to your broker for assistance.

<figure><img src="/files/nSKdgP778iBG8C609cEY" alt=""><figcaption><p>DXtrade unexpected error</p></figcaption></figure>

## Early Position Closure on Slave Account

Sometimes, positions on a slave account close earlier than expected because the Stop Loss (SL) or Take Profit (TP) levels were reached sooner on the slave account than on the master account. To prevent this from happening, you can disable the copying of SL/TP values.

<figure><img src="/files/cLOKghR2SCSZQN95lA9a" alt=""><figcaption><p>Copier settings</p></figcaption></figure>

## Account disconnected

Account disconnection occurs when your trading account loses connection to the broker's server. This means you might not be able to execute trades or access real-time information.

### **Common Causes**

* **Broker Server Problems:** Sometimes, the broker's server may be down or experiencing issues. This is more common with demo accounts than live accounts. On weekends, brokers often perform maintenance, which can prevent accounts from connecting.
* **Connectivity issues:** Network problems between MetaCopier and the broker’s server can cause interruptions.
* **Login Problems:** Incorrect login credentials or disabled accounts can lead to disconnection.

### Reccomendations

* Select the server region closest to your broker to minimize latency and reduce connection issues.
* Always place stop-loss orders on the broker’s side to help protect your capital in case of unexpected interruptions.

In most cases, MetaCopier will automatically try to reconnect as soon as possible. If the disconnection lasts more than 24 (weekend excluded) please contact us and we will analize it.

{% hint style="info" %}
Some prop firms block shared IPs. If this is the case, we recommend using a [dedicated IP.](/features/pro-features#dedicated-ip)
{% endhint %}

## Account stopped

When an account is disconnected for three days, it will be automatically stopped to save resources.

## Positions get closed automatically on slave account

If you remove a copier from a strategy or account with open positions, those positions will automatically close after 10 minutes (you'll see "unmanaged position" in the log). This is intentional and serves as a safety measure to prevent positions from staying open without management.

To avoid this, if you have open positions, simply disable the copier instead of removing it. This way, the positions will remain open on the slave account and will continue to be managed. Only new positions will stop being copied.

## Position not copied because the market is closed

Brokers may have different market opening and closing times. This means the trade might not be opened on the slave account right away. To have the trade open as soon as the market reopens on the slave account, you can enable the "[Open retry" option in the copier settings](/features/basic-features/copiers). The copier will then keep trying to copy the trade until the market is open.

## Position not copied because of account leverage limitation

If the lot size exceeds the account's maximum leverage, the position will not be copied. To avoid this, use the option in the copier "[Max lot size](/features/basic-features/copiers)" to limit it

## Position not copied because of a PAMM account

Some PAMM accounts do not transmit open orders and therefore cannot be used as a master account. This can result in missing trades on the slave account. If this occurs, please contact the PAMM account provider and ask them to verify whether open orders are being sent.

## Position Price Differencies

If you notice price differencies between the slave and master account, it could have multiple reasons. The common ones are:

* **Latency between accounts**: There is always a slight delay when copying trades, especially during high volatility, which can cause price slippage between master and slave.
* **Broker price feed differences**: Different brokers may have slightly different bid/ask prices or spreads at the same time.
* **Execution speed**: The slave account might execute trades slightly slower due to network delays or platform response times.
* **Slippage settings**: If the allowed slippage is too low, the copier may skip or delay trades when the exact price is not available.
* **Off Quotes**: This trading error occurs when no valid price is available from the broker, usually due to market volatility or connection issues. If the price moves sharply during this time, your order may fail or be executed later at a worse rate.

## Why were some positions copied slowly?

You may occasionally notice delays in trade copying. While MetaCopier’s internal latency is just 5 milliseconds, meaning trades are duplicated to your slave account almost instantly, there are several external factors that can introduce additional delays. These include the time it takes for your master broker to send the trade to MetaCopier, the time required to deliver it to your slave broker, and the time your broker needs to forward the order to a liquidity provider and execute it. The type of trading platform you use also plays a role. Platforms using socket-based APIs are generally faster than those using REST APIs. Additionally, during periods of high market activity such as crashes or news-driven volatility, brokers may experience internal delays due to high order volume. It is important to understand that many of these steps are outside our control, and analyzing them thoroughly requires access to third-party systems. If you are experiencing occasional delays on a few trades, they are most likely caused by the factors mentioned above. However, if delays are consistent and ongoing, please let us know so we can investigate further.

## Risk limit did not work as expected

If you have a large number of positions and/or positions with high lot sizes, the risk limit may not work as expected. Various external factors, such as slippage, market volatility, and latency in order execution by the broker, can impact its effectiveness. To address this, try reducing the lot size.

## Max open positions not working as expected

In rare cases, when many trades are placed exactly at the same time, the max open positions feature may not work as expected. This happens because the orders haven’t been fully placed on the broker yet, so the copier can’t detect them. In these cases, the copier will run a check afterward and close any extra positions on follower accounts to enforce the max open positions limit.

## The calculation of the monthly profit is incorrect

The calculation of the monthly profit is based on midnight UTC time. Therefore, the profit may differ from what you see on other platforms due to differences in time zones.

## I can not add accounts because I have open invoices

If you are unable to add accounts or projects due to open invoices, you can update your credit card information or fund your project. The system processes payments daily, and once the invoices are cleared, you will be able to add accounts again.

## Position mismatch warning

If the slave account can't open or close a position for any reason, a warning symbol will appear on the account. You can check the logs for details on what went wrong.

## I cannot add an account

If you are unable to add an account, first log in directly to your broker’s platform to confirm that your credentials are correct. Also, double-check the broker name or URL and ensure you have selected the correct trading platform.

## I can't delete a project

You cannot delete a project if any of its trading accounts have not been deleted yet. Once all accounts are deleted, the project will remain locked until the 3rd day of the following month. This is because invoices are processed on the 2nd of each month. After this period, you will be able to delete the project. Please make sure the project is completely empty; otherwise, it may be billed for another month.

## I can’t change my email address

Changing the email address of an existing account is not currently supported. If you need to use a new email address, please register a new account with that email, then log in with your old account and grant access to the same project via **Dashboard → Project → Settings (Gearbox symbol) → Permissions**. This will allow both accounts to access and manage the same project. Once the new account is set up, you may delete the old account if desired. Since billing on MetaCopier is project-based, having multiple users on a single project does not incur any additional costs.

## My broker changed its name. How can I update it?

If your broker has changed its name, you do **not** need to update anything in MetaCopier. Your trading account will remain connected and continue working normally, even if the broker's name has changed. If you still want the new broker name to be displayed in MetaCopier, you will need to remove the account and add it again using the updated broker information.

## I cannot edit my trading account properties

Once a trading account has been added to MetaCopier, its account details cannot be edited. Only the **password** and **account label** can be changed after setup. To modify any other information, such as the broker, account number, or server, you must remove the account and add it again with the correct details.

## The timestamp of trade histroy is wrong

The timestamps in the trade history may appear incorrect due to the way MT4 and MT5 store trades using the broker’s local server time, without exposing the server’s time zone. Our system attempts to detect the correct time zone automatically, but during seasonal transitions like daylight saving time changes, this detection can be briefly inaccurate. To verify the time offset being used, you can check the `brokeTimeOffsetToUtc` field in the account’s JSON.

## Why is the lot size different between accounts with different base currencies?

MetaCopier automatically adjusts the lot size based on the exchange rate between the currencies. For example, if you’re copying from a USD account to a GBP account, and the exchange rate is 0.74, a 1 lot trade on the USD account would become a 0.74 lot trade on the GBP account, assuming both accounts have the same balance.

## Why is my signal follower not copying trades?

If your signal follower isn’t working and you’re not seeing any trades being copied, first check the logs in your account for any errors or warnings. If everything appears to be in order, it likely means that the signal provider or trading bot hasn’t opened any trades yet. Please contact the signal provider directly for clarification. MetaCopier does not offer support for the trading activity of third-party signal providers. We can only assist with technical issues on our platform.

## Check the Logs and Audit Logs

When troubleshooting any issue, we recommend checking the **Logs** and **Audit Logs** sections in MetaCopier as a first step.

* **Logs** provide real-time information about trade execution, errors, warnings, and broker rejections. They help you identify what went wrong with a specific trade or connection.
* **Audit Logs** provide a detailed history of all actions and changes made to your account, copiers, and settings. They are useful for tracking configuration changes and understanding the sequence of events that may have led to an issue.

By reviewing both, you can often identify and resolve problems without needing to contact support.


# App

A **Progressive Web Application (PWA)** is a web application that offers a fast, reliable, and engaging user experience similar to a native app. PWAs combine the best features of web and mobile apps, such as offline access, push notifications, and the ability to be installed directly from the browser. Once installed, you can launch it like a regular app from your home screen or application menu, without needing to visit the app store.

### Installing MetaCopier PWA on Different Platforms

Follow the instructions below to install MetaCopier PWA on your device.

***

## Microsoft Edge

1. Open MetaCopier in Microsoft Edge.
2. Look for the **App available** icon in the address bar.\
   ![](/files/28xzn4Xz2LH5PvvyPKDO)
3. Click the icon and select **Install**.
4. The PWA will be added to your Start menu and Desktop (Windows) or Launchpad (macOS).

***

## Google Chrome

1. Open MetaCopier in Google Chrome.
2. Click the three dots (menu) in the top-right corner.\
   ![](/files/e8MOpty0B2B6235OgidW)
3. Select **Install MetaCopier**.
4. The app will appear on your Desktop and Start menu (Windows) or in your **Applications** folder and Dock (macOS).

***

## Mozilla Firefox

1. Open MetaCopier in Firefox.
2. Click on the three lines (menu) in the top-right corner and select **Save Page As**.
3. Right-click on the saved shortcut and select **Properties**.
4. Modify the target to include `--app=URL` to open it as a PWA.

***

## Safari

1. Open MetaCopier in Safari.
2. Click the **Share** icon in the toolbar (macOS) or at the bottom of the screen (iOS).\
   ![](/files/FaVjaPWcNWbMqDx4jhgJ)
3. Select **Add to Home Screen**.
4. Name the app and click **Add**.
5. The PWA will appear on your home screen (iOS) or Launchpad (macOS).

***

## Opera

1. Open MetaCopier in Opera.
2. Click the three dots (menu) in the top-right corner.
3. Select **Install MetaCopier**.
4. The PWA will be installed and appear in your application launcher or dock.


# Billing

## Introduction

We believe in **transparent**, **flexible**, and **usage-based pricing** that adjusts to your needs, whether you're just starting out or scaling a complex trading setup. Our model is designed to give you full control over your costs, with **no fixed monthly fees** or hidden charges. Instead, you're billed based on **actual usage**, calculated daily, so you only pay for what you use.

This page provides a complete overview of how our billing system works. You’ll find clear breakdowns of pricing for **shared and dedicated projects**, optional **pro features**, **dedicated IPs**, and **volume discounts**. We also explain how billing is managed across regions, how to interpret your invoice, and where to find your **real-time cost forecast**. Plus, new users benefit from a **$20 free trial credit** to get started risk-free.

## Subscription Model

Our pricing is built around a **pay-per-account model**, with costs calculated on a **daily basis**. Each account (whether a **master** or **slave)** is counted individually, and your monthly invoice reflects the **average number of active accounts** maintained throughout the month. This ensures pricing stays **fair**, **proportional**, and **easy to understand**.

{% hint style="info" %}
For example, if you have 4 accounts connected for 15 days and 2 accounts connected for 30 days, the total usage is **120 account-days**. This is calculated as:

* **4 accounts × 15 days = 60 account-days**
* **2 accounts × 30 days = 60 account-days**
* **Total: 120 account-days**

The cost is then **120 account-days × 0.27 USD**, which equals **USD 32.40**.

On your invoice, the **120 account-days** will be divided by the number of days in the month (e.g., **30 days**), resulting in an **average of 4 accounts** (rounded).
{% endhint %}

{% hint style="warning" %}
If an account is deployed and then removed immediately, it will still count as **1 account-day** on your usage calculation.
{% endhint %}

{% hint style="warning" %}
Disconnected or inactive accounts will still be charged until they are completely removed from the platform.
{% endhint %}

### Key Billing Details

* **Payment Schedule**: Billing occurs at the end of each month with no upfront charges.
* **Currencies**: Payments can be made in USD, EUR, or CHF, with no hidden fees or complex pricing structures.
* **Free Trial**: New users get a USD 20 credit for a shared project to explore all features.

### Cost Forecast

We aim to be as transparent as possible, which is why we added a cost forecast feature. You can view the monthly cost forecast directly in the dashboard where all your projects are listed. Simply click on it to see more details.

<figure><img src="/files/hwIAmmsgqhPMPcb5z40M" alt=""><figcaption><p>Monthly cost forecast in the dashboard</p></figcaption></figure>

Alternatively, you can find it in the accounts overview at the top right corner.

<figure><img src="/files/uJFCmPcD0qhdNfNjUMxC" alt=""><figcaption><p>Monthly cost forecast in the accounts overview</p></figcaption></figure>

***

## Shared Project Pricing

In a shared project setup, **multiple users share server resources**, which allows us to keep costs low while still maintaining a **reliable, high-performance environment** suitable for most trading needs. Despite the shared nature of the infrastructure, all users enjoy **isolated account configurations**, ensuring both security and operational integrity.

### **Key Features**

* **New User Credit**: USD 20 credit for all new users (this will be automatically added to your first project)
* **Access**: Includes all basic features, with optional pro features and dedicated IPs available for an extra cost.
* **API and SDK Access**: Access to our Rest API and SDKs.
* **Unlimited Usage**: No restrictions on usage.
* **Support**: Standard support included.

### **Pricing**

* **Rate**: USD 0.27 per account/day, billed monthly.
* **Pay-As-You-Go**: Only pay for the days you use the service.
* **No Volume Discounts:** Shared projects do **not** offer volume-based discounts, regardless of the number of accounts used.

***

## Dedicated Project Pricing

For professional traders, institutions, or power users who require maximum reliability and control, our **dedicated project** option offers a fully isolated server environment with **resources reserved exclusively for your use**. This ensures consistent and predictable performance, even during periods of high demand. Additionally, dedicated project users benefit from **priority support**, giving you faster response times and direct access to our technical team when it matters most.

### **Pricing**

* **Billing Per Project and Region**: Charges apply based on the number of reserved accounts per region and project.
* **Minimum Package**: Starts with 25 accounts, with additional increments of 25 as needed.
  * Example: If you have 4 accounts in New York, you’re billed for 25. If you have 42 accounts, you’re billed for 50.
  * Adding accounts across regions (e.g., 15 in New York and 4 in London) will incur charges for separate packages in each region.

{% hint style="info" %}
Switching from a shared to a dedicated project later will incur a migration fee. If you need to upgrade, please contact us for assistance.
{% endhint %}

### Volume Discounts

The monthly costs below are calculated with 30 days.

<table><thead><tr><th width="292">Accounts per project and region</th><th width="214">Daily costs per account</th><th>Monthly costs</th></tr></thead><tbody><tr><td>1-25</td><td>USD 0.32</td><td>USD 240</td></tr><tr><td>26-50</td><td>USD 0.31</td><td>USD 465</td></tr><tr><td>51-75</td><td>USD 0.30</td><td>USD 675</td></tr><tr><td>76-100</td><td>USD 0.29</td><td>USD 870</td></tr><tr><td>101-125</td><td>USD 0.28</td><td>USD 1050</td></tr><tr><td>126-150</td><td>USD 0.27</td><td>USD 1215</td></tr><tr><td>151-175</td><td>USD 0.26</td><td>USD 1365</td></tr><tr><td>176-200</td><td>USD 0.25</td><td>USD 1500</td></tr><tr><td>201-225</td><td>USD 0.24</td><td>USD 1620</td></tr><tr><td>226-250</td><td>USD 0.23</td><td>USD 1725</td></tr><tr><td>251-<em>∞</em></td><td>USD 0.22 (minimum)</td><td>USD 1656-<em>∞</em></td></tr></tbody></table>

***

## Pro Features

Pro features can be added or removed at any time, giving you full flexibility. An additional fee of **USD 0.10** per day applies to any account using pro features.

For dedicated projects, you will only be billed for the accounts that are actively using pro features.

## Dedicated IP & My Home IP

Both IP options cost a flat rate of **6 USD per IP per month**. Unlike accounts and pro features, they are **not** calculated on a daily basis, so the amount is never prorated. An IP added on the last day of the month still costs the full 6 USD.

### Dedicated IP

If you require a dedicated IP address for your trading setup, it’s available at a flat rate of **6 USD per month**. The cycle follows the **calendar month**, so every IP you still hold is charged again on the 1st. If you release an IP and order another one within the same month, both are charged.

### My Home IP

The [My Home IP](/tutorials/my-home-ip) feature costs the same **6 USD per month** and appears in the same invoice position as the dedicated IPs.

Here the cycle is a **rolling 30 days**, counted from the day you added the feature, not from the 1st of the month. An IP added on the 20th therefore renews on the 20th of the following months. You are charged once per unique combination of host and port, regardless of how many accounts use it.

***

## Taxes & VAT

All prices displayed on MetaCopier are **fixed final service prices**. The price you see is the total amount you pay, and any legally required VAT is already included in that price.

{% hint style="info" %}
Are you a business customer looking for **reverse-charge / B2B tax treatment**? See the dedicated section on our B2B page:

[business-to-business.md](/b2b/business-to-business)
{% endhint %}


# Payment methods

MetaCopier offers flexible payment methods to streamline the process of funding your projects and managing invoices. You can choose between automatic payments with a credit card or manual funding using a credit card, cryptocurrencies or bank transfer. Below are the details of the payment methods available:

* Automatic credit card payments
* Manual funding (credit card or cryptocurrencies)
* Manual funding (bank transfer)

{% hint style="warning" %}
**Important note**

Ensure that your browser allows pop-up windows. If the payment window does not appear, check your browser settings to unblock pop-ups.
{% endhint %}

{% hint style="warning" %}
**Refund policy**

Refunds are only processed to the original source of payment. Refunds are available for amounts above 30 USD (or equivalent). An administration fee of 20 USD (or equivalent), plus a payment processing fee of 5% of the total amount, will be deducted from the refund.
{% endhint %}

{% hint style="warning" %}
When you add a credit card, you can choose the currency you want to use for transactions. This means it doesn’t have to match the currency of your credit card account. For example, if your credit card currency is USD, you can still add this card to MetaCopier with EUR as the chosen currency, and the transaction on your card will be processed in EUR. However, the currency of the added credit card in MetaCopier must match the currency you used when creating the project in MetaCopier.
{% endhint %}

***

## Automatic credit card payments

#### Features:

* **Easy Setup:** Add a credit card to your account for seamless payment processing.
* **Automated Billing:** Invoices are paid automatically without requiring manual intervention.
* **Security:** The credit card must have **3D Secure** enabled to ensure safe transactions.

#### How It Works:

1. Add your credit card details to your account.
   1. Go to this page: <https://metacopier.io/settings/payment-method> and add a credit card
   2. Go to this page: <https://metacopier.io/settings/projects> and click on the project’s **Settings** [⚙️](https://emojipedia.org/gear) **-> Settings -> select** the previously added payment method (please note that the project's currency and the card's currency must match).
2. Once added, your invoices will be paid automatically as they are generated (begin of the month)
3. Ensure that 3D Secure is active on your card to avoid payment issues.
4. Receive a **$20 trial** for your first project.

***

## Manual funding (credit card or cryptocurrencies)

#### Features:

* Fund your project directly using a credit card or supported cryptocurrencies.
* Receive a **$20 trial** if this is your first project.
* If you have funds in your project and a credit card added, the funds will be used first.

#### First Project Funding:

* **Without Credit Card:** You need to manually fund your project with $20 to activate the trial, giving you a total of $40 to start.
* **With Credit Card:** Simply add your card on this page <https://metacopier.io/settings/payment-method> to receive the $20 trial automatically, without requiring additional manual funding.

#### Accepted Payment Methods:

**Credit Cards:**

* VISA
* MasterCard

**Cryptocurrencies:**

We support the stablecoins **USDT** and **USDC**:

| Coin | Network  | Token standard |
| ---- | -------- | -------------- |
| USDT | Tron     | TRC-20         |
| USDT | Ethereum | ERC-20         |
| USDC | Ethereum | ERC-20         |

You choose the coin and the network when you fund the project. MetaCopier then shows you a payment address together with a QR code and the exact amount to send.

This address is **permanent**. It belongs to your project and the network you picked, and it stays the same for every future top-up. You can save it in your wallet or your exchange address book and reuse it whenever you want to add funds.

The minimum for a crypto top-up is **20 USD** (or the equivalent in your project currency).

{% hint style="warning" %}
**Check the network in your exchange before you send**

USDT and USDC exist on several blockchains, and exchanges often preselect the wrong network after you scan or paste the address. Binance may offer a Tron address as Solana. Coinbase does not support Tron at all and defaults USDC withdrawals to Base. Base, Polygon, BNB Smart Chain and Arbitrum all use the same address format as Ethereum, so the address alone does not tell your exchange which network to use.

Before confirming the withdrawal, make sure the selected network matches the one in the MetaCopier payment window:

* **Tron** addresses start with `T`. The network must say Tron or TRC-20.
* **Ethereum** addresses start with `0x`. The network must say Ethereum or ERC-20.

A transfer sent on a different network is not detected, is not credited to your project, and in most cases cannot be recovered.
{% endhint %}

{% hint style="info" %}
**If the amount does not match**

Your exchange or wallet may deduct a withdrawal fee from the amount you send, so less arrives than you requested. Nothing is lost: the payment is registered as partial, and you can send the difference to the same address at any time. The moment the total covers the requested amount, your project is credited.

Amounts above the requested value are credited in full.
{% endhint %}

{% hint style="info" %}
**Money you send outside a payment window**

The price quote in the payment window is only valid for a limited time, but the **address never expires**. If you send funds after the quote has run out, or without opening the payment window at all, they are still credited to your project automatically. In that case the conversion uses the exchange rate at the moment the funds arrive instead of the rate that was shown to you earlier.
{% endhint %}

Crypto payments work for projects in **USD**, **EUR** and **CHF**. You enter the amount in your project currency and MetaCopier converts it into the stablecoin amount at the current exchange rate. The rate is fixed for the duration of the payment window, and your project is credited with exactly the amount you entered in your project currency.

## How to fund a project

1. Go to this page: <https://metacopier.io/settings/projects>
2. Click on the project’s **Settings** [⚙️](https://emojipedia.org/gear) button -> **Fund**
3. Specify the amount
4. Select your preferred payment method:
   * **Credit Card**: Enter your card details such as card number, expiration date, and CVV.
   * **Cryptocurrency**: Choose the coin and the network (USDT on Tron or Ethereum, USDC on Ethereum), then send the displayed amount to the displayed address.
5. It takes up to 1 minute to process the payment (credit card). Cryptocurrencies takes longer
6. Once funded, you can view your project's balance under Dashboard -> Projects or on the 'Invoices' page in the project section.

***

## Manual Funding (bank transfer)

Manual funding via bank transfer is also possible for amounts greater than 500 CHF / 500 EUR / 500 USD. To fund the project, please select the option **“Fund via bank”** on the project page.

<figure><img src="/files/w4cQspJn778W9NwYmtJu" alt=""><figcaption><p>Fund via bank</p></figcaption></figure>

Then follow all the steps for the bank transfer. Make sure to include all required information to avoid any delays in processing.

<figure><img src="/files/adQmTnWollG0jT4PaDsF" alt=""><figcaption><p>Bank transfer instructions</p></figcaption></figure>


# Support

If you need support or have questions, please contact us using the chat widget on the homepage or via email at <support@metacopier.io>.


# Release notes

Release notes detail the features and improvements introduced in each release

### 2026-08-23

New features:

* Trade Cooldown (copier feature)
  * Skip copying a new trade on a symbol when a previous copied trade on the same symbol was opened or closed less than a configurable number of minutes ago.
  * The cooldown window can be measured from the previous position's close (default) or open, and BUY / SELL can optionally be tracked separately.
  * Correlated symbols can be grouped (e.g. US30, US500 and NAS100) so that a cooldown started by one member also applies to the others.
  * Per-symbol overrides let you use a different cooldown for individual symbols.
  * Designed to help comply with prop-firm 'trade idea' rules such as FTMO's 1-hour rule.
* Pending order expiry
  * Orders sent through the API can now carry a native expiry time. The broker cancels the pending order automatically if it is not filled within the configured time. Available for MT4 and MT5 pending orders; enforcement is broker-dependent.
* Account reconnect
  * A new action triggers a fast reconnect to the broker without restarting the account. This is much quicker than a full restart when a connection gets stuck. Limited to once every 30 minutes per account.
* TradeStation for white-labels
  * White-label owners can enable TradeStation accounts by providing their TradeStation OAuth client credentials.
* Native crypto payments for white-labels
  * White-label owners can accept crypto payments directly (BTC, ETH, USDT and USDC on Ethereum and TRON) by configuring their own extended public keys, so funds go straight to their own wallets.

Improvements:

* TradingView Webhook: volume safety cap and retries
  * A new maximum allowed volume caps the resulting lot size across all sizing modes (explicit volume, risk percent, risk amount), applied per leg for multi-TP requests.
  * Open retries are now configurable: when the broker rejects a request or the terminal does not respond, the request is retried every 30 seconds for a configurable period (1 to 60 minutes), or sent only once when disabled.
* Safe cancellation of pending orders
  * Closing a position can now be restricted to pending orders only, so a pending order that already filled into a live position is left untouched instead of being closed.
* Quotes with symbol details in one call
  * Quote requests can optionally return the symbol details (points, digits, volume limits) in the same response, removing the need for a second request.
* Master accounts overview in one call
  * A new endpoint returns all accounts that have at least one slave copying from them, together with their slaves and slave count, instead of querying each account individually.
* Telegram Signals: margin-based position sizing
  * A new volume mode sizes the position as a percentage of the account's free margin. Unlike risk-based sizing, this does not require a stop loss.

### 2026-07-19

New features:

* Account Templates
  * Save a reusable account configuration as a template and apply it to other accounts, with full revision history and safe concurrent updates.
  * Track which accounts are linked to a template (and when they fall behind), and get flagged when a template references resources that no longer exist.
* White-label manual collection
  * White-label owners can switch to per-customer manual collection: invoices are generated with the real amount in OPEN status, Stripe auto-charging is suppressed, and payments are collected externally.
  * Optionally send a branded statement email to end customers with the outstanding amount and custom payment instructions (bank / IBAN, crypto wallet, in-person pickup, etc.).
  * Mark individual or all of a customer's open manual invoices as paid, with optional external reference and audit note.
  * Block a white-label customer across every project they own with a single request (runs in the background with an email summary).

Improvements:

* Faster account configuration retrieval
  * New endpoint returns all accounts with their copiers, risk limits and features populated in a single call.
* White-label broker support
  * cTrader and Tradovate can now be enabled for a white-label by providing the respective OAuth client credentials.
  * Telegram Signals and TradingView Webhook features can be enabled per white-label.
  * Marketplace visibility can be restricted to authenticated users only.
* Telegram signal filtering
  * Include and exclude regular-expression filters let you route only relevant messages to the AI (or skip noise before the AI is called, saving tokens).
* Trailing Stop: percentage step
  * The trailing step can now be defined as a percentage of the take profit in addition to a fixed distance.
* Signal provider cost coverage cap
  * Signal providers can cap the number of covered follower accounts per follower project when covering follower costs.

### 2026-06-01

New features:

* Outbound Webhooks
  * Configure webhook endpoints to receive real-time HTTP POST notifications when positions are opened, closed, or history is updated.
  * Supports HMAC-SHA256 signature verification, Bearer Token, or no authentication.
  * Configurable retry policy (exponential backoff), rate limiting, request timeout, custom headers, and event filtering.
  * Option to include full position details or minimal payload (accountId + ticket only).
* Reverse Break-Even
  * A new mode for the break-even feature that triggers when a trade moves against the position by a configurable number of points, placing a take profit at a defined distance from entry.
  * Runs simultaneously with the normal break-even logic.
* Copier Filter: Min/Max Lot Size
  * The copier filter now supports filtering by master lot size - skip trades where the master's lot size is below a minimum or above a maximum threshold.
* Daily Profit Target: Track by Open Date
  * A new option to calculate the daily profit target based on the profit of trades opened on the current day, instead of the default equity-vs-balance comparison. Useful for prop firm consistency rules.
* Account Environment Detection
  * Account information now exposes whether the account is LIVE or DEMO.

Improvements:

* Advanced Performance Metrics
  * Performance metrics significantly extended with Data Collector-powered analytics: equity curve smoothness, intraday max drawdown, floating PnL tracking, per-symbol analytics, direction-based performance (buy/sell), profit per hour/weekday, trades by holding-time bucket, best/worst day/week/month, and much more.
  * Date range filtering now supported via startDate and endDate parameters.
* Telegram Signal Integration enhanced
  * AI tier selection (BASIC, STANDARD, PRO) for signal interpretation with different model quality levels.
  * Multiple connectors per account (up to 9) with independent position management.
  * Configurable context message count for multi-message signals.
  * Risk-based position sizing (fixed amount or percentage of balance) directly in the Telegram connector.
* White-label configuration extended
  * Custom CSS and JavaScript injection for advanced styling and third-party integrations.
  * Registration restriction by email address or domain with configurable redirect.
  * Custom navigation links (Home, Support).
  * Authentication page background color customization.
  * Signal provider alias to replace 'Signal' terminology for regulatory compliance.
  * Options to hide balance in signal provider listings, disable marketplace subscriptions, and show/hide signal scores.
* Progressive Trade Sizing: Cycles option
  * New `cycles` parameter defines how many consecutive profitable trades at the elevated level are required before the volume resets to the base size.
* Prop firm account flag
  * Accounts can now be explicitly marked as prop firm accounts.

### 2026-04-05

New features:

* Asynchronous account creation support
  * Account creation workflows can now be tracked asynchronously.
  * This makes it easier to submit account provisioning requests and monitor their progress separately.
* Telegram signal integration
  * You can now copy trades directly from Telegram to any trading account (e.g., MT5, MT4, cTrader, TradeLocker, DXtrade, etc.).
  * Supports public channels, private channels, groups, and private chats.
* Block Hedging
  * A new feature that prevents hedging by blocking trades in the opposite direction of an existing open position on the same symbol.

Improvements:

* TP/SL Management enhanced with two new options
  * **Master TP/SL Priority:** When enabled, the master account's TP/SL values take priority over the configured fixed TP/SL values. The fixed values are only applied as a fallback when the master has no TP/SL set. If the master later adds TP/SL, the slave accounts will be updated accordingly.
  * **Block Trade Without TP/SL:** When enabled, trades will not be opened on slave accounts if no TP/SL is available (neither from the master nor from configured values). This is especially important for prop firm accounts where every trade must have a TP/SL.
* Improved earnings report for signal providers
  * The earnings report has been improved with more detailed and clearer payout information.
* Signal provider logo
  * Signal providers can now upload a custom logo to personalize their profile in the marketplace.
* Verified badge
  * Signal providers can now get verified by MetaCopier to receive a verified badge displayed in the marketplace, helping followers identify trusted providers.

### 2026-03-15

New features:

* TradingView webhooks can now persist custom payload data and expose it through dedicated retrieval and deletion actions. This makes it easier to build workflows where TradingView alerts store intermediate data that can later be reviewed, reused, or cleaned up.
* Investor program profiles now expose performance metrics, giving investors a clearer view of trader analytics directly through the API.

### 2026-02-24

New features:

* Signal followers can now configure copier features\
  Followers are now able to attach and manage copier features directly on their signal relationship. This means that a follower can fine-tune how trades are copied to their account without affecting other followers or changing the core signal configuration.

  This allows for more flexible setups, including:

  * Adjusting risk and execution behavior per follower
  * Enabling or disabling selected copier features individually
  * Running different configurations across multiple followers of the same signal

  The signal provider’s base configuration remains intact, while followers gain controlled flexibility tailored to their own account requirements.
* TradingView webhooks are now available

### 2026-02-08

Improvements:

* More control for signal providers over copier behavior\
  Signal providers can now define which parts of their copier configuration may be adjusted by followers and which parts must remain fixed. This allows providers to protect the core logic of their strategy while still giving followers flexibility where it makes sense, such as adapting risk or execution preferences to their own accounts.
* Direct management of followers by signal providers\
  Signal providers can now actively manage their follower base and remove followers when necessary.

### 2026-02-01

New features:

* Feature Martingale Strategy: Added support for a Martingale strategy in the copier, ensuring lot sizes are adjusted correctly based on the Martingale multiplier, even when master and slave account balances differ.

### 2026-01-25

Improvements:

* White-label configuration extended: several new options were added to better control what end-users can do and see (e.g., disabling adding copiers / dedicated projects / dedicated IP purchase / invoicing, setting max projects/accounts limits, and hiding broker information in signal provider listings)
* Masaniello series reset: to reset the Masaniello money management series for an account

## 2026-01-17

New features:

* Signal providers can now explicitly control whether their historical trades are publicly accessible

Improvements:

* Maintenance window feature extended with explicit maintenance actions and position close strategies
* Profit target features now support controlling whether deposits/withdrawals reset the reference balance

## 2026-01-11

New features:

* Trade Guardrails (PRO): a new risk-protection feature that allows enforcing additional safety rules on copied trades:

  * Maximum lot size thresholds (optionally aggregated per symbol)
  * Maximum allowed open time for positions
  * Per-symbol guardrail configurations

  This helps prevent oversized or long-running positions automatically.
* More flexible lot size limits Max lot size handling now supports skipping trades that exceed limits instead of clamping them, and optionally validating against the master lot size.
* Improved position throttling Max open positions can now be limited within a configurable time window to reduce overtrading.
* Enhanced signal provider billing options Signal providers can now choose between different billing models (Monthly and High-Watermark) and optionally cover platform costs for followers.

## 2026-01-04

New features:

* Masaniello Money Management (PRO): Masaniello is a dynamic position sizing strategy designed to reach a predefined profit target within a fixed number of trades while controlling risk along the way.

## 2025-12-27

New features:

* Data Collector (Account Analytics) MetaCopier can now record time-based account data such as balance, equity and floating PnL. This enables advanced analytics like equity curves, drawdown tracking and performance monitoring.
* Global copier control New actions allow you to control all copiers across all accounts at once:

  * Activate all copiers
  * Deactivate all copiers
  * Switch all copiers to monitor-only mode

  This is especially useful for risk management, maintenance windows or emergency stops.

## 2025-12-14

New features:

* Advanced API key access policies API keys can now be restricted much more precisely to improve security and control:

  * Limit which API endpoints an API key is allowed to access
  * Restrict access to specific data fields in API responses
  * Hide selected frontend features in the user interface
  * Restrict API usage to specific IP addresses or CIDR ranges
  * Restrict allowed CORS origins for browser-based integrations

  Policies can be enabled or disabled per API key. When disabled, the API key behaves as before with full access.
* AI-assisted symbol mapping Missing symbol mappings can now be resolved using the built-in AI assistant:

  * The system automatically detects missing symbol mappings when trades fail to replicate
  * You can select the affected master account and missing symbol
  * The destination (slave) account is detected automatically
  * The AI analyzes available symbols on both accounts and suggests the best possible match
  * Suggested mappings can be reviewed and created with a single click

  This makes fixing symbol mismatches significantly faster and reduces manual mapping errors.

## 2025-12-07

New features:

* Order type filter for copiers
  * You can now restrict which order types are copied using the new *Order Type Filter* feature.
  * Configure a whitelist of order types (Buy, Sell, BuyLimit, SellLimit, BuyStop, SellStop); if you leave it empty, all order types continue to be copied as before.
* Fixed balance/equity for multiplier feature
  * New options let you “fix” the master and/or slave balance and equity to a given value for lot size calculation.
  * This is available in the global multiplier feature and directly on the copier, giving you very fine-grained control over risk scaling, independent of the real account balance.
* Detailed signal strategy description
  * Signal providers can now add a short description plus a separate long, detailed description of their strategy (entry/exit logic, risk management, timeframes, etc.).
  * This helps followers better understand how a strategy works before subscribing.
* Signal quality score breakdown
  * Performance metrics now include a composite score (0–100) and a Score Breakdown that shows how the score is built (risk, drawdown, consistency, balance size, diversification, penalties, etc.).
  * This gives a much more transparent view of why a signal is rated the way it is.
* Profit target: pause instead of close
  * Daily, weekly and monthly profit targets now support a “pause instead of close” option:
    * When enabled, reaching the target pauses the copier and blocks new trades, but keeps existing positions open.
    * When disabled, the previous behavior remains: all positions are closed and new trades are blocked until the next period.

## 2025-11-23

New Features:

* Master–Slave visibility\
  Accounts now expose which slave accounts are copying from a given master.

Improvements:

* Richer audit log context\
  Audit logs now include the account alias and project name, so you can immediately see which project/account an entry belongs to.
* Enhanced performance metrics\
  Performance metrics now provide a composite score (0–100) and per-day trade counts, enabling better analysis and comparisons.
* More flexible risk limits\
  Risk limits support fallback thresholds (absolute, relative, and percentage) that will close all positions once reached.

## 2025-11-16

New Features

* Audit Logs
  * View project-level changes
  * View account-specific audit logs
* Extended Account Features
  * New option to disable trading on accounts
  * Support for aggregate per-symbol risk
  * Trailing stop features now include activation threshold percentage
* Signal Provider Enhancements
  * Providers can now define contact information
  * New option to control visibility in the marketplace

## 2025-11-02

New features:

* Account symbols dialog
* Performance report dialog for signal provider

## 2025-10-26

Improvements

* MatchTrader Connector

## 2025-10-19

New features:

* Define a custom comment (copier)
* Define a custom magic number (copier)
* Copy from CEX (e.g. Binance/Bybit) to any regular broker (MT5, MT4, TradeLocker, cTrader, etc)

## 2025-10-05

New features:

* Portfolio metrics for the accounts page

## 2025-09-28

New features:

* Marketplace available
* Performance metrics for accounts (analytics)
* Performance metrics for followed signals
* Accounts page metrics

Improvements:

* Account information now includes average and maximum drawdown
* Copier can be set to 'monitor only' mode
* Signal follower can be set to 'monitor only' mode
* Signal providers can now include a profile link (Fx Blue or Myfxbook)

## 2025-09-14

New features:

* Live delay feature (copier)

## 2025-08-25

New features:

* Break-even revert option for special traders :wink:

Improvements:

* New connection management logic for MT4/MT5

## 2025-07-27

New features:

* Risk per trade (account and copier)

## 2025-07-20

New features:

* Close unmanaged position (account)
* Attach a dedicated ip or my home ip during account creation
* Skip position feature (copier)
* Copy magic number (copier)
* Copy original comment (copier)
* Ignore currency (copier)

## 2025-07-13

Frontend:

* Updated Look and Feel

## 2025-07-06

New features:

* Accounts page
  * Sort by balance and equity
  * Import copier settings from another copier

## 2025-06-22

New features:

* Fix slave balance and equity in the copier
* Check if the account is added twice within the same project
* New risk limits type
  * Equity-balance
  * Smart reference (maximum of balance or equity)
* Verify if "My home IP" is functioning and send notification if not
* Feature minimum holding time added
* Force copy open positions: If a position was closed on the slave account but remains open on the master, this operation will reopen the position on the slave to match the master's state.

## 2025-06-15

New features:

* Credit field added to MT4/MT5

## 2025-06-08

New features:

* White-Label solution

## 2025-05-18

New features:

* Lock TP/SL in feature TP/SL Management
* Approval feature in UI

## 2025-05-04

New features:

* Relative profit target (in account currency)
* Relative risk limit (in account currency)
* Autoreset for profit target

## 2025-04-27

New features:

* Live updates on the accounts page (via socket)
* Import for "Multiplier" feature

## 2025-04-20

New features:

* Absolute profit target (in account currency)
* Absolute risk limit (in account currency)
* Keep alive trade feature: close after option

## 2025-03-23

New features:

* Bybit integration

## 2025-03-09

New features:

* Maintenance Window
* Binance Fast API integration
* Activate/deactivate all slave copiers

## 2025-02-22

New features:

* Delayed execution (PRO)
* Used and free margin for DXTrade, MT4, MT5 and cTrader

## 2025-02-15

New features:

* Approval (PRO)

## 2025-02-09

New features:

* HFT mode (PRO)
* Socket (PRO)

## 2025-02-02

New features:

* Trading windows (PRO)
* Trailing stop (PRO)

## 2025-01-26

New features:

* MatchTrader integration
* Break-even (PRO)

## 2025-01-18

New features:

* Max open positions per symbol
* Max lot size per symbol
* Maximum lot per symbol
* Multiplier per symbol

## 2025-01-11

New features:

* Payment method: fund your project
  * Credit card
  * Cryptocurrencies
* Cost forecast for projects
* Group accounts using labels
* Show the public IP of the "Dedicated IP" feature

## 2025-01-04

New features:

* Notifications panel
* "Balance" under project (invoice page)

## 2024-12-28

New features:

* Authentication with Passkey supported
* Close all positions in all accounts (emergency close)

## 2024-12-22

New features:

* Close all positions on all accounts
* Terminal
  * Open
  * Modify
  * Close

## 2024-12-08

New features:

* Signal sharing
  * View your followers and manage the copier settings

## 2024-11-24

New features:

* Fallback setting
* TP/SL Management
* My home IP
* Exit signal override
* Account:
  * show profit this month
  * show if there is a mismatch between master and slave positions
  * download history (xlsx and pdf)
* Signal sharing: Performance report

## 2024-11-10

New features:

* Force position lot size option for copier
* Signal share feature

## 2024-11-02

New features:

* Copy open positions option for copier

## 2024-10-27

New features:

* Feature daily profit target
* Feature weekly profit target
* Feature monthly profit target

## 2024-10-20

New features:

* Hide comment option for copier

## 2024-10-13

New features:

* Accounts displayed as a list and in card view
* Accounts can be sorted by name or ID
* Accounts show if positions (buy/sell) are open

Improvements:

* TradeLocker Performance

## 2024-09-28

New features:

* Mobile/Desktop App
* Progressive Trade Sizing (PRO)

## 2024-09-21

New features:

* Failover for Dedicated IP (proxy) implemented

Improvements:

* TradeLocker History
* DXtrade TP/SL

## 2024-09-14

New features:

* Dedicated IP (proxy) for cTrader, MT5 and MT4 (PRO)

Improvements:

* "Reject reason" improvements for cTrader, TradeLocker and DXtrade

## 2024-09-07

New features:

* Dedicated IP (proxy) for TradeLocker and DXtrade (PRO)
* New region: Berlin and Singapore

Improvements:

* TradeLocker performance

## 2024-08-04

New features:

* TradeLocker integration
* TradingView integration
* Reverse option

## 2024-06-23

New features:

* Feature Keep Alive Trade (PRO)
* Feature Permitted Symbols

## 2024-06-09

New features:

* 'Open retry' option for copier

## 2024-05-26

New features:

* Filter trades
* Trading API (open, modify and close positions)

## 2024-05-05

New features:

* CTrader integration
* Fixed lot size and no scaling functionality

## 2024-04-17

New features:

* Telegram integration

## 2024-03-02

New features:

* DXtrade integration

## 2024-01-16

New features:

* Invoice PDF generation

## 2023-12-05

:rocket: The inaugural version of MetaCopier.io has been officially launched and is open to the public. Prior to this release, the platform was operated exclusively in a private environment.

## 2020-03-20

The initial version was launched as a private copy-trading platform


# AI Assistant

MetaCopier ships an **MCP server**. It lets an AI assistant such as ChatGPT, Claude, Cursor or any other MCP capable client work directly on your MetaCopier project: read your accounts, explain why a copier is not firing, adjust settings, and, if you allow it, place and close trades.

MCP stands for **Model Context Protocol**, the open standard that AI applications use to talk to external systems. You do not need to write any code. You connect once, and from then on you simply ask questions in plain language.

{% hint style="info" %}
The MCP server is reachable at **`https://ai.metacopier.io/p/{projectId}/mcp`**. You add it to your AI application yourself, see [connect](/ai/ai/connect).
{% endhint %}

### What you can do with it

* **Understand your setup.** "Which of my accounts are disconnected, and since when?"
* **Diagnose problems.** "Account X did not copy the last EURUSD trade, why not?"
* **Change configuration.** "Set the risk per trade on all copiers of strategy Y to 1 percent."
* **Review performance.** "Give me a weekly review of this project with the worst performing symbols."
* **Trade.** "Buy 0.1 lots of ETHUSD on my cTrader account with a 50 point stop loss."
* **Search the documentation.** The assistant can look things up in these docs while it works.

### What it is made of

| Building block | Count | Purpose                                                                                |
| -------------- | ----- | -------------------------------------------------------------------------------------- |
| Tools          | 134   | Everything the assistant can read or change, grouped into [toolsets](/ai/ai/endpoints) |
| Prompts        | 5     | Ready made workflows such as `weekly-review` or `risk-audit`                           |
| Resources      | 1     | `metacopier://connection`, a short description of what the current connection may do   |

### Two ways to authenticate

MetaCopier is not listed in any connector directory, so you add the server yourself in both cases. What differs is how the connection proves who you are.

<table><thead><tr><th width="180">Mode</th><th>Best for</th></tr></thead><tbody><tr><td><strong>OAuth</strong> (sign in)</td><td>Hosts that speak OAuth, such as ChatGPT, Claude and Claude Code. You paste the URL once, sign in with your MetaCopier account, and approve the permissions. No secret is stored in the client.</td></tr><tr><td><strong>API key</strong></td><td>Clients that cannot do OAuth, or your own agent. You paste an API key into the client configuration.</td></tr></tbody></table>

Both modes are explained in detail on the [authentication](/ai/ai/authentication) page. Setting up the connection is explained on the [connect](/ai/ai/connect) page.

{% hint style="warning" %}
An AI assistant is not a trading bot. It acts when you ask it to, it can misread an instruction, and it works on live money. Read [security and limits](/ai/ai/security) before you grant write or trading permission.
{% endhint %}

### Where to go next

{% content-ref url="/pages/WZcSMGq66VwWi3UOliQg" %}
[Connect your AI assistant](/ai/ai/connect)
{% endcontent-ref %}

{% content-ref url="/pages/hNG3oceRF9PT96lxSnRu" %}
[Authentication](/ai/ai/authentication)
{% endcontent-ref %}

{% content-ref url="/pages/tOce9ZiGhQFBg4zfyLj0" %}
[Endpoints and toolsets](/ai/ai/endpoints)
{% endcontent-ref %}

{% content-ref url="/pages/I23q2UBaFLPPsgyU2f1S" %}
[Tool reference](/ai/ai/tools)
{% endcontent-ref %}

{% content-ref url="/pages/l1Y9SsVD9jpcAhIU9gs9" %}
[Trading with AI](/ai/ai/trading)
{% endcontent-ref %}

{% content-ref url="/pages/m5z0zcK1u57ggQzRcl0g" %}
[Security and limits](/ai/ai/security)
{% endcontent-ref %}

{% content-ref url="/pages/pIGwf6upfMauVpir02XD" %}
[Troubleshooting](/ai/ai/troubleshooting)
{% endcontent-ref %}


# Connect your AI assistant

MetaCopier is **not listed in the connector directories** of ChatGPT, Claude or any other host, so searching for it there finds nothing. You add the MCP server yourself as a custom connector. It takes about a minute and works on every host that speaks MCP.

{% hint style="success" %}
Adding it yourself is the better setup anyway. The project becomes part of the URL, so the assistant can never end up on a project you did not mean.
{% endhint %}

***

## Set it up

### Step 1: Get your project id

The project id is the UUID of the project. You find it in the MetaCopier web app on the project, and it is returned by the REST API on `GET /rest/api/v1/projects`. It looks like this:

```
3f6b0c22-8d41-4a7e-9f0e-2c5b1d7a44e9
```

### Step 2: Build the URL

```
https://ai.metacopier.io/p/{projectId}/mcp
```

For the example above:

```
https://ai.metacopier.io/p/3f6b0c22-8d41-4a7e-9f0e-2c5b1d7a44e9/mcp
```

{% hint style="success" %}
You can narrow the URL further, for example to read only access or to a single toolset. See [endpoints and toolsets](/ai/ai/endpoints).
{% endhint %}

### Step 3: Choose how to authenticate

Both work on this URL:

* **OAuth.** Add the URL as a custom connector. The host discovers MetaCopier's sign in flow on its own, you sign in, and because the project is in the URL, the oldest project rule does not apply.
* **API key.** Create an API key in the project and send it as a header. This is the only option for clients that cannot do OAuth.

### Step 4: Configure your client

#### ChatGPT

Go to **Settings → Connectors**, choose **Create** or **Add custom connector**, paste the URL and pick OAuth. Some plans hide this behind **Advanced → Developer mode**. ChatGPT signs you in and stores the connection.

If you prefer an API key, use the header `X-API-KEY` where the connector form asks for authentication.

#### Claude (web, Desktop)

Go to **Customize → Connectors → Add custom connector** and paste the URL. On a Team or Enterprise plan an owner adds it once under **Organization settings → Connectors**, then every member connects to it individually.

Claude discovers the sign in flow on its own, so there is nothing else to configure. Enable the connector per conversation through the **+** button.

#### Claude Code

```bash
claude mcp add metacopier --scope user --transport http \
  https://ai.metacopier.io/p/3f6b0c22-8d41-4a7e-9f0e-2c5b1d7a44e9/mcp
```

`--scope user` makes the server available in every folder you work in instead of only the current one. Then type `/mcp` in Claude Code and authenticate. For an API key instead, append `--header "X-API-KEY: YOUR_API_KEY"`.

Claude Desktop also accepts the classic configuration file:

```json
{
  "mcpServers": {
    "metacopier": {
      "type": "http",
      "url": "https://ai.metacopier.io/p/3f6b0c22-8d41-4a7e-9f0e-2c5b1d7a44e9/mcp",
      "headers": {
        "X-API-KEY": "YOUR_API_KEY"
      }
    }
  }
}
```

Leave `headers` out for OAuth.

#### Cursor, VS Code and other editors

```json
{
  "servers": {
    "metacopier": {
      "type": "http",
      "url": "https://ai.metacopier.io/p/3f6b0c22-8d41-4a7e-9f0e-2c5b1d7a44e9/mcp",
      "headers": {
        "X-API-KEY": "YOUR_API_KEY"
      }
    }
  }
}
```

#### Anything else

The server speaks **streamable HTTP MCP** and is stateless, so any compliant client works. Send your requests as JSON-RPC over `POST` to the URL and add one of:

```
X-API-KEY: YOUR_API_KEY
```

```
Authorization: Bearer YOUR_API_KEY
```

### Step 5: Verify

Ask the assistant:

> Describe this connection and list my accounts.

If it answers with your project and your accounts, you are connected.

***

## Which project does it use?

The project in the URL, always. If you leave it out and connect to `https://ai.metacopier.io/mcp`, for example because your client cannot store a long URL, MetaCopier has to pick one for you:

{% hint style="warning" %}
**The oldest project you own wins.**
{% endhint %}

The rule in full:

1. Only projects you **own** are considered. Projects that were shared with you by someone else are not.
2. Deleted projects are skipped.
3. **White label projects are skipped.** A white label project belongs to another brand, so a generic MetaCopier connection does not speak for it.
4. Of what remains, the **oldest** project is chosen, meaning the one you created first.
5. If nothing qualifies, the connection fails with `[PROJECT_NOT_FOUND]`.

An example. You created project A in 2023, project B in 2024, and a partner shared project C with you. A connection without a project in the URL works on **A**.

You can always check which project you ended up on. Just ask the assistant:

> Which project are you connected to?

It will call `metacopier_describe_connection` and tell you the project id, whether it may write, and when the current credential expires.

{% hint style="danger" %}
If you own more than one project, do not rely on this rule. Put the project in the URL.
{% endhint %}

***

## Both at once

Nothing stops you from adding the connector twice, for example one entry per project, or one read only entry for everyday questions and one full entry for the rare moment you want the assistant to change something. Give each entry a name you recognise in the client.


# Authentication

The MCP server accepts two kinds of credential. They are equivalent in what they can reach, they differ in how the credential gets there and how the project is decided.

<table><thead><tr><th width="150">Mode</th><th width="200">Credential</th><th>Project</th></tr></thead><tbody><tr><td><strong>API key</strong></td><td>A MetaCopier API key you created yourself, sent as a header</td><td>The project the key belongs to</td></tr><tr><td><strong>OAuth</strong></td><td>Your MetaCopier login, exchanged automatically for a short lived credential</td><td>The project in the URL, or the oldest project you own</td></tr></tbody></table>

***

## Mode A: API key

### Creating the key

1. Open the MetaCopier web app.
2. Go to **Projects → API Keys**.
3. Create a key for the project you want the assistant to work on.
4. Copy the key. It is shown once.

{% hint style="info" %}
Give the AI its **own** key. Do not reuse a key that your EA, your website or a partner already uses. A separate key can be revoked without breaking anything else, and the audit log then shows exactly what the assistant did.
{% endhint %}

### Sending the key

Either header works:

```
X-API-KEY: YOUR_API_KEY
```

```
Authorization: Bearer YOUR_API_KEY
```

The second form exists because some MCP clients only offer a generic bearer token field. MetaCopier tells an API key and an OAuth token apart by their shape, so there is no ambiguity.

### What the key may do

Exactly what the key itself may do, no more. That is decided by two things:

* The key's **permission type**, `READ_ONLY` or `READ_WRITE`.
* The key's **access policy**, which can restrict endpoints, account fields, IP addresses and CORS origins.

{% content-ref url="/pages/4TcQLRM0kbdZBZLnhwDE" %}
[Access Policy](/rest-api/access-policy)
{% endcontent-ref %}

An access policy is optional, and it applies to both modes. On an OAuth connection it is the policy of the project's AI Apps key that counts.

If you want an assistant that can look but not touch, the cleanest way is a `READ_ONLY` key. A [read only endpoint](/ai/ai/endpoints#read-only-endpoints) is a second, independent layer you can add on top.

### When to use this mode

* Your client cannot do OAuth.
* You are building your own agent or automation.
* You want a credential that is not tied to a person and does not expire.
* You want the access policy to do the fine grained restriction for you.

***

## Mode B: OAuth

### How it works

You never handle a token. The flow is:

1. Your AI host asks MetaCopier's MCP server what it needs. The server answers with a standard discovery document ([RFC 9728](https://datatracker.ietf.org/doc/html/rfc9728)) that names MetaCopier's identity provider.
2. The host sends you to the MetaCopier sign in page. You log in and approve the requested permissions.
3. The host receives an access token for the MCP server, and nothing else. That token is only valid for MetaCopier's MCP server, it cannot be replayed anywhere else.
4. On every request, the MCP server exchanges that token for a **short lived MetaCopier credential**, scoped to your project and narrowed to the permissions you approved. It lives for **60 minutes** and is minted fresh, so there is nothing for you to renew.

{% hint style="info" %}
The credential the MCP server uses internally is a child of a key called **AI Apps**, which MetaCopier creates in your project the first time an assistant connects. Revoking that key cuts off every AI connection to the project at once. See [security and limits](/ai/ai/security#revoking-access).
{% endhint %}

### Scopes: what the assistant is allowed to do

When you approve the connection, the host asks for one or more of these:

<table><thead><tr><th width="230">Scope</th><th>Grants</th></tr></thead><tbody><tr><td><code>mcp:read</code></td><td>Reading everything the underlying key may read: accounts, copiers, strategies, positions, history, reports, logs, news.</td></tr><tr><td><code>mcp:config.write</code></td><td>Changing configuration: creating and editing accounts, copiers, strategies, templates, dashboards, project features.</td></tr><tr><td><code>mcp:trading.write</code></td><td>Placing, modifying and closing trades. See <a href="/pages/l1Y9SsVD9jpcAhIU9gs9">trading with AI</a>.</td></tr></tbody></table>

The rules are strict and enforced on MetaCopier's side, not by the assistant:

* Without `mcp:config.write` **and** without `mcp:trading.write`, the credential is read only. Every write is refused.
* Without `mcp:trading.write`, every trading endpoint is refused even if configuration writes are allowed. A conversation about copier settings cannot turn into an order by accident.
* A scope can only ever **narrow** what the underlying key may do. If the project's AI key is read only, `mcp:trading.write` changes nothing.
* On a project with **more than 100 accounts**, both write scopes are dropped and the credential is read only. See [security and limits](/ai/ai/security#large-projects-are-read-only).

{% hint style="warning" %}
Grant `mcp:trading.write` only if you really want the assistant to trade. You can always reconnect later with more permissions.
{% endhint %}

### Which project does OAuth use?

**If the project is in the URL**, that project is used:

```
https://ai.metacopier.io/p/{projectId}/mcp
```

**If it is not**, for example because your client cannot store a long URL, MetaCopier resolves the project from your account:

1. Only projects you **own** count.
2. Deleted projects are skipped.
3. **White label projects are skipped**, because they belong to another brand.
4. Of what remains, the **oldest** one is chosen.
5. If nothing remains, the connection fails with `[PROJECT_NOT_FOUND]`.

{% hint style="danger" %}
With more than one project, always pin the project in the URL. The oldest project rule is a convenience for single project customers, not a selection you should rely on.
{% endhint %}

### When to use this mode

* You are a person using ChatGPT, Claude or a similar assistant.
* You want the connection tied to your login, so it ends when your access ends.
* You want to approve permissions explicitly instead of managing key permissions yourself.
* You do not want a long lived secret sitting in a configuration file.

***

## Comparison

<table><thead><tr><th width="240">Property</th><th width="180">API key</th><th>OAuth</th></tr></thead><tbody><tr><td>Setup effort</td><td>Create key, paste it</td><td>Paste the URL, sign in</td></tr><tr><td>Lifetime</td><td>Until you revoke it</td><td>Until you sign out or <a href="/pages/m5z0zcK1u57ggQzRcl0g#revoking-access">revoke access</a></td></tr><tr><td>Secret in a config file</td><td>Yes</td><td>No</td></tr><tr><td>Project selection</td><td>The key's project</td><td>URL, otherwise oldest owned project</td></tr><tr><td>Permission control</td><td>Key permission type plus access policy</td><td>Scopes, on top of the key permission and access policy</td></tr><tr><td>Works without a browser</td><td>Yes</td><td>No</td></tr><tr><td>Tied to a person</td><td>No</td><td>Yes</td></tr></tbody></table>


# Endpoints and toolsets

The MCP server publishes **134 tools**. That is far more than most assistants handle well: a large tool list eats context, slows the model down and makes it more likely to pick the wrong tool. So the catalogue can be narrowed by the URL you connect to.

***

## The URL

```
https://ai.metacopier.io[/p/{projectId}]/mcp[/x/{toolset}][/readonly]
```

Every part in brackets is optional and they combine freely.

<table><thead><tr><th width="360">URL</th><th>What you get</th></tr></thead><tbody><tr><td><code>/mcp</code></td><td>The default toolsets on the project resolved from your login</td></tr><tr><td><code>/mcp/readonly</code></td><td>The same, with every write tool removed</td></tr><tr><td><code>/mcp/x/trading</code></td><td>Only the trading toolset</td></tr><tr><td><code>/mcp/x/all</code></td><td>All 134 tools</td></tr><tr><td><code>/mcp/x/all/readonly</code></td><td>Every read tool, no write tool at all</td></tr><tr><td><code>/p/{projectId}/mcp</code></td><td>The default toolsets on that specific project</td></tr><tr><td><code>/p/{projectId}/mcp/x/copiers/readonly</code></td><td>Read only copier tools on that specific project</td></tr></tbody></table>

{% hint style="info" %}
The URL is the whole configuration. There is no settings page for the connection, which means you can change what an assistant sees by editing one line in your client and reconnecting.
{% endhint %}

***

## Toolsets

<table><thead><tr><th width="150">Toolset</th><th width="70" align="center">Tools</th><th>Contents</th></tr></thead><tbody><tr><td><code>accounts</code></td><td align="center">25</td><td>Trading accounts, their connection state, balances, settings, groups and labels</td></tr><tr><td><code>templates</code></td><td align="center">8</td><td>Account templates and their defaults</td></tr><tr><td><code>copiers</code></td><td align="center">17</td><td>Copiers, their settings, symbol mappings, filters and state</td></tr><tr><td><code>strategies</code></td><td align="center">10</td><td>Strategies, their members and their configuration</td></tr><tr><td><code>trading</code></td><td align="center">10</td><td>Open positions, trade history, symbols, quotes, and the five tools that trade</td></tr><tr><td><code>reports</code></td><td align="center">4</td><td>Performance and statistics reporting</td></tr><tr><td><code>logs</code></td><td align="center">7</td><td>Account and copier logs, the first place to look when something did not fire</td></tr><tr><td><code>news</code></td><td align="center">19</td><td>Economic calendar, market news, bank holidays, news filters and calendar alerts</td></tr><tr><td><code>marketplace</code></td><td align="center">13</td><td>Signal marketplace, investor traders, signal performance and earnings</td></tr><tr><td><code>dashboards</code></td><td align="center">5</td><td>Dashboards</td></tr><tr><td><code>webhooks</code></td><td align="center">4</td><td>Webhook requests and stored webhook data</td></tr><tr><td><code>project</code></td><td align="center">6</td><td>The project itself, its labels and its features</td></tr><tr><td><code>reference</code></td><td align="center">4</td><td>Enum values, copier setting fields, broker servers and the connection description</td></tr><tr><td><code>docs</code></td><td align="center">2</td><td>Search and read these documentation pages</td></tr></tbody></table>

### Default selection

Connecting to `/mcp` without naming a toolset gives you:

```
accounts, copiers, logs
```

That covers the great majority of questions people ask: what do I have, why is it not copying, what happened.

### Always present

`reference` and `docs` are added to **every** selection and cannot be switched off. The assistant needs them to know which values a field accepts and to look things up rather than guess.

### Selecting several toolsets

Name them comma separated:

```
https://ai.metacopier.io/mcp/x/accounts,copiers,trading,logs
```

Or use the header, which works on every endpoint shape:

```
X-MC-Toolsets: accounts,copiers,trading,logs
```

The header wins when both are present, which is handy for a client that lets you set headers but not the URL.

An unknown name is answered with an error naming the toolsets that exist. You are told, rather than silently handed the default.

***

## Read only endpoints

Appending `/readonly` removes every tool that can change anything. Only reads remain.

```
https://ai.metacopier.io/p/{projectId}/mcp/readonly
```

The same can be done with a header:

```
X-MC-Readonly: true
```

{% hint style="success" %}
This is a good default for a first connection. Let the assistant explain your setup for a while, and add write access once you trust what it does.
{% endhint %}

Read only is applied on top of everything else. A read only endpoint with a read write key is still read only, and a read write endpoint with a read only key is still read only. The most restrictive layer always wins.

***

## Prompts

Prompts are ready made workflows your client can offer as slash commands or buttons.

<table><thead><tr><th width="200">Prompt</th><th width="200">Arguments</th><th>What it does</th></tr></thead><tbody><tr><td><code>weekly-review</code></td><td><code>projectId</code>, <code>days</code></td><td>Walks through the past week of a project: what was traded, what went wrong, what is worth changing</td></tr><tr><td><code>diagnose-copier</code></td><td><code>accountId</code>, <code>symbol</code></td><td>Works out why trades are not arriving on a follower account</td></tr><tr><td><code>risk-audit</code></td><td><code>projectId</code></td><td>Checks a project for the gaps that turn a bad day into a blown account</td></tr><tr><td><code>onboard-account</code></td><td><code>accountId</code></td><td>Checks a newly added account against the accounts that already work</td></tr><tr><td><code>cost-review</code></td><td><code>projectId</code></td><td>Explains what the project is being charged for and where the money goes</td></tr></tbody></table>

Where an argument is optional, leaving it out means "the project of this connection".

***

## Resources

<table><thead><tr><th width="280">Resource</th><th>Contents</th></tr></thead><tbody><tr><td><code>metacopier://connection</code></td><td>Which project this connection works on, whether it may change anything, when it expires, and the access rules that apply</td></tr></tbody></table>

Attaching it at the start of a conversation saves the assistant from guessing, and stops it proposing a change it is not allowed to make.


# Tool reference

Every tool the MCP server publishes, grouped by [toolset](/ai/ai/endpoints#toolsets). You do not have to memorise any of this. The assistant picks the right tool from your question. The list is here so you can see exactly what an assistant is able to reach before you connect it.

<table><thead><tr><th width="120" align="center">Type</th><th>Meaning</th></tr></thead><tbody><tr><td align="center">read</td><td>Only reads. Available on every connection, including read only ones.</td></tr><tr><td align="center"><strong>write</strong></td><td>Changes something. Needs a read write credential and, on OAuth, the matching scope. Removed entirely on a <code>/readonly</code> endpoint.</td></tr></tbody></table>

{% hint style="info" %}
`reference` and `docs` are part of every connection. All other toolsets have to be selected, see [endpoints and toolsets](/ai/ai/endpoints).
{% endhint %}

### `accounts`

<table><thead><tr><th width="330">Tool</th><th width="80" align="center">Type</th><th>What it does</th></tr></thead><tbody><tr><td><code>metacopier_get_account</code></td><td align="center">read</td><td>Returns one trading account by id</td></tr><tr><td><code>metacopier_get_account_creation_status</code></td><td align="center">read</td><td>Returns the state of an account creation that was started asynchronously</td></tr><tr><td><code>metacopier_get_account_information</code></td><td align="center">read</td><td>Returns the live broker state of one account: connection, margin, leverage, floating profit and today's, this week's and this month's result</td></tr><tr><td><code>metacopier_get_account_performance</code></td><td align="center">read</td><td>Returns headline performance metrics of one account: win rate, profit factor, expectancy, drawdown, streaks and average trade size</td></tr><tr><td><code>metacopier_get_configuration_summary</code></td><td align="center">read</td><td>Lists every account with its copier state in one call: whether it has active, disabled or monitor only copiers, and whether it runs on a dedicated IP</td></tr><tr><td><code>metacopier_list_account_features</code></td><td align="center">read</td><td>Lists the features enabled on one account with their configuration</td></tr><tr><td><code>metacopier_list_accounts</code></td><td align="center">read</td><td>Lists the trading accounts in the caller's project with account type, connection status, balance and equity</td></tr><tr><td><code>metacopier_list_equity_history</code></td><td align="center">read</td><td>Lists sampled balance, equity and floating profit readings of one account over time</td></tr><tr><td><code>metacopier_list_master_accounts</code></td><td align="center">read</td><td>Lists the master accounts of the project together with the slave accounts that copy from them</td></tr><tr><td><code>metacopier_list_risk_limits</code></td><td align="center">read</td><td>Lists the risk limits configured on one account, including the limit type, the threshold and whether it closes all open positions when hit</td></tr><tr><td><code>metacopier_list_slave_accounts</code></td><td align="center">read</td><td>Lists the accounts that copy from the given master account</td></tr><tr><td><code>metacopier_create_account</code></td><td align="center"><strong>write</strong></td><td>Connects a new trading account to the project</td></tr><tr><td><code>metacopier_create_account_feature</code></td><td align="center"><strong>write</strong></td><td>Adds a feature to one account, which is how filters, trading windows, news filters and the rest of the account behaviour are configured</td></tr><tr><td><code>metacopier_create_risk_limit</code></td><td align="center"><strong>write</strong></td><td>Creates a risk limit on one account, for example a daily loss cap</td></tr><tr><td><code>metacopier_delete_account</code></td><td align="center"><strong>write</strong></td><td>Removes a trading account from the project</td></tr><tr><td><code>metacopier_delete_account_feature</code></td><td align="center"><strong>write</strong></td><td>Removes a feature from one account</td></tr><tr><td><code>metacopier_delete_risk_limit</code></td><td align="center"><strong>write</strong></td><td>Deletes one risk limit from an account</td></tr><tr><td><code>metacopier_reconnect_account</code></td><td align="center"><strong>write</strong></td><td>Drops and rebuilds the broker connection of one account</td></tr><tr><td><code>metacopier_rename_account</code></td><td align="center"><strong>write</strong></td><td>Changes the display name of one account</td></tr><tr><td><code>metacopier_reset_profit_target</code></td><td align="center"><strong>write</strong></td><td>Resets the counter behind one profit target feature, so it starts measuring again from now</td></tr><tr><td><code>metacopier_reset_risk_limit</code></td><td align="center"><strong>write</strong></td><td>Resets the counter behind one risk limit, so a limit that already tripped starts measuring again from now</td></tr><tr><td><code>metacopier_start_account</code></td><td align="center"><strong>write</strong></td><td>Starts one account so it connects to the broker and its copiers run</td></tr><tr><td><code>metacopier_stop_account</code></td><td align="center"><strong>write</strong></td><td>Stops one account</td></tr><tr><td><code>metacopier_update_account_feature</code></td><td align="center"><strong>write</strong></td><td>Changes named settings on a feature of one account</td></tr><tr><td><code>metacopier_update_risk_limit</code></td><td align="center"><strong>write</strong></td><td>Changes named settings on one risk limit, for example the threshold, the reset time or whether it is active</td></tr></tbody></table>

### `templates`

<table><thead><tr><th width="330">Tool</th><th width="80" align="center">Type</th><th>What it does</th></tr></thead><tbody><tr><td><code>metacopier_get_template_revision</code></td><td align="center">read</td><td>Returns the metadata of one stored template revision</td></tr><tr><td><code>metacopier_list_account_templates</code></td><td align="center">read</td><td>Lists the account templates of a project, with the current revision, how many accounts are linked and whether any need attention</td></tr><tr><td><code>metacopier_list_template_linked_accounts</code></td><td align="center">read</td><td>Lists the accounts linked to one template and the revision each of them last received, so drift is visible</td></tr><tr><td><code>metacopier_list_template_revisions</code></td><td align="center">read</td><td>Lists the revision history of one account template: which revision was saved when and by whom</td></tr><tr><td><code>metacopier_apply_account_template</code></td><td align="center"><strong>write</strong></td><td>Applies one account template to an account, which overwrites the account's copier and feature configuration with what the template says</td></tr><tr><td><code>metacopier_create_account_template</code></td><td align="center"><strong>write</strong></td><td>Creates an account template in a project, which is a saved set of account settings that can be applied to accounts later</td></tr><tr><td><code>metacopier_delete_account_template</code></td><td align="center"><strong>write</strong></td><td>Deletes an account template from a project</td></tr><tr><td><code>metacopier_update_account_template</code></td><td align="center"><strong>write</strong></td><td>Changes named fields on one account template</td></tr></tbody></table>

### `copiers`

<table><thead><tr><th width="330">Tool</th><th width="80" align="center">Type</th><th>What it does</th></tr></thead><tbody><tr><td><code>metacopier_get_copier</code></td><td align="center">read</td><td>Returns one copy relation with its full configuration</td></tr><tr><td><code>metacopier_get_copier_symbol_mappings</code></td><td align="center">read</td><td>Returns the symbol mappings currently in effect for one copier</td></tr><tr><td><code>metacopier_list_copier_features</code></td><td align="center">read</td><td>Lists the features enabled on one copier with their configuration</td></tr><tr><td><code>metacopier_list_copiers</code></td><td align="center">read</td><td>Lists the copy relations of one account: source, scaling mode, multiplier, lot limits and whether the copier is active or monitor only</td></tr><tr><td><code>metacopier_list_project_symbol_mappings</code></td><td align="center">read</td><td>Lists the project wide symbol mapping rules</td></tr><tr><td><code>metacopier_create_copier</code></td><td align="center"><strong>write</strong></td><td>Creates a copier that copies trades from a master account onto one slave account</td></tr><tr><td><code>metacopier_create_copier_feature</code></td><td align="center"><strong>write</strong></td><td>Adds a feature to one copier. Cooldowns, profit and drawdown targets, spread and news filters, trading windows, symbol permissions and trailing stops are features rather than copier settings, so they are added here</td></tr><tr><td><code>metacopier_create_symbol_mapping</code></td><td align="center"><strong>write</strong></td><td>Creates a project symbol mapping, which tells copiers that a symbol on the master corresponds to a differently named symbol on the slave</td></tr><tr><td><code>metacopier_delete_copier</code></td><td align="center"><strong>write</strong></td><td>Deletes one copier from an account</td></tr><tr><td><code>metacopier_delete_copier_feature</code></td><td align="center"><strong>write</strong></td><td>Removes a feature from one copier. Turning the behaviour off with <code>metacopier_update_copier</code> does not work, because none of it is a setting on the copier</td></tr><tr><td><code>metacopier_delete_symbol_mapping</code></td><td align="center"><strong>write</strong></td><td>Deletes one project symbol mapping</td></tr><tr><td><code>metacopier_reset_masaniello</code></td><td align="center"><strong>write</strong></td><td>Resets the progression of one Masaniello feature back to its first step, either for every symbol or for one named symbol</td></tr><tr><td><code>metacopier_resync_copier</code></td><td align="center"><strong>write</strong></td><td>Rebuilds the link between the positions on the source account and the positions on this copier's target account</td></tr><tr><td><code>metacopier_set_copiers_state</code></td><td align="center"><strong>write</strong></td><td>Sets every copier that feeds this account to the same state at once</td></tr><tr><td><code>metacopier_update_copier</code></td><td align="center"><strong>write</strong></td><td>Changes named settings on one copier, for example the multiplier, the lot size caps or whether it is active</td></tr><tr><td><code>metacopier_update_copier_feature</code></td><td align="center"><strong>write</strong></td><td>Changes named settings on a feature of one copier. Reads the feature first and preserves every setting not named in the changes</td></tr><tr><td><code>metacopier_update_symbol_mapping</code></td><td align="center"><strong>write</strong></td><td>Changes named fields on one project symbol mapping, for example the target symbol or the priority</td></tr></tbody></table>

### `strategies`

<table><thead><tr><th width="330">Tool</th><th width="80" align="center">Type</th><th>What it does</th></tr></thead><tbody><tr><td><code>metacopier_get_strategy</code></td><td align="center">read</td><td>Returns one signal strategy of a project</td></tr><tr><td><code>metacopier_list_strategies</code></td><td align="center">read</td><td>Lists the signal strategies of a project</td></tr><tr><td><code>metacopier_list_strategy_copiers</code></td><td align="center">read</td><td>Lists the copiers that consume one strategy</td></tr><tr><td><code>metacopier_create_strategy</code></td><td align="center"><strong>write</strong></td><td>Creates a strategy in a project</td></tr><tr><td><code>metacopier_create_strategy_copier</code></td><td align="center"><strong>write</strong></td><td>Creates a copier that copies trades from a master account onto a project strategy rather than onto a single account</td></tr><tr><td><code>metacopier_delete_strategy</code></td><td align="center"><strong>write</strong></td><td>Deletes a strategy from a project</td></tr><tr><td><code>metacopier_delete_strategy_copier</code></td><td align="center"><strong>write</strong></td><td>Deletes one copier from a project strategy</td></tr><tr><td><code>metacopier_resync_strategy_copier</code></td><td align="center"><strong>write</strong></td><td>Rebuilds the position link for one copier that runs off a project strategy</td></tr><tr><td><code>metacopier_update_strategy</code></td><td align="center"><strong>write</strong></td><td>Changes named fields on one project strategy: its name, whether it is active, and the key it is listed under</td></tr><tr><td><code>metacopier_update_strategy_copier</code></td><td align="center"><strong>write</strong></td><td>Changes named settings on one copier that runs off a project strategy rather than off a second account</td></tr></tbody></table>

### `trading`

<table><thead><tr><th width="330">Tool</th><th width="80" align="center">Type</th><th>What it does</th></tr></thead><tbody><tr><td><code>metacopier_get_quote</code></td><td align="center">read</td><td>Returns the current bid and ask of one symbol on one account</td></tr><tr><td><code>metacopier_get_symbol</code></td><td align="center">read</td><td>Returns the broker specification of one symbol</td></tr><tr><td><code>metacopier_list_history_positions</code></td><td align="center">read</td><td>Lists the closed positions of one account in a time range</td></tr><tr><td><code>metacopier_list_open_positions</code></td><td align="center">read</td><td>Lists the currently open positions and pending orders of one account</td></tr><tr><td><code>metacopier_list_symbols</code></td><td align="center">read</td><td>Lists the symbols the broker of this account offers, with contract size, volume steps and whether trading is disabled</td></tr><tr><td><code>metacopier_close_all_positions</code></td><td align="center"><strong>write</strong></td><td>Closes every open position on one account and cancels every pending order on it</td></tr><tr><td><code>metacopier_close_position</code></td><td align="center"><strong>write</strong></td><td>Closes one open position or cancels one pending order</td></tr><tr><td><code>metacopier_modify_position</code></td><td align="center"><strong>write</strong></td><td>Changes the stop loss, the take profit, the volume or the entry price of one open position or pending order</td></tr><tr><td><code>metacopier_open_position</code></td><td align="center"><strong>write</strong></td><td>Opens a position on one account, or places a pending order, and waits for the core to accept it</td></tr><tr><td><code>metacopier_send_order</code></td><td align="center"><strong>write</strong></td><td>Places the same order as metacopier_open_position but returns the moment the core has taken it, without waiting for the broker</td></tr></tbody></table>

### `reports`

<table><thead><tr><th width="330">Tool</th><th width="80" align="center">Type</th><th>What it does</th></tr></thead><tbody><tr><td><code>metacopier_generate_performance_report</code></td><td align="center">read</td><td>Builds a performance report over a period for a set of accounts, projects or features, with balance, equity, drawdown and net profit per account</td></tr><tr><td><code>metacopier_get_cost_forecast</code></td><td align="center">read</td><td>Returns the forecast cost of the current billing period, broken down by position</td></tr><tr><td><code>metacopier_list_invoices</code></td><td align="center">read</td><td>Lists the invoices of a project</td></tr><tr><td><code>metacopier_list_transactions</code></td><td align="center">read</td><td>Lists the balance movements of a project</td></tr></tbody></table>

### `logs`

<table><thead><tr><th width="330">Tool</th><th width="80" align="center">Type</th><th>What it does</th></tr></thead><tbody><tr><td><code>metacopier_list_account_audit_logs</code></td><td align="center">read</td><td>Lists the API calls made against one account: endpoint, status code and duration</td></tr><tr><td><code>metacopier_list_account_logs</code></td><td align="center">read</td><td>Lists the log lines of one account</td></tr><tr><td><code>metacopier_list_project_audit_logs</code></td><td align="center">read</td><td>Lists the API calls made against the project</td></tr><tr><td><code>metacopier_list_project_logs</code></td><td align="center">read</td><td>Lists project level log lines, for example billing and account provisioning events</td></tr><tr><td><code>metacopier_list_signal_follower_audit_logs</code></td><td align="center">read</td><td>Lists the configuration changes made to one follower account of a signal provider: who changed what and when</td></tr><tr><td><code>metacopier_list_signal_follower_logs</code></td><td align="center">read</td><td>Lists the operational log of one follower account of a signal provider</td></tr><tr><td><code>metacopier_acknowledge_logs</code></td><td align="center"><strong>write</strong></td><td>Marks project log entries as read</td></tr></tbody></table>

### `news`

<table><thead><tr><th width="330">Tool</th><th width="80" align="center">Type</th><th>What it does</th></tr></thead><tbody><tr><td><code>metacopier_backtest_news_filter</code></td><td align="center">read</td><td>Replays a news filter setting over the trades this account already closed and reports which of them would have been skipped and what that would have cost or saved</td></tr><tr><td><code>metacopier_get_calendar_exposure</code></td><td align="center">read</td><td>Returns the upcoming calendar events the currently open positions are exposed to, with the volume, margin and floating profit at risk per event</td></tr><tr><td><code>metacopier_get_calendar_heatmap</code></td><td align="center">read</td><td>Returns the event load per currency and day as a grid, so a week can be ranked by how crowded it is before deciding when to trade</td></tr><tr><td><code>metacopier_get_economic_calendar</code></td><td align="center">read</td><td>Returns economic calendar events in a time range, filterable by currency, country and impact</td></tr><tr><td><code>metacopier_get_economic_calendar_event</code></td><td align="center">read</td><td>Returns one economic calendar event with actual, forecast and previous values</td></tr><tr><td><code>metacopier_get_indicator_history</code></td><td align="center">read</td><td>Returns the past releases of the indicator behind one calendar event, with actual, forecast and previous values and the surprise each release scored</td></tr><tr><td><code>metacopier_get_rate_outlook</code></td><td align="center">read</td><td>Returns the current policy rate of each central bank, the next rate decision and the change the market expects</td></tr><tr><td><code>metacopier_get_surprise_index</code></td><td align="center">read</td><td>Returns how often each currency beat or missed its forecast recently, with the average surprise in standard deviations</td></tr><tr><td><code>metacopier_list_bank_holidays</code></td><td align="center">read</td><td>Lists bank holidays in a date range</td></tr><tr><td><code>metacopier_list_calendar_alert_rules</code></td><td align="center">read</td><td>Lists the standing rules that arm calendar reminders automatically, for example \</td></tr><tr><td><code>metacopier_list_calendar_alerts</code></td><td align="center">read</td><td>Lists the calendar reminders that have not fired yet, both the ones armed by hand and the ones a rule created</td></tr><tr><td><code>metacopier_list_market_news</code></td><td align="center">read</td><td>Returns market news articles with sentiment and affected currencies</td></tr><tr><td><code>metacopier_preview_news_filter</code></td><td align="center">read</td><td>Shows the blackout windows a news filter setting would produce for the given symbols, without changing anything</td></tr><tr><td><code>metacopier_add_news_bookmark</code></td><td align="center"><strong>write</strong></td><td>Saves one market news article</td></tr><tr><td><code>metacopier_create_calendar_alert</code></td><td align="center"><strong>write</strong></td><td>Arms a reminder for one economic calendar event that the user names, such as the next ECB rate decision</td></tr><tr><td><code>metacopier_create_calendar_alert_rule</code></td><td align="center"><strong>write</strong></td><td>Creates a standing rule that arms reminders automatically, for example 30 minutes before every high impact USD event</td></tr><tr><td><code>metacopier_delete_calendar_alert</code></td><td align="center"><strong>write</strong></td><td>Disarms one calendar reminder</td></tr><tr><td><code>metacopier_delete_calendar_alert_rule</code></td><td align="center"><strong>write</strong></td><td>Deletes a standing calendar alert rule</td></tr><tr><td><code>metacopier_remove_news_bookmark</code></td><td align="center"><strong>write</strong></td><td>Removes one saved market news article</td></tr></tbody></table>

### `marketplace`

<table><thead><tr><th width="330">Tool</th><th width="80" align="center">Type</th><th>What it does</th></tr></thead><tbody><tr><td><code>metacopier_get_investor_trader</code></td><td align="center">read</td><td>Returns one trader of the investor program</td></tr><tr><td><code>metacopier_get_investor_trader_performance</code></td><td align="center">read</td><td>Returns the performance metrics of one trader in the investor program: win rate, profit factor, drawdown and the rest of the scorecard</td></tr><tr><td><code>metacopier_get_signal_earnings</code></td><td align="center">read</td><td>Returns the earnings summary of a signal provider: follower count, gross and net amounts and the MetaCopier fee share</td></tr><tr><td><code>metacopier_get_signal_follower_performance</code></td><td align="center">read</td><td>Returns the performance metrics of one follower account of a signal provider: win rate, profit factor, drawdown and the rest of the scorecard</td></tr><tr><td><code>metacopier_list_investor_trader_history</code></td><td align="center">read</td><td>Lists the closed positions one trader of the investor program published in a time range</td></tr><tr><td><code>metacopier_list_investor_traders</code></td><td align="center">read</td><td>Lists the traders available in the investor program, with their headline drawdown limit and current status</td></tr><tr><td><code>metacopier_list_marketplace_signals</code></td><td align="center">read</td><td>Lists the signal providers offered on the MetaCopier marketplace, with their pricing and subscription model</td></tr><tr><td><code>metacopier_list_signal_follower_accounts</code></td><td align="center">read</td><td>Lists the follower accounts subscribed to a signal provider</td></tr><tr><td><code>metacopier_list_signal_follower_positions</code></td><td align="center">read</td><td>Lists the open positions of one follower account of a signal provider, as the provider sees them</td></tr><tr><td><code>metacopier_list_signal_history_positions</code></td><td align="center">read</td><td>Lists the closed positions a signal provider published in a time range</td></tr><tr><td><code>metacopier_list_signal_symbols</code></td><td align="center">read</td><td>Lists the symbols a signal provider trades, as they resolve on one follower account</td></tr><tr><td><code>metacopier_list_subscribed_signals</code></td><td align="center">read</td><td>Lists the signal providers this project may follow, with the terms of each subscription</td></tr><tr><td><code>metacopier_list_traders</code></td><td align="center">read</td><td>Lists the traders this project publishes, with their headline drawdown limit and status</td></tr></tbody></table>

### `dashboards`

<table><thead><tr><th width="330">Tool</th><th width="80" align="center">Type</th><th>What it does</th></tr></thead><tbody><tr><td><code>metacopier_get_dashboard</code></td><td align="center">read</td><td>Returns one saved dashboard of a project by id</td></tr><tr><td><code>metacopier_list_dashboards</code></td><td align="center">read</td><td>Lists the saved dashboards of a project, with their name, sort order and which one is the default</td></tr><tr><td><code>metacopier_create_dashboard</code></td><td align="center"><strong>write</strong></td><td>Creates a dashboard in a project</td></tr><tr><td><code>metacopier_delete_dashboard</code></td><td align="center"><strong>write</strong></td><td>Deletes a dashboard from a project</td></tr><tr><td><code>metacopier_duplicate_dashboard</code></td><td align="center"><strong>write</strong></td><td>Copies an existing dashboard, optionally under a new name</td></tr></tbody></table>

### `webhooks`

<table><thead><tr><th width="330">Tool</th><th width="80" align="center">Type</th><th>What it does</th></tr></thead><tbody><tr><td><code>metacopier_get_webhook_data</code></td><td align="center">read</td><td>Returns one stored TradingView webhook payload by id</td></tr><tr><td><code>metacopier_get_webhook_request_status</code></td><td align="center">read</td><td>Returns what became of one TradingView webhook request: whether it succeeded, how many positions it matched, and the error code and hint if it did not</td></tr><tr><td><code>metacopier_list_webhook_data</code></td><td align="center">read</td><td>Lists the payloads an account received through its TradingView webhook store action, newest first</td></tr><tr><td><code>metacopier_delete_webhook_data</code></td><td align="center"><strong>write</strong></td><td>Deletes one stored TradingView webhook payload from an account</td></tr></tbody></table>

### `project`

<table><thead><tr><th width="330">Tool</th><th width="80" align="center">Type</th><th>What it does</th></tr></thead><tbody><tr><td><code>metacopier_get_project</code></td><td align="center">read</td><td>Returns the project header: name, balance, currency and whether it is blocked</td></tr><tr><td><code>metacopier_list_labels</code></td><td align="center">read</td><td>Lists the account labels defined in a project</td></tr><tr><td><code>metacopier_list_project_features</code></td><td align="center">read</td><td>Lists the features enabled on a project with their configuration</td></tr><tr><td><code>metacopier_create_project_feature</code></td><td align="center"><strong>write</strong></td><td>Adds a feature to a project, which applies it across the project rather than to one account</td></tr><tr><td><code>metacopier_delete_project_feature</code></td><td align="center"><strong>write</strong></td><td>Removes a feature from a project</td></tr><tr><td><code>metacopier_update_project_feature</code></td><td align="center"><strong>write</strong></td><td>Changes named settings on a feature of one project</td></tr></tbody></table>

### `reference`

<table><thead><tr><th width="330">Tool</th><th width="80" align="center">Type</th><th>What it does</th></tr></thead><tbody><tr><td><code>metacopier_describe_connection</code></td><td align="center">read</td><td>Returns which project this connection works on and what it may do: read only or read write, when it expires, and the access rules that apply</td></tr><tr><td><code>metacopier_list_broker_servers</code></td><td align="center">read</td><td>Lists the broker servers known for one platform</td></tr><tr><td><code>metacopier_list_copier_setting_fields</code></td><td align="center">read</td><td>Lists the settings a copier accepts, with their type and allowed values</td></tr><tr><td><code>metacopier_list_enum_values</code></td><td align="center">read</td><td>Lists one of the reference types, as id and name pairs</td></tr></tbody></table>

### `docs`

<table><thead><tr><th width="330">Tool</th><th width="80" align="center">Type</th><th>What it does</th></tr></thead><tbody><tr><td><code>metacopier_get_doc_page</code></td><td align="center">read</td><td>Reads one MetaCopier documentation page in full, as markdown</td></tr><tr><td><code>metacopier_search_docs</code></td><td align="center">read</td><td>Searches the MetaCopier documentation and returns matching pages with an excerpt and a citable link</td></tr></tbody></table>


# Trading with AI

The assistant can place, modify and close trades. This page explains exactly what it can do, what it cannot do, and how to keep it in check.

{% hint style="danger" %}
Trading tools act on **live accounts with real money**. An assistant can misread an instruction, a symbol name or a volume. Never enable trading on an account you are not prepared to see traded.
{% endhint %}

***

## Enabling it

Trading is off unless four things are true at the same time:

1. The connection uses a **read write** credential. A `READ_ONLY` API key can never trade.
2. On OAuth, the scope **`mcp:trading.write`** was approved. Without it every trading endpoint is refused, even when configuration writes are allowed.
3. The endpoint includes the **`trading`** toolset and is not a `/readonly` endpoint.
4. The project has **100 accounts or fewer**. See [large projects are read only](/ai/ai/security#large-projects-are-read-only).

Example of a connection that may trade on one specific project:

```
https://ai.metacopier.io/p/{projectId}/mcp/x/trading
```

{% hint style="info" %}
The refusal happens on MetaCopier's side, not in the assistant. Even if a model decided to try, an endpoint it has no scope for answers with an error.
{% endhint %}

***

## The five trading tools

<table><thead><tr><th width="300">Tool</th><th>What it does</th></tr></thead><tbody><tr><td><code>metacopier_open_position</code></td><td>Opens a position, or places a pending order, and waits for the broker to answer. The result tells you whether it worked.</td></tr><tr><td><code>metacopier_send_order</code></td><td>The same, but returns immediately without waiting. Faster, and it does <strong>not</strong> confirm that the trade was executed.</td></tr><tr><td><code>metacopier_modify_position</code></td><td>Changes the stop loss, take profit, volume or pending price of an existing position or order.</td></tr><tr><td><code>metacopier_close_position</code></td><td>Closes one position, or cancels one pending order.</td></tr><tr><td><code>metacopier_close_all_positions</code></td><td>Closes everything open on one account, and cancels its pending orders.</td></tr></tbody></table>

All five are marked **destructive** in the protocol, which is the signal most hosts use to ask you to confirm before the call goes out. Whether you actually get that confirmation dialog depends on your client, so treat it as a helpful extra and not as your safety net.

***

## Parameters

### Opening a position or sending an order

<table><thead><tr><th width="220">Parameter</th><th width="100" align="center">Required</th><th>Meaning</th></tr></thead><tbody><tr><td><code>accountId</code></td><td align="center">yes</td><td>The account to trade on</td></tr><tr><td><code>symbol</code></td><td align="center">yes</td><td>The symbol as the broker spells it, for example <code>EURUSD</code> or <code>ETHUSD</code></td></tr><tr><td><code>orderType</code></td><td align="center">yes</td><td><code>Buy</code>, <code>Sell</code>, <code>BuyLimit</code>, <code>SellLimit</code>, <code>BuyStop</code> or <code>SellStop</code></td></tr><tr><td><code>volume</code></td><td align="center">yes</td><td>Size in <strong>lots</strong>, for example <code>0.1</code></td></tr><tr><td><code>openPrice</code></td><td align="center">no</td><td>Required for the four pending types. Left out on a market order, which fills at the current price.</td></tr><tr><td><code>stopLoss</code></td><td align="center">no</td><td>Price, or points when <code>relativeTpSl</code> is set. Omit or <code>0</code> for none.</td></tr><tr><td><code>takeProfit</code></td><td align="center">no</td><td>Same as above</td></tr><tr><td><code>relativeTpSl</code></td><td align="center">no</td><td>When true, stop loss and take profit are read as a distance in points from the fill price instead of an absolute price</td></tr><tr><td><code>pendingExpirySeconds</code></td><td align="center">no</td><td>How long a pending order stays alive. MT4 and MT5 only, and the broker decides whether it accepts it.</td></tr><tr><td><code>comment</code></td><td align="center">no</td><td>A short note on the trade. Keep it under roughly 23 characters, the rest is cut off.</td></tr></tbody></table>

### Modifying

`accountId` and `positionId` are required. Everything you pass of `stopLoss`, `takeProfit`, `volume` and `openPrice` is changed, everything you leave out stays as it is.

### Closing

`accountId` and `positionId` are required. `pendingOnly` restricts the call to cancelling an unfilled order, so a filled position is left alone.

***

## Things worth knowing before you let it trade

### Copiers still apply

A trade the assistant opens on a **master account**, meaning an account whose trades are copied to its follower accounts, is copied exactly like any other trade. "Buy 0.1 lots of EURUSD" on a master is not one trade, it is one trade per follower, sized by each copier's settings.

{% hint style="warning" %}
Before you ask for a trade, ask the assistant what the account is: "Is this account a master, and which accounts follow it?" It has the tools to answer.
{% endhint %}

### Send order does not confirm anything

`metacopier_send_order` returns as soon as the request is on its way. A rejection by the broker, an invalid volume or a closed market surfaces later in the account log, not in the answer you see. Prefer `metacopier_open_position` unless speed genuinely matters, and check the logs afterwards.

### Close all is per account

`metacopier_close_all_positions` closes everything on **one** account. It does not close the whole project. If the account is a master, the closes are copied to its followers as usual.

### Symbols are the broker's

Brokers name the same instrument differently: `EURUSD`, `EURUSD.m`, `EURUSD_i`. The assistant can list the symbols an account actually has, and it should, rather than guess. If a trade is refused with an unknown symbol, that is usually why.

### Request ids

Every order carries a request id so that a repeated network attempt cannot become a second trade. This is handled for you, there is nothing to configure.

***

## Recommended way to work

1. Start with a **read only** connection and get used to what the assistant sees and how it reasons.
2. Move to a connection that has `trading` but only on a **demo project or a demo account** while you learn its habits.
3. When you go live, keep trading on its own connection, for example `/p/{projectId}/mcp/x/trading`, separate from the connection you use for everyday questions. A conversation about copier settings then has no way to place an order at all.
4. Always name the account explicitly in your instruction, and read back what the assistant says it is about to do before you confirm.

{% hint style="success" %}
A good habit: ask for a plan first. "Do not trade yet. Tell me exactly which order you would send, on which account, and with what stop." Then confirm.
{% endhint %}


# Security and limits

An AI assistant with access to your MetaCopier project is powerful and, for the same reason, worth setting up carefully. This page collects everything that limits what it can do.

***

## The layers

Access is decided by four independent layers. Every one of them can only take away, never add, so the most restrictive layer always wins.

<table><thead><tr><th width="60" align="center">#</th><th width="200">Layer</th><th>Decides</th></tr></thead><tbody><tr><td align="center">1</td><td>The API key</td><td>Which project, read only or read write, and the access policy attached to it</td></tr><tr><td align="center">2</td><td>OAuth scopes</td><td>On an OAuth connection: read, configuration writes, trading writes</td></tr><tr><td align="center">3</td><td>The endpoint</td><td>Which toolsets the assistant can even see, and whether write tools are published at all</td></tr><tr><td align="center">4</td><td>Your client</td><td>Whether it asks you to confirm before a destructive call goes out</td></tr></tbody></table>

Layers 1 to 3 are enforced by MetaCopier. Layer 4 is a convenience of your AI application, so do not build your safety on it alone.

***

## What the assistant can never do

* Reach a project that is not the project of the connection.
* Reach another customer's data.
* Write anything on a read only connection, no matter how it is asked.
* Trade without `mcp:trading.write` on an OAuth connection, even when configuration writes are allowed.
* Write anything on a project with more than 100 accounts, unless we unlocked that project for you.
* Change your billing, your password or your login.
* Keep working after you revoke access. There is no cached credential that outlives it by more than its short lifetime.

***

## Large projects are read only

A project with **more than 100 accounts** only ever gets a read only AI credential. Both write scopes are dropped when the credential is issued, so configuration changes and trades are refused no matter which scopes were approved or which endpoint you use.

The reason is blast radius. A single misread instruction on a project of that size touches hundreds of live accounts at once, and no undo exists for an order that already reached the broker. Reading stays fully available: the assistant can still analyse, report and explain everything.

{% hint style="info" %}
Need writes on a project above the limit? Write to <support@metacopier.io> with your project id and what the assistant is supposed to do. We unlock individual projects after a short look at how the connection will be used.
{% endhint %}

The account count is refreshed at most once a day, so a project that just crossed the limit may keep its write access until the next refresh.

***

## Credentials and lifetimes

<table><thead><tr><th width="200">Mode</th><th width="180">Lifetime</th><th>Notes</th></tr></thead><tbody><tr><td>API key</td><td>Until revoked</td><td>A long lived secret. Treat it like a password.</td></tr><tr><td>OAuth</td><td>60 minutes per credential</td><td>Minted fresh for each request and never handed to the AI application. The application only holds a token that is valid for MetaCopier's MCP server and nothing else.</td></tr></tbody></table>

On OAuth, MetaCopier keeps one key per project called **AI Apps**, created the first time an assistant connects. Every AI connection to that project works through a short lived child of it.

***

## Revoking access

**OAuth.** Remove the connector in your AI application, and revoke the **AI Apps** key of the project in **Projects → API Keys**. Revoking the key cuts off every AI connection to that project at once, including ones you forgot about.

**API key.** Revoke the key in **Projects → API Keys**. The connection stops working immediately.

{% hint style="warning" %}
Revoking **AI Apps** stops all AI access to the project. Any assistant that was connected through OAuth has to be reconnected afterwards.
{% endhint %}

***

## Access policy

An API key can carry an access policy, and everything in it applies to the assistant as well: allowed endpoints, hidden account fields, IP restrictions and CORS origins. On an OAuth connection, the scopes are applied **on top of** the policy of the AI Apps key, so a policy that already blocks an endpoint keeps blocking it.

{% content-ref url="/pages/4TcQLRM0kbdZBZLnhwDE" %}
[Access Policy](/rest-api/access-policy)
{% endcontent-ref %}

This is the tool to reach for when you want something more specific than "read only", for example an assistant that may manage copiers but must never see account credentials.

***

## Data and privacy

* The assistant reads only what it asks for, and it can only ask for what the connection allows.
* Everything it reads is sent to the AI provider you chose, because that is where the model runs. Your account names, balances, trade history and logs become part of that conversation. If that matters to you, restrict the fields with an access policy.
* MetaCopier does not send anything to an AI provider on its own. Nothing happens without a request from your client.

***

## A sensible setup

<table><thead><tr><th width="220">Goal</th><th>Setup</th></tr></thead><tbody><tr><td>Trying it out</td><td><code>/p/{projectId}/mcp/readonly</code> with a read only API key, or OAuth with only <code>mcp:read</code> approved</td></tr><tr><td>Everyday questions</td><td><code>/p/{projectId}/mcp</code>, default toolsets, read only</td></tr><tr><td>Managing the setup</td><td><code>/p/{projectId}/mcp/x/accounts,copiers,strategies</code> with <code>mcp:config.write</code></td></tr><tr><td>Trading</td><td>A separate connection on <code>/p/{projectId}/mcp/x/trading</code> with <code>mcp:trading.write</code></td></tr></tbody></table>

Keeping trading on its own connection is the single most useful habit here. A conversation that cannot see the trading tools cannot place an order by accident.


# Troubleshooting

***

## The assistant says it has no tools, or does not see MetaCopier at all

The tool list is fetched when the connection is established and then cached by your AI application. If you changed the URL, changed toolsets or the catalogue was extended, the client is still holding the old list.

**Fix.** Disconnect and reconnect the connector, or restart the client. In ChatGPT and Claude, removing and re-adding the connector is the reliable way.

***

## The assistant refuses to do something it should be able to do

Ask it directly:

> Describe this connection.

The answer names the project, whether the connection may write, when the current credential expires (on OAuth, an API key does not expire) and which access rules apply. Common outcomes:

<table><thead><tr><th width="270">What it says</th><th>What to do</th></tr></thead><tbody><tr><td>Read only</td><td>Your key is <code>READ_ONLY</code>, or you are on a <code>/readonly</code> endpoint, or the OAuth connection has no write scope, or the project has more than 100 accounts. See <a href="/pages/hNG3oceRF9PT96lxSnRu">authentication</a> and <a href="/pages/m5z0zcK1u57ggQzRcl0g#large-projects-are-read-only">large projects are read only</a>.</td></tr><tr><td>The wrong project</td><td>You connected without naming a project and got the oldest one. Use <code>/p/{projectId}/mcp</code>. See <a href="/pages/WZcSMGq66VwWi3UOliQg#which-project-does-it-use">which project does it use</a>.</td></tr><tr><td>The right project, still refused</td><td>An access policy on the key is blocking the endpoint. See <a href="/pages/4TcQLRM0kbdZBZLnhwDE">access policy</a>.</td></tr></tbody></table>

***

## `... is not available on this endpoint.`

The tool exists, but it is not in the toolsets this URL publishes, or it is a write tool on a `/readonly` endpoint.

**Fix.** Add the toolset to the URL or the `X-MC-Toolsets` header, or drop the `/readonly` suffix. See [endpoints and toolsets](/ai/ai/endpoints).

***

## `There is no toolset named ...`

A typo in the URL. The error lists every toolset that exists, and the [toolset table](/ai/ai/endpoints#toolsets) has them too. Note that they are singular or plural exactly as listed, for example `copiers` and not `copier`. In the URL they have to be lowercase, in the `X-MC-Toolsets` header the case does not matter.

***

## `[PROJECT_NOT_FOUND]`

MetaCopier could not resolve a project for the connection. Either the project id in the URL does not exist or was deleted, or you connected without a project and nothing qualified.

Nothing qualifies when:

* You own no project at all, for example because every project you work with was shared with you rather than created by you.
* Every project you own is a white label project. Those are skipped on purpose.

**Fix.** Name the project in the URL: `https://ai.metacopier.io/p/{projectId}/mcp`.

***

## `[AI_CREDENTIAL_CUSTOMER_NOT_RESOLVED]`

You signed in, but the login could not be matched to a MetaCopier customer. This usually means you signed in with a different identity from the one your MetaCopier account uses, for example a different email or a different social login.

**Fix.** Sign out in the AI application, reconnect, and sign in with the account you use in the MetaCopier web app.

***

## `[AI_KEY_REVOKED]`

The project's **AI Apps** key was revoked, which blocks all AI access to that project.

**Fix.** Restore or recreate the key in **Projects → API Keys**, then reconnect.

***

## `401 Unauthorized`

<table><thead><tr><th width="300">Cause</th><th>Fix</th></tr></thead><tbody><tr><td>The API key is wrong, expired or revoked</td><td>Create a new key and update your client</td></tr><tr><td>The key was pasted with a trailing space or a line break</td><td>Paste it again, carefully</td></tr><tr><td>The OAuth session ended</td><td>Reconnect the connector and sign in again</td></tr><tr><td>The token was issued for a different server</td><td>Check the URL. A token is only valid for the MCP server it was issued for.</td></tr></tbody></table>

***

## `404 Not Found`

The URL shape is wrong. Valid shapes are:

```
https://ai.metacopier.io/mcp
https://ai.metacopier.io/mcp/readonly
https://ai.metacopier.io/mcp/x/{toolset}
https://ai.metacopier.io/mcp/x/{toolset}/readonly
https://ai.metacopier.io/p/{projectId}/mcp
https://ai.metacopier.io/p/{projectId}/mcp/readonly
https://ai.metacopier.io/p/{projectId}/mcp/x/{toolset}
https://ai.metacopier.io/p/{projectId}/mcp/x/{toolset}/readonly
```

A `{projectId}` that is not a valid UUID also produces a 404, and so does a malformed toolset list such as `x/copiers,` or `x/,copiers`.

***

## The assistant is slow or loses track of what it is doing

Too many tools. A model given 134 tools spends its attention choosing between them rather than answering.

**Fix.** Connect to the toolsets you actually need. `/mcp/x/accounts,copiers,logs` is a good working set for diagnosing problems, and the default `/mcp` already gives you exactly that.

***

## A trade did not happen, or happened differently than expected

1. If the assistant used `metacopier_send_order`, it never waited for the broker. Check the account log, the rejection is there.
2. Check the symbol. Brokers spell symbols differently, and the assistant may have used the name you said rather than the name the account has.
3. If the account is a master, the trade was copied to its followers with each copier's own sizing. That is normal, see [trading with AI](/ai/ai/trading#copiers-still-apply).
4. Ask the assistant to read the account log for the last few minutes and explain it. That is what the `logs` toolset is for.

***

## Still stuck

{% content-ref url="/pages/J12gWkmL9SXg0F1wNGAQ" %}
[Support](/metacopier/support)
{% endcontent-ref %}

When you write in, include the URL you connected to, whether you used an API key or OAuth, and the exact error text.


# SDK

An SDK (Software Development Kit) is a collection of tools, libraries, documentation, and code samples designed to help developers integrate and interact with a specific software platform or service. In the context of an OpenAPI Specification, an SDK is generated to provide developers with pre-built code components and utilities that streamline the process of consuming and interacting with the API. This SDK typically includes functions and classes that abstract away the complexities of making HTTP requests, handling authentication, parsing responses, and other common tasks associated with interacting with the API. By leveraging the SDK, developers can accelerate the development process, reduce the likelihood of errors, and ensure consistency in their codebase when integrating the API into their applications. Overall, an SDK generated from an OpenAPI Specification serves as a valuable resource for clients, enabling them to more efficiently utilize and integrate with the API in their software projects.

There are two options available:

1. Use our pre-generated library. See [Usage](/rest-api/sdk/usage)
2. Generate the SDK yourself. See [Generation](/rest-api/sdk/generation)

{% hint style="info" %}
We offer a REST API to manage and add accounts, retrieve data, and a Socket API to receive real-time updates on open positions, trade history, balance, equity, and more.

For the REST API, you can generate an SDK for your preferred language, but for the Socket API, no SDK is available.
{% endhint %}

***

The following languages are supported:

* [ada](https://openapi-generator.tech/docs/generators/ada)
* [android](https://openapi-generator.tech/docs/generators/android)
* [apex](https://openapi-generator.tech/docs/generators/apex)
* [bash](https://openapi-generator.tech/docs/generators/bash)
* [c](https://openapi-generator.tech/docs/generators/c)
* [clojure](https://openapi-generator.tech/docs/generators/clojure)
* [cpp-qt-client](https://openapi-generator.tech/docs/generators/cpp-qt-client)
* [cpp-restsdk](https://openapi-generator.tech/docs/generators/cpp-restsdk)
* [cpp-tiny (beta)](https://openapi-generator.tech/docs/generators/cpp-tiny)
* [cpp-tizen](https://openapi-generator.tech/docs/generators/cpp-tizen)
* [cpp-ue4 (beta)](https://openapi-generator.tech/docs/generators/cpp-ue4)
* [crystal (beta)](https://openapi-generator.tech/docs/generators/crystal)
* [csharp](https://openapi-generator.tech/docs/generators/csharp)
* [dart](https://openapi-generator.tech/docs/generators/dart)
* [dart-dio](https://openapi-generator.tech/docs/generators/dart-dio)
* [eiffel](https://openapi-generator.tech/docs/generators/eiffel)
* [elixir](https://openapi-generator.tech/docs/generators/elixir)
* [elm](https://openapi-generator.tech/docs/generators/elm)
* [erlang-client](https://openapi-generator.tech/docs/generators/erlang-client)
* [erlang-proper](https://openapi-generator.tech/docs/generators/erlang-proper)
* [go](https://openapi-generator.tech/docs/generators/go)
* [groovy](https://openapi-generator.tech/docs/generators/groovy)
* [haskell-http-client](https://openapi-generator.tech/docs/generators/haskell-http-client)
* [java](https://openapi-generator.tech/docs/generators/java)
* [java-helidon-client (beta)](https://openapi-generator.tech/docs/generators/java-helidon-client)
* [java-micronaut-client (beta)](https://openapi-generator.tech/docs/generators/java-micronaut-client)
* [javascript](https://openapi-generator.tech/docs/generators/javascript)
* [javascript-apollo-deprecated (deprecated)](https://openapi-generator.tech/docs/generators/javascript-apollo-deprecated)
* [javascript-closure-angular](https://openapi-generator.tech/docs/generators/javascript-closure-angular)
* [javascript-flowtyped](https://openapi-generator.tech/docs/generators/javascript-flowtyped)
* [jaxrs-cxf-client](https://openapi-generator.tech/docs/generators/jaxrs-cxf-client)
* [jetbrains-http-client (experimental)](https://openapi-generator.tech/docs/generators/jetbrains-http-client)
* [jmeter](https://openapi-generator.tech/docs/generators/jmeter)
* [julia-client (beta)](https://openapi-generator.tech/docs/generators/julia-client)
* [k6 (beta)](https://openapi-generator.tech/docs/generators/k6)
* [kotlin](https://openapi-generator.tech/docs/generators/kotlin)
* [lua (beta)](https://openapi-generator.tech/docs/generators/lua)
* [n4js (beta)](https://openapi-generator.tech/docs/generators/n4js)
* [nim (beta)](https://openapi-generator.tech/docs/generators/nim)
* [objc](https://openapi-generator.tech/docs/generators/objc)
* [ocaml](https://openapi-generator.tech/docs/generators/ocaml)
* [perl](https://openapi-generator.tech/docs/generators/perl)
* [php](https://openapi-generator.tech/docs/generators/php)
* [php-dt (beta)](https://openapi-generator.tech/docs/generators/php-dt)
* [php-nextgen (beta)](https://openapi-generator.tech/docs/generators/php-nextgen)
* [powershell (beta)](https://openapi-generator.tech/docs/generators/powershell)
* [python](https://openapi-generator.tech/docs/generators/python)
* [python-pydantic-v1](https://openapi-generator.tech/docs/generators/python-pydantic-v1)
* [r](https://openapi-generator.tech/docs/generators/r)
* [ruby](https://openapi-generator.tech/docs/generators/ruby)
* [rust](https://openapi-generator.tech/docs/generators/rust)
* [scala-akka](https://openapi-generator.tech/docs/generators/scala-akka)
* [scala-gatling](https://openapi-generator.tech/docs/generators/scala-gatling)
* [scala-pekko](https://openapi-generator.tech/docs/generators/scala-pekko)
* [scala-sttp](https://openapi-generator.tech/docs/generators/scala-sttp)
* [scala-sttp4 (beta)](https://openapi-generator.tech/docs/generators/scala-sttp4)
* [scalaz](https://openapi-generator.tech/docs/generators/scalaz)
* [swift-combine](https://openapi-generator.tech/docs/generators/swift-combine)
* [swift5](https://openapi-generator.tech/docs/generators/swift5)
* [typescript (experimental)](https://openapi-generator.tech/docs/generators/typescript)
* [typescript-angular](https://openapi-generator.tech/docs/generators/typescript-angular)
* [typescript-aurelia](https://openapi-generator.tech/docs/generators/typescript-aurelia)
* [typescript-axios](https://openapi-generator.tech/docs/generators/typescript-axios)
* [typescript-fetch](https://openapi-generator.tech/docs/generators/typescript-fetch)
* [typescript-inversify](https://openapi-generator.tech/docs/generators/typescript-inversify)
* [typescript-jquery](https://openapi-generator.tech/docs/generators/typescript-jquery)
* [typescript-nestjs (experimental)](https://openapi-generator.tech/docs/generators/typescript-nestjs)
* [typescript-node](https://openapi-generator.tech/docs/generators/typescript-node)
* [typescript-redux-query](https://openapi-generator.tech/docs/generators/typescript-redux-query)
* [typescript-rxjs](https://openapi-generator.tech/docs/generators/typescript-rxjs)
* [xojo-client](https://openapi-generator.tech/docs/generators/xojo-client)
* [zapier (beta)](https://openapi-generator.tech/docs/generators/zapier)


# Usage


# C\#

Instructions on how to install and use the MetaCopier API Client package

## Create API Key from metacopier.io

You can use two types of API keys:

* **Project-level API key**: Navigate to **Your Projects > (Choose a project) > API Keys** (provides access to all accounts in the project)
* **Account API key**: Automatically generated when an account is created (provides access only to that specific account). Retrieve using the [getAccountApiKeys](https://api.metacopier.io/rest/api/documentation/swagger-ui/index.html#/Account%20API/getAccountApiKeys) endpoint.

*Note: Please do not share your API Key to people whom you don't trust.*

## Package Information

Both packages from option 1 or option 2 are based on the following **OpenAPI** configuration:

{% embed url="<https://api.metacopier.io/rest/api/documentation/v3/api-docs>" %}

## Option 1: Install with NuGet

Execute the following command to install the api package to your project:

```
dotnet add package MetaCopier.Api --version 1.2.6
```

You can also visit the package on the offical NuGet site:

{% embed url="<https://www.nuget.org/packages/MetaCopier.Api/1.2.6>" %}

## Option 2: Generate package with OpenAPI Generator CLI

### Install OpenAPI Generator CLI

See instructions under [Generation](/rest-api/sdk/generation)

### Execute CLI command

Execute the following command to generate the SDK package:

```powershell
openapi-generator-cli generate -i https://api.metacopier.io/rest/api/documentation/v3/api-docs -g csharp
```

### Change Output Type

Open up generated project file *Org.OpenAPITools.csproj* and value of output type to the following:

```xml
<OutputType>Exe</OutputType>
```

### Install and Update NuGet Packages

First, run the following dotnet CLI command inside the generated project to restore the NuGet packages:

```powershell
dotnet restore
```

Then use the following command to list all installed NuGet Packages:

```powershell
dotnet list package
```

The following should be listed (***versions may differ depending on .net version***):

```
Project 'Org.OpenAPITools' has the following package references
   [net8.0]:
   Top-level Package      Requested   Resolved
   > JsonSubTypes         2.0.1       2.0.1
   > Newtonsoft.Json      13.0.3      13.0.3
   > Polly                8.1.0       8.1.0
   > RestSharp            110.2.0     110.2.0

Project 'Org.OpenAPITools.Test' has the following package references
   [net8.0]:
   Top-level Package                Requested   Resolved
   > Microsoft.NET.Test.Sdk         17.9.0      17.9.0
   > xunit                          2.7.0       2.7.0
   > xunit.runner.visualstudio      2.5.7       2.5.7 
```

Now navigate into the following directory "*src\Org.OpenAPITools*" and execute the following commands to install and update the necessary NuGet packages:

```powershell
dotnet add package JsonSubTypes --version 2.0.1
dotnet add package Newtonsoft.Json --version 13.0.3
dotnet add package RestSharp --version 112.0.0
dotnet add package System.ComponentModel.Annotations --version 5.0.0
```

After installing and updating the necessary NuGet packages assure your packages have at least the following version:

```
Project 'Org.OpenAPITools' has the following package references
   [net8.0]:
   Top-level Package                        Requested   Resolved
   > JsonSubTypes                           2.0.1       2.0.1
   > Newtonsoft.Json                        13.0.3      13.0.3
   > Polly                                  8.1.0       8.1.0
   > RestSharp                              112.0.0     112.0.0
   > System.ComponentModel.Annotations      5.0.0       5.0.0
```

## Run the following code

Create a *program.cs* file and insert the following code, then replace the "*YOUR-API-KEY*" with your own and run the code:

```csharp
internal class Program
{
    public static void Main(string[] args)
    {
        Configuration config = new Configuration();
        config.BasePath = "https://api.metacopier.io";

        // Configure API key authorization: ApiKeyAuth
        config.ApiKey.Add("X-API-KEY", "YOUR-API-KEY");
        
        // Uncomment below to setup prefix (e.g. Bearer) for API key, if needed
        // config.ApiKeyPrefix.Add("X-API-KEY", "Bearer");

        var apiInstance = new AccountAPIApi(config);

        try
        {
            var accounts = apiInstance.GetAccounts();
            Console.WriteLine(JsonConvert.SerializeObject(accounts));
        }
        catch (ApiException e)
        {
            Debug.Print("Exception when calling AccountAPIApi: " + e.Message);
            Debug.Print("Status Code: " + e.ErrorCode);
        }
    }
}
```

## What endpoints can I call?

To check all available endpoints see either of the two pages:

{% content-ref url="/pages/3HakPo5rmjlgHIYpy5Yo" %}
[Readme.io](/rest-api/api/readme.io)
{% endcontent-ref %}

{% content-ref url="/pages/7KVz9yHPKLMm9yjqkThN" %}
[Swagger](/rest-api/api/swagger)
{% endcontent-ref %}


# Java

Instructions on how to install and use the MetaCopier API Client package

## Create API Key from metacopier.io

You can use two types of API keys:

* **Project-level API key**: Navigate to **Your Projects > (Choose a project) > API Keys** (provides access to all accounts in the project)
* **Account API key**: Automatically generated when an account is created (provides access only to that specific account). Retrieve using the [getAccountApiKeys](https://api.metacopier.io/rest/api/documentation/swagger-ui/index.html#/Account%20API/getAccountApiKeys) endpoint.

*Note: Please do not share your API Key to people whom you don't trust.*

## Package Information

The library is based on the following **OpenAPI** configuration:

{% embed url="<https://api.metacopier.io/rest/api/documentation/v3/api-docs>" %}

## Install with Maven

Add the following dependency to your pom.xml:

```
<dependency>
    <groupId>io.metacopier</groupId>
    <artifactId>api</artifactId>
    <version>1.2.5</version>
</dependency>
```

You can also visit the package on the official Maven Central Repository:

{% embed url="<https://central.sonatype.com/artifact/io.metacopier/api>" %}

## Example Program

Replace the "*YOUR\_API\_KEY*" with your own and run the code:

```java
import io.metacopier.AccountApiApi;
import io.metacopier.api.ApiClient;
import io.metacopier.api.ApiException;
import io.metacopier.api.Configuration;
import io.metacopier.api.auth.ApiKeyAuth;
import io.metacopier.client.model.AccountDTO;

import java.util.List;

public class Main {
    public static void main(String[] args) {
        ApiClient defaultClient = Configuration.getDefaultApiClient();
        defaultClient.setBasePath("https://api.metacopier.io");

        // Configure API key authorization: ApiKeyAuth
        ApiKeyAuth ApiKeyAuth = (ApiKeyAuth) defaultClient.getAuthentication("ApiKeyAuth");
        ApiKeyAuth.setApiKey("YOUR_API_KEY");
        AccountApiApi apiInstance = new AccountApiApi(defaultClient);
        
        try {
            List<AccountDTO> results = apiInstance.getAccounts();
            System.out.println(results);
        } catch (ApiException e) {
            System.err.println("Exception when calling AccountApiApi#createAccount");
            System.err.println("Status code: " + e.getCode());
            System.err.println("Reason: " + e.getResponseBody());
            System.err.println("Response headers: " + e.getResponseHeaders());
            e.printStackTrace();
        }

    }
}

```

## Generate your own package

With the following command, you can generate your own package for the metacopier api:

{% hint style="info" %}
Be sure that you have installed the OpenAPI Generator.\
See [Generation](/rest-api/sdk/generation) page for more information.
{% endhint %}

```bash
openapi-generator-cli generate -i https://api.metacopier.io/rest/api/documentation/v3/api-docs -g java
```

For more information regarding the Open API generator, please visit their offical page:

{% embed url="<https://openapi-generator.tech/>" %}

## What endpoints can I call?

To check all available endpoints see either of the two pages:

{% content-ref url="/pages/3HakPo5rmjlgHIYpy5Yo" %}
[Readme.io](/rest-api/api/readme.io)
{% endcontent-ref %}

{% content-ref url="/pages/7KVz9yHPKLMm9yjqkThN" %}
[Swagger](/rest-api/api/swagger)
{% endcontent-ref %}


# Typescript

Instructions on how to install and use the MetaCopier API Client package

## Create API Key from metacopier.io

You can use two types of API keys:

* **Project-level API key**: Navigate to **Your Projects > (Choose a project) > API Keys** (provides access to all accounts in the project)
* **Account API key**: Automatically generated when an account is created (provides access only to that specific account). Retrieve using the [getAccountApiKeys](https://api.metacopier.io/rest/api/documentation/swagger-ui/index.html#/Account%20API/getAccountApiKeys) endpoint.

*Note: Please do not share your API Key to people whom you don't trust.*

### Package Information

The package is based on the following **OpenAPI** configuration:

{% embed url="<https://api.metacopier.io/rest/api/documentation/v3/api-docs>" %}

## Angular

### Install with npm

Execute the following command to install the api package to your project:

```
npm i ng-metacopier-api
```

Or you can manually download it directly from npmjs.com

{% embed url="<https://www.npmjs.com/package/ng-metacopier-api>" %}

### Example

#### App Module

{% hint style="info" %}
Import both MetaCopierAPIApiModule and HttpClientModule
{% endhint %}

```typescript
import { NgModule } from '@angular/core';
import { BrowserModule } from '@angular/platform-browser';
import { AppRoutingModule } from './app-routing.module';
import { AppComponent } from './app.component';
import { DashboardComponent } from './dashboard/dashboard.component';
import { HttpClientModule } from '@angular/common/http';
import { RouterOutlet } from '@angular/router';
import { MetaCopierAPIApiModule } from 'ng-metacopier-api';

@NgModule({
  declarations: [AppComponent, DashboardComponent],
  imports: [
    RouterOutlet,
    BrowserModule,
    AppRoutingModule,
    MetaCopierAPIApiModule,
    HttpClientModule,
  ],
  providers: [],
  bootstrap: [AppComponent],
})
export class AppModule {}
```

#### Component

<pre class="language-typescript"><code class="lang-typescript">import { Component, OnInit } from '@angular/core';
import {
  MetaCopierAPIConfigurationParameters,
  AccountAPIService,
  MetaCopierAPIConfiguration,
  AccountDTO,
} from 'ng-metacopier-api';

<strong>@Component({
</strong>  selector: 'app-dashboard',
  templateUrl: './dashboard.component.html',
  styleUrl: './dashboard.component.scss',
})
export class DashboardComponent implements OnInit {
  private _paramsConfig: MetaCopierAPIConfigurationParameters = {
    apiKeys: {
      'X-API-KEY': 'YOUR_API_KEY', // Replace this value with your API key
    },
    basePath: 'https://api.metacopier.io',
  };

  constructor(private _accountAPIService: AccountAPIService) {}

  ngOnInit(): void {
    this._accountAPIService.configuration = new MetaCopierAPIConfiguration(
      this._paramsConfig
    );

    this._accountAPIService.getAccounts().subscribe({
      next: (data: AccountDTO[]) => {
        console.log(data);
      },
      error: (e: Error) => {
        console.error(e);
      },
    });
  }
}
</code></pre>

### Generate your own package

With the following command, you can generate your own package for the metacopier api:

{% hint style="info" %}
Be sure that you have installed the OpenAPI Generator.\
See [Generation](/rest-api/sdk/generation) page for more information.
{% endhint %}

```bash
openapi-generator-cli generate -i https://api.metacopier.io/rest/api/documentation/v3/api-docs -g typescript-angular
```

For more information regarding the Open API generator, please visit their offical page:

{% embed url="<https://openapi-generator.tech/>" %}

## React

### Install with npm

```
npm i js-metacopier-api
```

Or you can manually download it directly from npmjs.com

{% embed url="<https://www.npmjs.com/package/js-metacopier-api>" %}

### Example

{% hint style="info" %}
You need to have the axios package installed too
{% endhint %}

#### App

```tsx
import "./App.css";
import axios from "axios";
import { useEffect, useState } from "react";
import { AccountAPIApi, Configuration } from "js-metacopier-api";

function App() {
  const [data, setData] = useState<any>(null);
  const [error, setError] = useState<string | null>(null);

  useEffect(() => {
    const apiConfig = new Configuration({
      apiKey: "YOUR_API_KEY", // Replace this value with your API key
      basePath: "https://api.metacopier.io",
    });

    const fetchData = async () => {
      const api = new AccountAPIApi(apiConfig, apiConfig.basePath, axios);

      try {
        const response = await api.getAccounts();
        setData(response.data);
      } catch (err: any) {
        setError(err.message);
      }
    };

    fetchData();
  }, []);

  return (
    <div>
      <h1>React App with Generated API Client</h1>
      {error ? (
        <p>Error: {error}</p>
      ) : (
        <pre>{JSON.stringify(data, null, 2)}</pre>
      )}
    </div>
  );
}

export default App;
```

### Generate your own package

With the following command, you can generate your own package for the metacopier api:

{% hint style="info" %}
Be sure that you have installed the OpenAPI Generator.\
See [Generation](/rest-api/sdk/generation) page for more information.
{% endhint %}

```bash
openapi-generator-cli generate -i https://api.metacopier.io/rest/api/documentation/v3/api-docs -g typescript-axios
```

For more information regarding the Open API generator, please visit their offical page:

{% embed url="<https://openapi-generator.tech/>" %}

## What endpoints can I call?

To check all available endpoints see either of the two pages:

{% content-ref url="/pages/3HakPo5rmjlgHIYpy5Yo" %}
[Readme.io](/rest-api/api/readme.io)
{% endcontent-ref %}

{% content-ref url="/pages/7KVz9yHPKLMm9yjqkThN" %}
[Swagger](/rest-api/api/swagger)
{% endcontent-ref %}


# Python

Instructions on how to install and use the MetaCopier API Client package

## Create API Key from metacopier.io

You can use two types of API keys:

* **Project-level API key**: Navigate to **Your Projects > (Choose a project) > API Keys** (provides access to all accounts in the project)
* **Account API key**: Automatically generated when an account is created (provides access only to that specific account). Retrieve using the [getAccountApiKeys](https://api.metacopier.io/rest/api/documentation/swagger-ui/index.html#/Account%20API/getAccountApiKeys) endpoint.

*Note: Please do not share your API Key to people whom you don't trust.*

## Package Information

Both packages from option 1 or option 2 are based on the following **OpenAPI** configuration:

{% embed url="<https://api.metacopier.io/rest/api/documentation/v3/api-docs>" %}

### Option 1: Install with python package index (PyPi.org)

#### Execute install command

Execute the following command to generate the SDK package:

```
pip install metacopier-api
```

You can also visit the package on the official PyPI site:

{% embed url="<https://pypi.org/project/metacopier-api/>" %}

### Options 2: Install with OpenAPI Generator CLI

See instructions under [Generation](/rest-api/sdk/generation)

#### Execute CLI command

Execute the following command to generate the SDK package:

<pre><code><strong>openapi-generator-cli generate -i https://api.metacopier.io/rest/api/documentation/v3/api-docs -g python --additional-properties packageName=metacopier_api
</strong></code></pre>

## Example

In the following python program I will use the **metacopier\_api** (OpenCLI or PyPI) package to fetch all accounts of my MetaCopier project.

```python
from metacopier_api.api.account_api_api import AccountAPIApi
from metacopier_api.api_client import ApiClient
from metacopier_api.configuration import Configuration
from metacopier_api.exceptions import ApiException

# Api Key from metacopier.io
apiKey = "YOUR_API_KEY"

configuration = Configuration(
    host = "https://api.metacopier.io"
)

# Set api key for authorization
configuration.api_key['ApiKeyAuth'] = apiKey

# USe Api Client
with ApiClient(configuration) as api_client:

    # Create an instance of the account API class
    accountClient = AccountAPIApi(api_client)

    try:
        # Send request to fetch accounts
        accounts = accountClient.get_accounts()
        
        # Print response
        print(accounts)
    except ApiException as e:
        print("Exception when calling AccountAPIApi: %s\n" % e)
        
```

## Generate your own package

With the following command, you can generate your own package for the metacopier api:

{% hint style="info" %}
Be sure that you have installed the OpenAPI Generator.\
See [Generation](/rest-api/sdk/generation) page for more information.
{% endhint %}

```bash
openapi-generator-cli generate -i https://api.metacopier.io/rest/api/documentation/v3/api-docs -g python
```

For more information regarding the Open API generator, please visit their offical page:

{% embed url="<https://openapi-generator.tech/>" %}

## What endpoints can I call?

To check all available endpoints see either of the two pages:

{% content-ref url="/pages/3HakPo5rmjlgHIYpy5Yo" %}
[Readme.io](/rest-api/api/readme.io)
{% endcontent-ref %}

{% content-ref url="/pages/7KVz9yHPKLMm9yjqkThN" %}
[Swagger](/rest-api/api/swagger)
{% endcontent-ref %}


# Go

Instructions on how to install and use the MetaCopier API Client package for Go

## Create API Key from metacopier.io

You can use two types of API keys:

* **Project-level API key**: Navigate to **Your Projects > (Choose a project) > API Keys** (provides access to all accounts in the project)
* **Account API key**: Automatically generated when an account is created (provides access only to that specific account). Retrieve using the [getAccountApiKeys](https://api.metacopier.io/rest/api/documentation/swagger-ui/index.html#/Account%20API/getAccountApiKeys) endpoint.

*Note: Please do not share your API Key to people whom you don't trust.*

## Package Information

Both packages from option 1 or option 2 are based on the following **OpenAPI** configuration:

{% embed url="<https://api.metacopier.io/rest/api/documentation/v3/api-docs>" %}

### Option 1: Install with Go modules (pkg.go.dev)

#### Execute install command

Execute the following command to install the SDK package:

```bash
go get github.com/metacopier/go-package@v1.2.9
```

You can also visit the package on the official pkg.go.dev site:

{% embed url="<https://pkg.go.dev/github.com/metacopier/go-package>" %}

### Options 2: Install with OpenAPI Generator CLI

See instructions under [Generation](/rest-api/sdk/generation)

#### Execute CLI command

Execute the following command to generate the SDK package:

```
openapi-generator-cli generate -i https://api.metacopier.io/rest/api/documentation/v3/api-docs -g go -o ./ --additional-properties packageName=metacopier,packageVersion=1.2.9,isGoSubmodule=false,withGoMod=true,structPrefix=false,useDefaultValuesForRequiredVars=false,disallowAdditionalPropertiesIfNotPresent=false
```

## Example

In the following Go program I will use the **metacopier** package to fetch all accounts of my MetaCopier project.

```go
package main

import (
    "context"
    "fmt"
    "log"
    
    metacopier "github.com/metacopier/go-package"
)

func main() {
    // Api Key from metacopier.io
    apiKey := "YOUR_API_KEY"
    
    // Create a new configuration
    cfg := metacopier.NewConfiguration()
    cfg.Host = "api.metacopier.io"
    cfg.Scheme = "https"
    
    // Set API key for authorization
    cfg.AddDefaultHeader("X-API-Key", apiKey)
    
    // Create API client
    client := metacopier.NewAPIClient(cfg)
    
    // Create an instance of the account API
    ctx := context.Background()
    
    // Send request to fetch accounts
    accounts, resp, err := client.AccountAPIApi.GetAccounts(ctx).Execute()
    if err != nil {
        log.Fatalf("Exception when calling AccountAPIApi->GetAccounts: %v\n", err)
    }
    
    // Print response
    fmt.Printf("Accounts: %+v\n", accounts)
    fmt.Printf("Status Code: %d\n", resp.StatusCode)
}
```

## Generate your own package

With the following command, you can generate your own package for the metacopier api:

{% hint style="info" %}
Be sure that you have installed the OpenAPI Generator.\
See [Generation](/rest-api/sdk/generation) page for more information.
{% endhint %}

```bash
openapi-generator-cli generate -i https://api.metacopier.io/rest/api/documentation/v3/api-docs -g go
```

For more information regarding the Open API generator, please visit their offical page:

{% embed url="<https://openapi-generator.tech/>" %}

## What endpoints can I call?

To check all available endpoints see either of the two pages:

{% content-ref url="/pages/3HakPo5rmjlgHIYpy5Yo" %}
[Readme.io](/rest-api/api/readme.io)
{% endcontent-ref %}

{% content-ref url="/pages/7KVz9yHPKLMm9yjqkThN" %}
[Swagger](/rest-api/api/swagger)
{% endcontent-ref %}


# Other

With the help of the Open API generator you can easily generate a MetaCopier API client package for your preferred technology. On their official site you will also find plenty of useful documentation and tutorials:

{% embed url="<https://openapi-generator.tech/>" %}

We also have a documentation page on which you will find further useful information for generating your own client package using the Open API generator:

{% content-ref url="/pages/o809zvdfXCpeM46Vepo8" %}
[Generation](/rest-api/sdk/generation)
{% endcontent-ref %}


# Generation

{% hint style="info" %}
To see real examples, take a look at the [usage](/rest-api/sdk/usage) pages.

Below, only a general description of how to create the SDKs is provided.
{% endhint %}

To generate SDK client stubs using the OpenAPI Generator, follow these steps:

1. **Install** [**OpenAPI Generator**](https://openapi-generator.tech): Ensure that you have the OpenAPI Generator installed on your system. You can download it from the official GitHub repository or use package managers like npm or Homebrew, depending on your operating system.
2. **Prepare your OpenAPI Specification**: Make sure you have an OpenAPI Specification file (usually in JSON or YAML format) that describes your API's endpoints, parameters, responses, and other relevant details. You can use the OpenAPI Specification file available at <https://api.metacopier.io/rest/api/documentation/v3/api-docs>.
3. **Choose the Language and Framework**: Decide on the programming language and framework you want to generate the client stubs for. The OpenAPI Generator supports a wide range of languages, including Java, JavaScript, Python, Ruby, Go, and more.
4. **Run the OpenAPI Generator**: Use the command-line interface of the OpenAPI Generator to generate the client stubs. Here's a basic example of how to run the generator:

```bash
codeopenapi-generator-cli generate -i https://api.metacopier.io/rest/api/documentation/v3/api-docs -g your_language -o output_directory
```

Replace `your_language` with the desired programming language or framework (e.g., `java`, `javascript`, `python`), and `output_directory` with the directory where you want the generated code to be saved.

5. **Customize Generation Options (Optional)**: Optionally, customize the generation process by specifying additional options such as package names, library versions, and code formatting preferences. Refer to the documentation of the OpenAPI Generator for a full list of available options.
6. **Review Generated Code**: Once the generation process is complete, review the generated client stubs to ensure they meet your requirements. You may need to make adjustments or enhancements based on your specific use case or project needs.
7. **Integrate Client Stubs into your Project**: Finally, integrate the generated client stubs into your project by importing them into your codebase and using them to interact with the API. Refer to the documentation and examples provided by the OpenAPI Generator for guidance on how to use the generated code effectively.

By following these steps, you can generate SDK client stubs using the OpenAPI Generator and seamlessly integrate them into your software projects, saving time and effort in API integration and development.


# API

{% hint style="info" %}
Our web app uses this same API. For a real end-to-end reference of how it works, see the example there
{% endhint %}

Explore the power of the MetaCopier API! Our RESTful API offers scalable and secure access to accounts, projects, and more. Get started quickly with authentication, explore endpoints, and access code samples in various languages. Have questions or need assistance? Contact our support team -we're here to help you succeed!

Our API adheres to the OpenAPI specification, ensuring clear documentation and interoperability with various development tools and platforms.

## Regional API URLs

Use the regional API URL where your account is deployed **for Trading API and TradingView Webhook API endpoints only**:

```
https://{region}.metacopier.io/rest/api/v1/accounts/{accountId}/positions
```

| Region    | Host            |
| --------- | --------------- |
| New York  | `api-newyork`   |
| London    | `api-london`    |
| Berlin    | `api-berlin`    |
| Singapore | `api-singapore` |
| Global    | `api`           |

> **Recommended**: Use the regional URL for best performance. The global URL works but may have higher latency.
>
> **Note**: For all other API endpoints (non-trading), always use the Global URL: `https://api.metacopier.io`

## Authentication

For authentication, we utilize API keys. We support two types of API keys:

* **Project-level API keys**: Generated under **Projects** → **(Choose a project)** → **API Keys**. These keys provide access to all accounts within that project.
* **Account API keys**: Automatically generated when an account is created. These keys are scoped to a single account and provide access only to that specific account. You can retrieve these keys using the [getAccountApiKeys](https://api.metacopier.io/rest/api/documentation/swagger-ui/index.html#/Account%20API/getAccountApiKeys) endpoint.

You have the opportunity to try out our API directly on the Swagger webpage and README webpage.

If you are looking to generate client stubs for your application, take a look at the [SDK](/rest-api/sdk) section.

## OpenAPI Spec

Here, you will find the OpenAPI Specification file:

{% embed url="<https://api.metacopier.io/rest/api/documentation/v3/api-docs>" %}

## Swagger

{% content-ref url="/pages/7KVz9yHPKLMm9yjqkThN" %}
[Swagger](/rest-api/api/swagger)
{% endcontent-ref %}

## Readme

{% content-ref url="/pages/3HakPo5rmjlgHIYpy5Yo" %}
[Readme.io](/rest-api/api/readme.io)
{% endcontent-ref %}

## cTrader Token Generation

cTrader requires an OAuth access token to communicate with broker accounts. Currently, the simplest and only supported way to generate this token is manually through the [MetaCopier.io Web App](https://metacopier.io/).

{% hint style="info" %}
For B2B partners who want to offer account connection directly on their own website (white-label, without MetaCopier branding/logos), this is also possible. In this setup, your users can add their cTrader account on your website. To enable this, you must register your own OAuth application on the cTrader platform and then email us the generated **Client ID** and **Client Secret**, so we can configure the integration on our side.
{% endhint %}

### How to Generate a cTrader Token

1. Go to your project in the [MetaCopier.io Web App](https://metacopier.io/).
2. Add a new account and select **cTrader** as the account type.
3. Click **Get token**.
4. A new window will open where you can select the cTrader accounts to authorize.
5. After confirming your selection, the window will close and the generated **access token** and **refresh token** will be displayed.

### Using the Token with the REST API

cTrader uses OAuth authentication. When adding a cTrader account via the REST API, you must provide the previously generated tokens.

* Combine the values in the following format:

  ```
  token|refreshToken
  ```
* Pass this combined value in the `loginAccountPassword` field when creating or updating the account via the REST API.

### Important Notes

* Direct token generation via the REST API is **not supported**.
* The browser-based authorization flow in the MetaCopier.io frontend is currently required to generate both the access token and refresh token.
* Once generated, the tokens can be reused programmatically via the REST API.

If you have a use case that requires end users (for example, customers of your own web application) to add cTrader accounts directly through an API-driven flow, please contact us so we can better understand your requirements.


---

[Next Page](/llms-full.txt/1)